
If you or someone you know is planning a kitchen revamp anytime ever, then this is a post you want to read! Creating your own DIY kitchen island will save you HUGE bucks!
I researched all the different floating kitchen islands I could purchase and install into my kitchen. Our existing island was so awkward. I can’t even explain to you the shape of it… it was like a mix between a triangle and a half-circle? Not only that, but the area really only allowed for a couple barstools to be used. It needed to go. I had dreams of a nice long, rectangle shaped bar, but what I wanted would have cost thousands of dollars! That’s not including the quartz countertop that would still need to be installed.
once heard of someone using base kitchen cabinets for a desk base. There’s no reason they can’t be used for an island. They are normally a standard height and depth, so you know they will match up perfectly with your existing cabinetry! This gives you the freedom to make your island the size you want, and incorporate whatever type of storage you would like, as well. I mean, it’s so good!
DIY Kitchen Island Tutorial:
You will need some tools for this project, but heck, you could rent/buy/borrow… and still be saving a ton of money. You will need a nail gun, chop saw and table saw.
Ok let’s get started on this DIY kitchen island project. (This post contains affiliate links)
To start off, I used my measuring tape and painters tape to mark off an area I thought would be ideal for the size of the island. I left the tape on the floor for a few days just to get a feel for how walking around it would be. We don’t have a ton of extra space, so I wanted to make sure that I didn’t go too big.
I decided on a 60” length. This was just the base. I had the countertop extend over on two sides to create an area for seating. I believe the countertop extended over approximately 13 extra inches both ways.
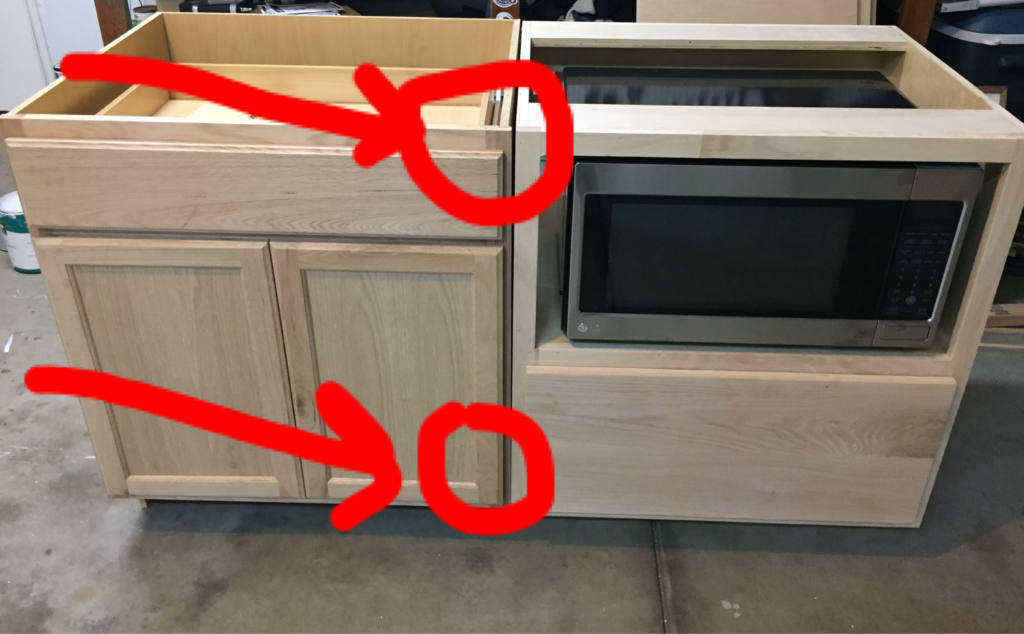
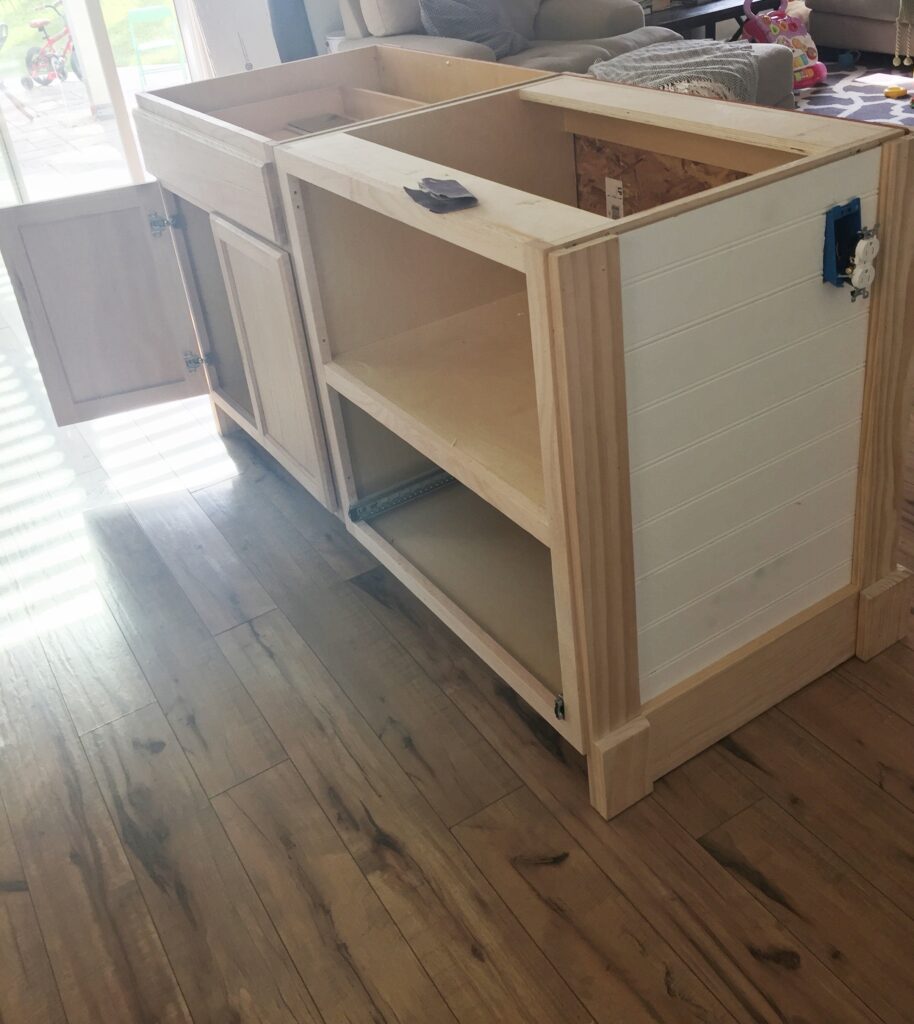
I went on the hunt for affordable base kitchen cabinets. The price range you will find out there is huge! If I wanted to pay a million bucks for a cabinet, I wouldn’t be making this myself. Ya know what I mean? I recommend Home Depot. I purchased a 30” cabinet with double doors on the bottom and a nice, large drawer on top for around $95. I got about a $30 discount because the toe kick was missing, but I didn’t need that dang thing anyway. I was planning to make my own later on. So, I scored! HERE is the cabinet I purchased.
Now, for the second cabinet, I actually had it made by a carpentry guy I found on craigslist. The reason being, I wanted an opening for my microwave. If you try to buy this type of cabinet online, you will pay $500 and up. That is just dumb. So, I found a guy to make me a 30” microwave cabinet for $250. Deals, deals, deals ya’ll. Find the deals.
![]()
Once we did demo on the old island (peace out), we could decide exactly where the new one would sit. 3-3.5’ is a good distance to have your island from your appliances. It gives the right amount of space for walking and opening doors.
Steps for Project:
You will need (4)- 2” finish screws to attach cabinets together.
Drill a hole with slightly smaller bit first, to make this easier. You will do one hole on top, and one hole toward the bottom on the front side of the cabinets. I’m SO sorry, I don’t have a picture of this step. Where I have circled in the photo below, is the area you will screw your holes to attach both cabinets. On the inside, so it is hidden. Obviously.
Once the front is attached, take a 1/2” piece of plywood, and wedge it in between the back end of the two cabinets. The reason you cannot just screw the back end together like the front, is because the front of the cabinets have about a half inch of extra thickness, where the back of the cabinets do not. You need to make up for that little extra space with a piece of wood.
Once it’s wedged in do the same thing as the front, pre-drill a hole and then screw in your 2” finish screw. One on top and one on the bottom.
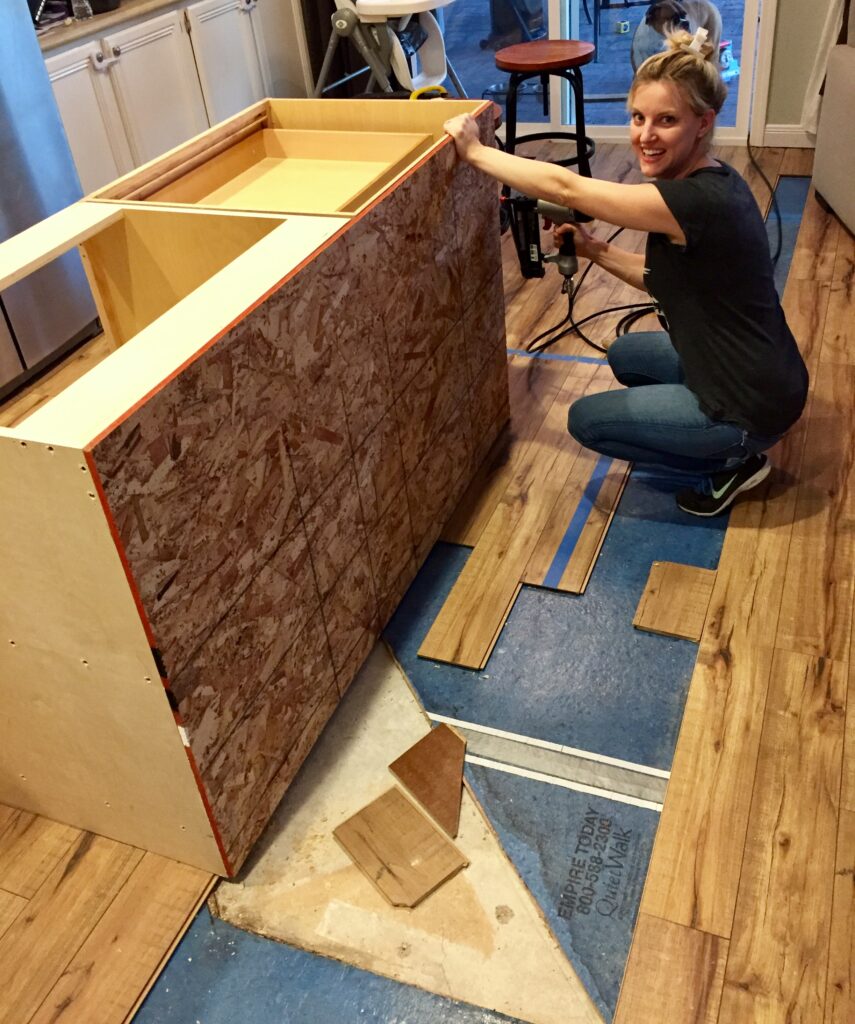
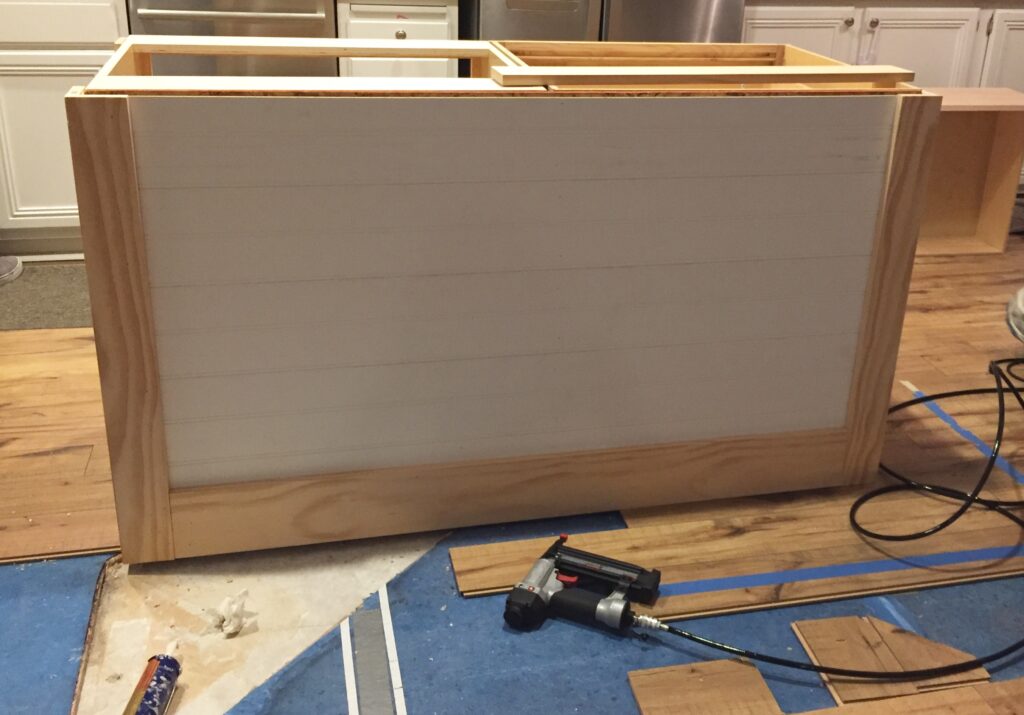
After this step, I attached a nice, solid piece of plywood to the entire back of the DIY kitchen island to make it child-kick-proof. That’s all I need is a foot through it. Here I am attaching it.. I look insane. Probably because I was SO TIRED.
Yes! The cabinets are one solid piece. Now you can style your island however you like! Shiplap, decorative wood X’s, corbels, support posts. Whatever you want!
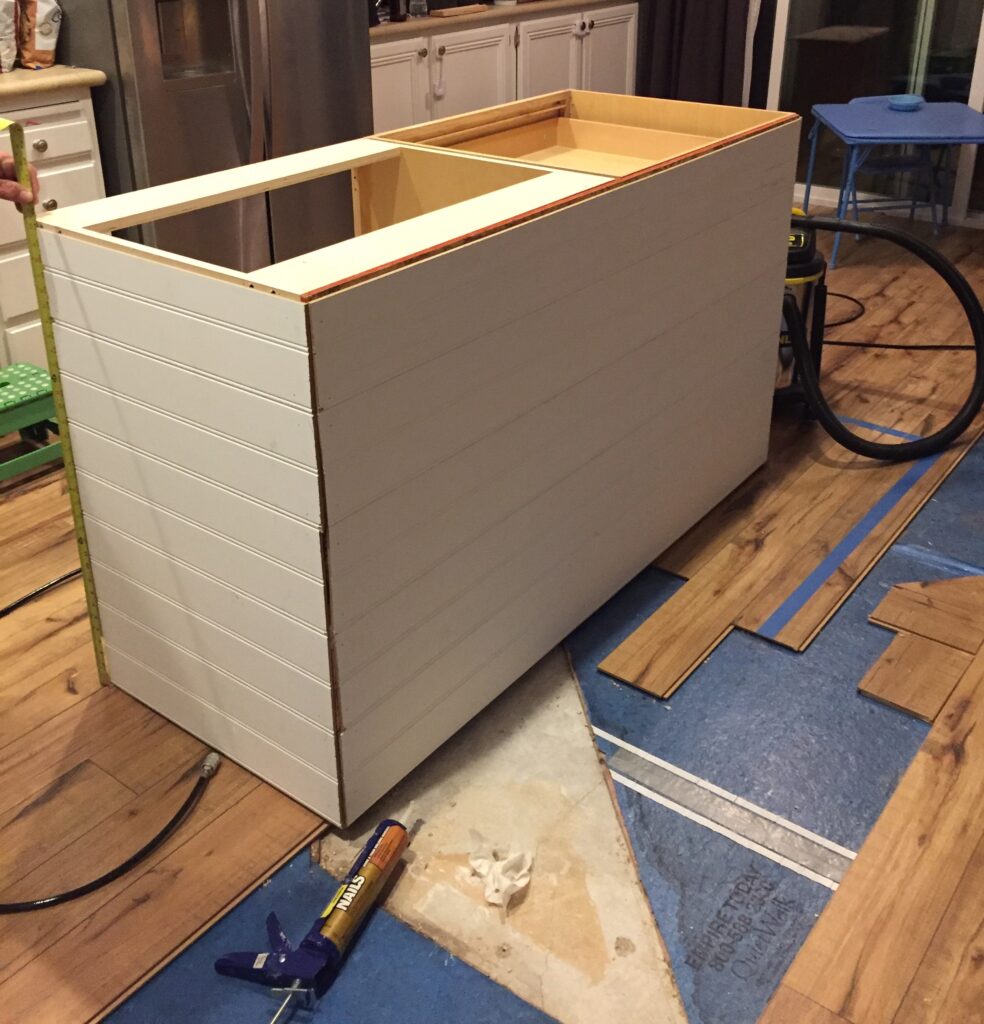
This is the product I chose to use for my siding. It a bead hardboard paneling. I bought it at home depot. I love how the planks are already attached, and it is quality material that is ready to paint.

Cut your planks to size length-wise, for the sides and back of your DIY kitchen island. Apply liquid nails first, and then with a small brad nailer, attach your siding. Starting from the bottom and working your way up.
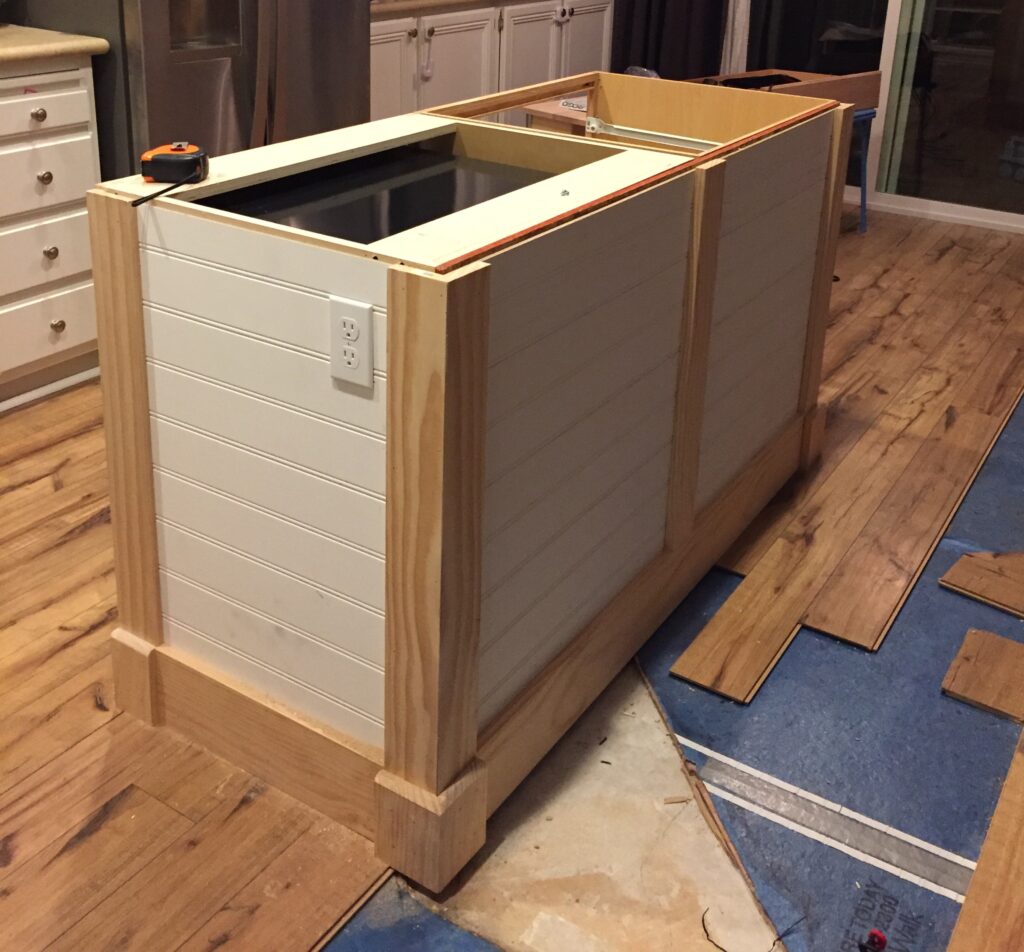
Once the siding was finished, I decided to add a frame around the bottom and edges. Along the bottom, I used a 1 x 6 board. Up the sides, I used a 1 x 4. You will need the table saw or a miter saw of some kind to create the 45 degree angles for the corners. You’ll need a nice, angled cut for the 1 x 4’s at each corner.
Just to add a little more decorative detail, I added some 1 x 6 squares to each corner at the bottom. These were miter cut at the back two corners to connect as well. Ignore the floor… we replaced some pieces because of the old island we took out.
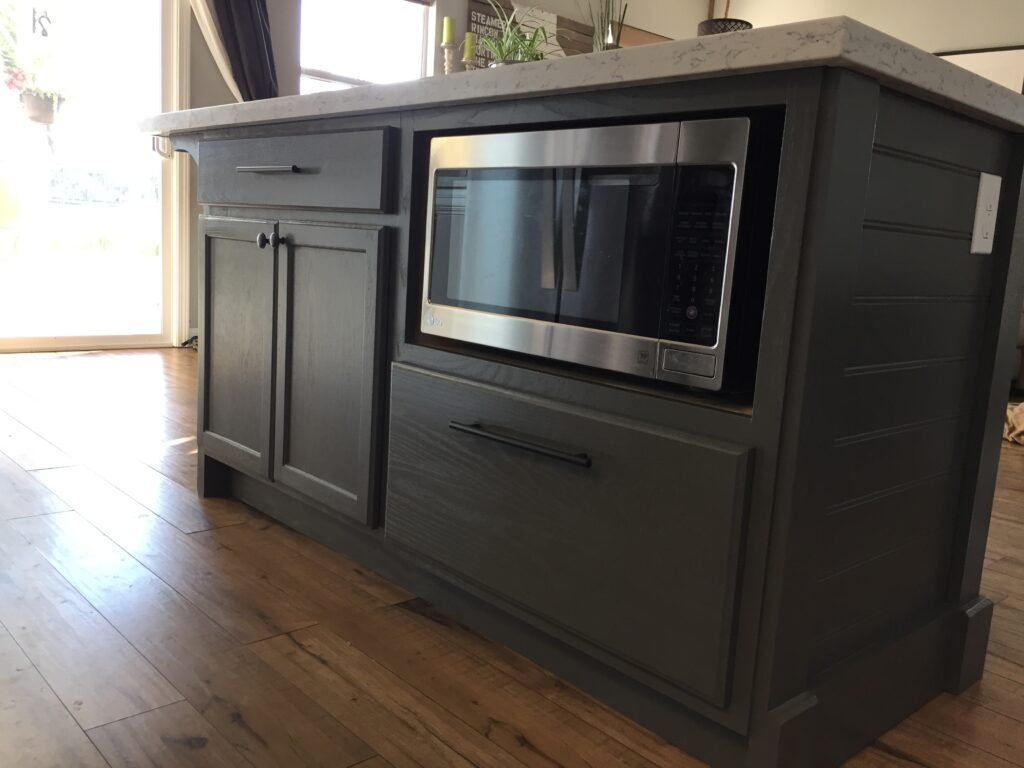
That’s It! She is sooooo pretty. I used Benjamin Moore Kendall Charcoal for the paint color. But, I color matched it with Behr’s Semi-Gloss Alkyd Enamel paint. This paint is great for cabinets and areas that get a lot of use. I painted our DIY kitchen island before discovering Benjamin Moore’s Advance line, which I used on the main cabinets. I am still pleased with Behr’s Alkyd paint… but it for sure does NOT go on as smoothly as the advance line. It has however, held up well against spills and clean-ups.
After the counter top was installed, I attached four corbels on top of each of the 1×4 boards for support.
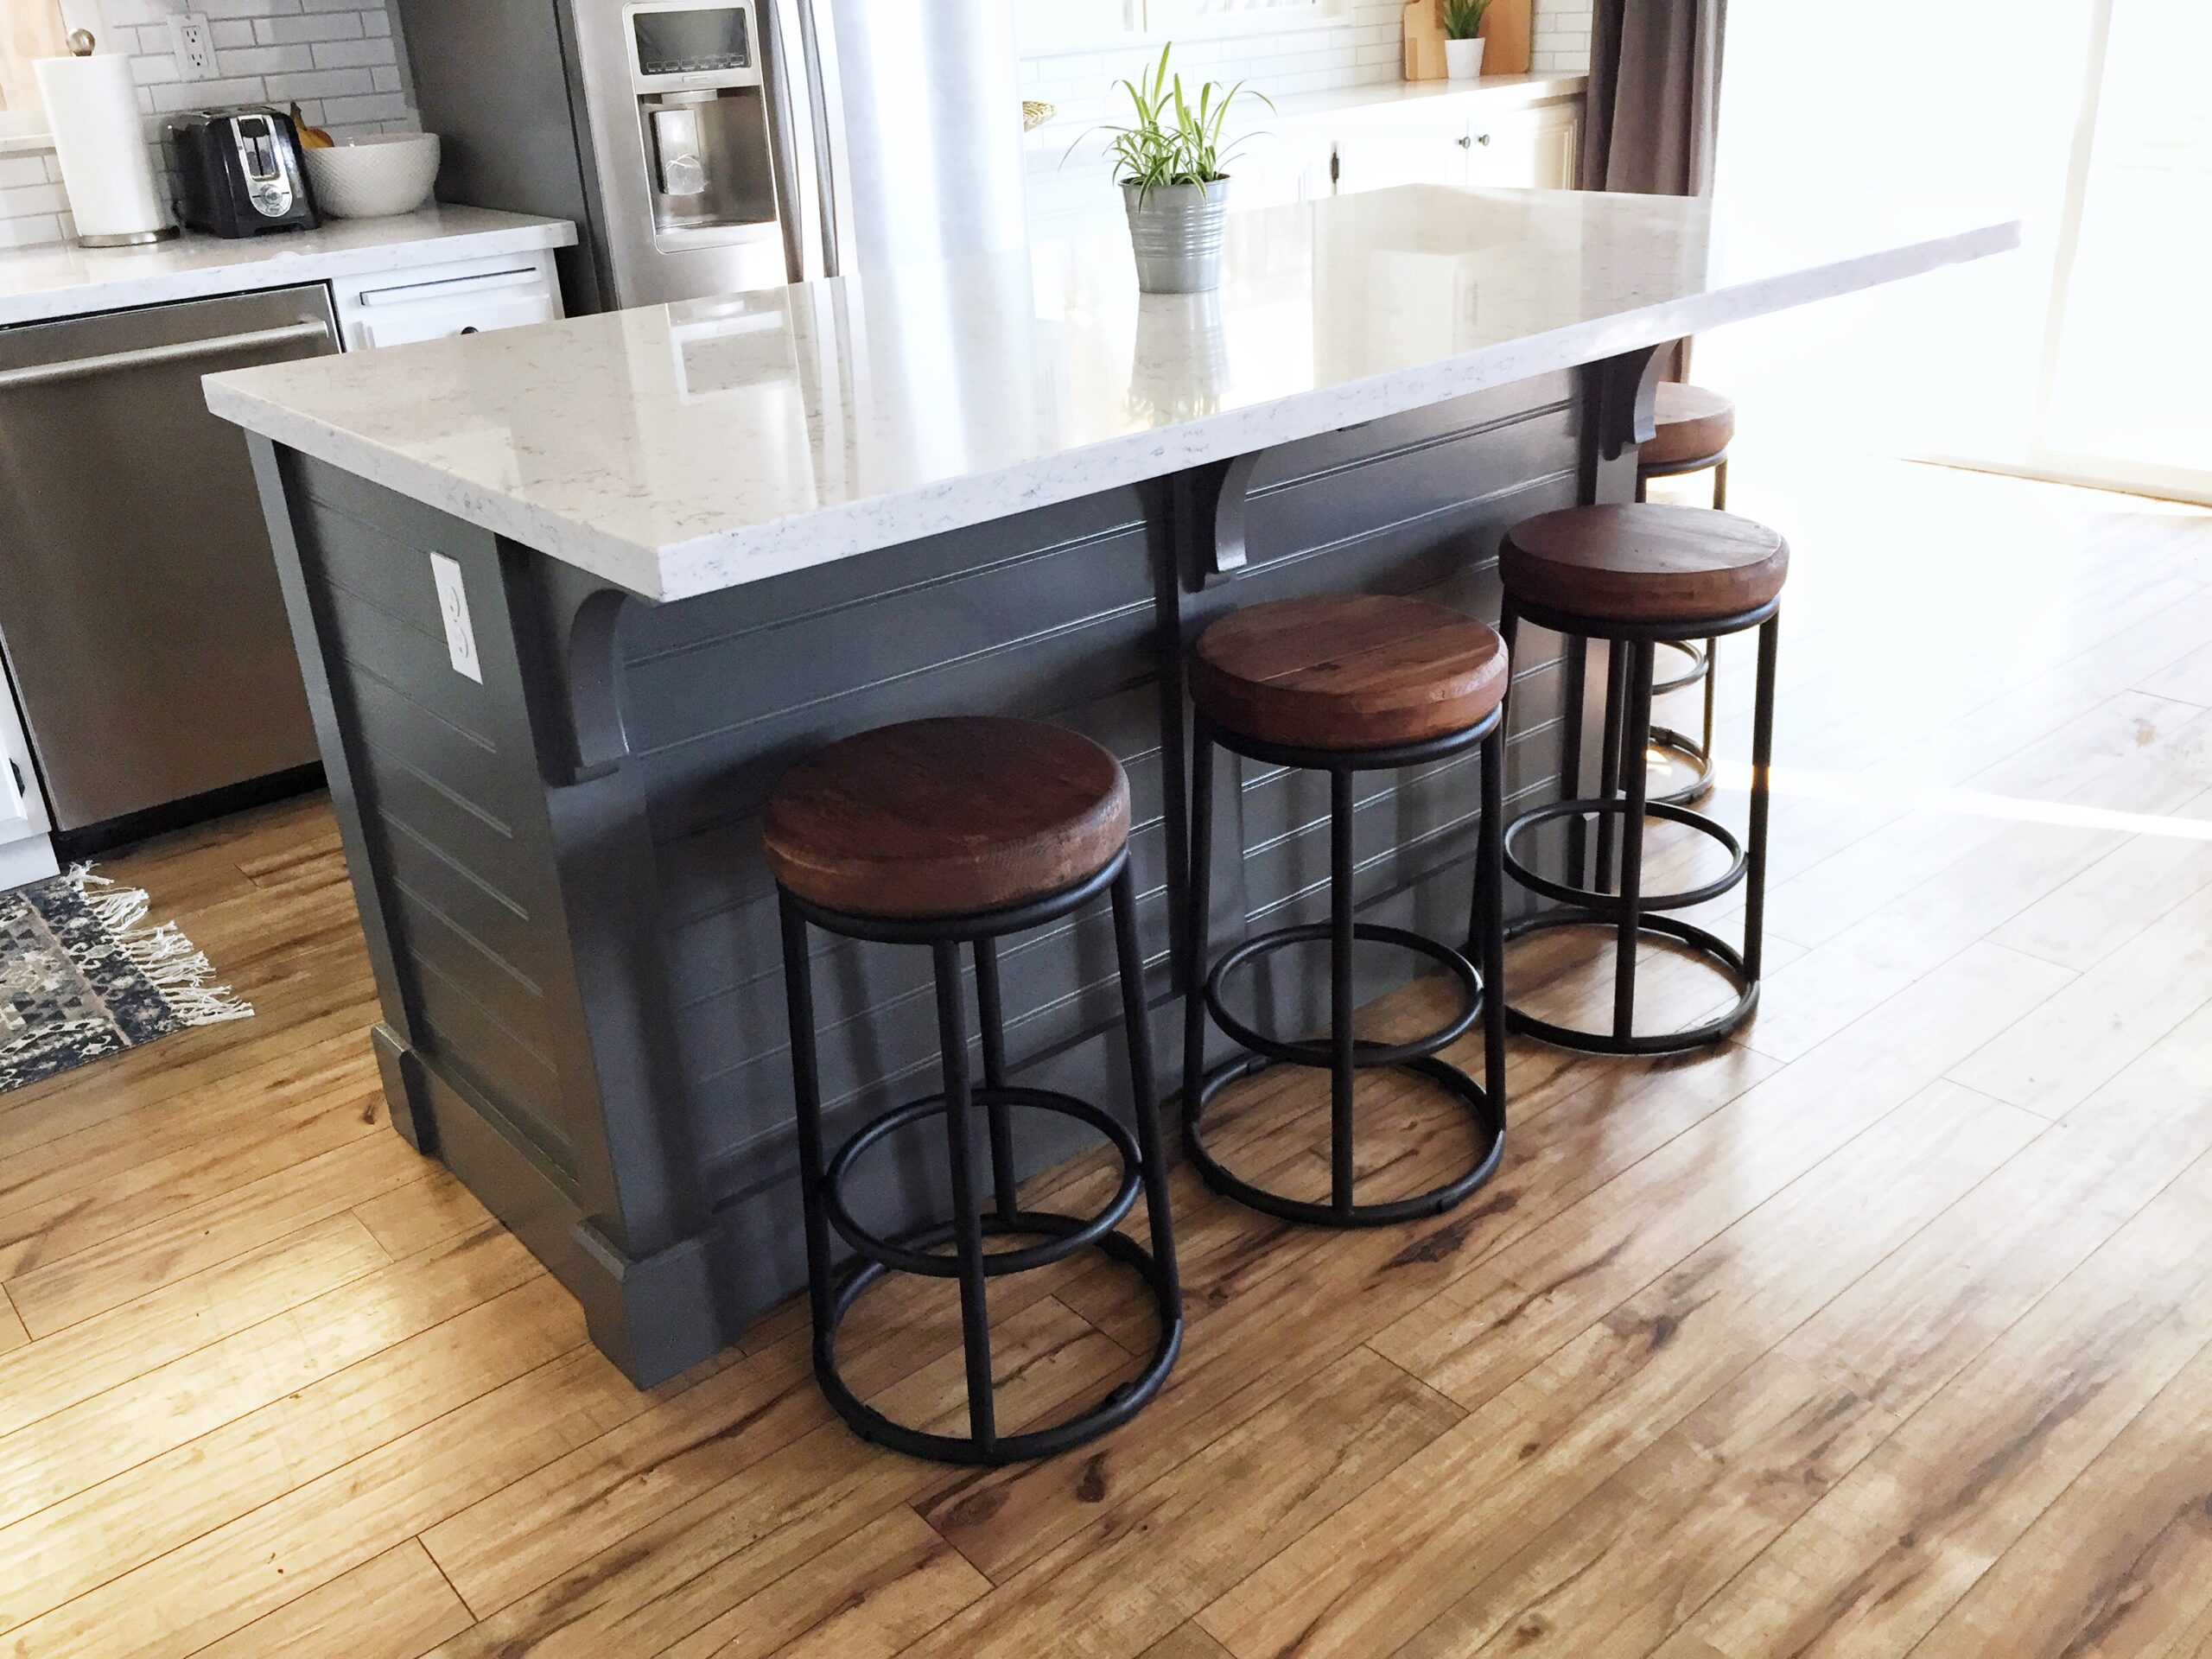
I am super thrilled about our DIY kitchen island.
We were able to add storage and hide our microwave inside, as well as add more seating. We love it!! (the electrical is a whole other topic. But, yes, you can run your existing wiring into your new island! It’s not too hard)
Once again, HERE is the cabinet I purchased from home depot for a great price!

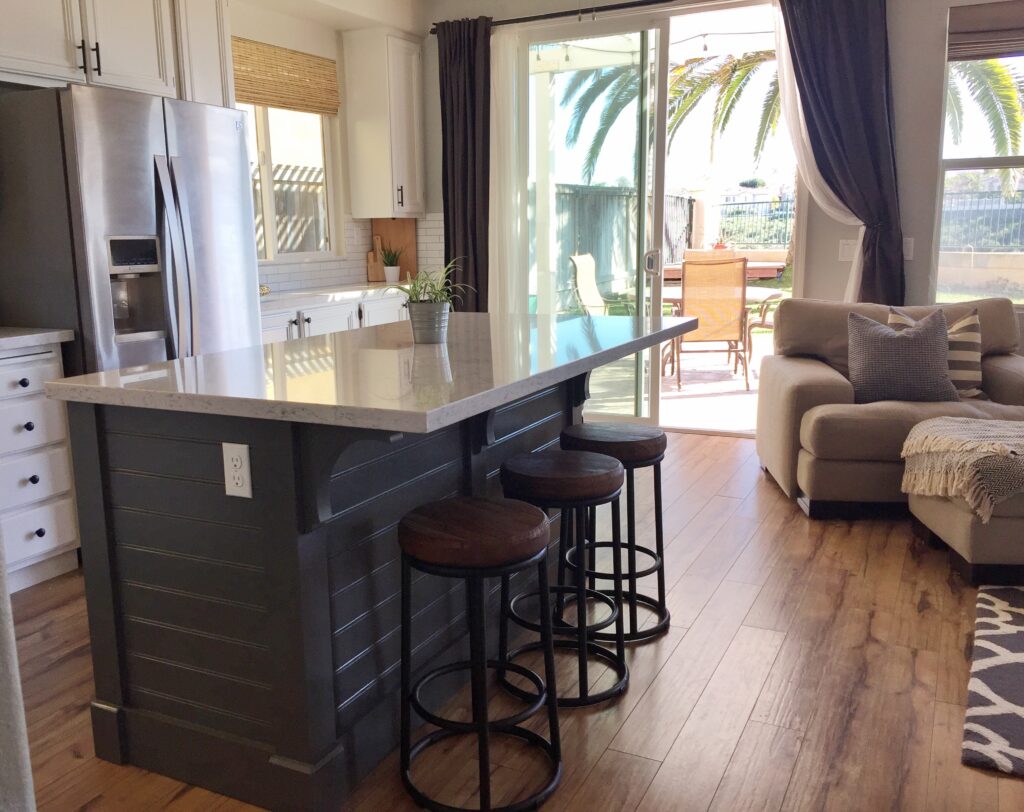
Find these barstools HERE! They are the best!
Very nice! This is something we may do in our new kitchen, once you installed the countertop how much did it cost overall? We wouldn’t be doing electrical.
Hi Angela! I’m so sorry I haven’t responded sooner! The cost of the island was only around $400! (not including the countertop) So affordable when you do it this way. That price includes the wood trim as well as the bead board that was added.
Where did you get counter supports and how does counter fasten to base cabinets.
Did you fasten base cabinets to floor? How?
Nice job we just purchased similar base cabinets but will incorporate some of your modifications.
Hi!
I purchased corbels at Home Depot. They are a pretty basic style- they have a few to choose from.
When we had the countertop installed, the installers screwed a thick sheet of plywood down to the island, then the quartz was placed on top of that.
I should have included the part of the project where we attached the cabinets!! I will have to add that.
There are two small pieces of 2 x 4 underneath. Nailed down to the wood floor. Each one was placed directly inside the side edge of the cabinet and nailed from the outside of cabinet with nail gun to secure together.
Hope this makes sense!
Very helpful. Will begin construction this weekend. Thanks
How long is the overall dimension of your countertop? I love how there is an extra seat on the end.
Hi Tiffany,
The length of the countertop is 75”, with approx 13” overhang around the two sides that have seating. I’m very happy I decided to add the seat on the end!
What are the total dimensions of the countertop? Do you have a viedo?
Wondering what the width of your counter top is?
It is about 35″
Where did you get your flooring? Love it!
Our flooring is by Timberline, the color is Lumberjack Hickory ❤️❤️
Does the flooring go under the cabinet or up to it?
Is the weight of the quartz counter top to heavy for cheap base cabinets?
The cabinets I purchased were affordable, but not made of cheap materials. They are solid wood- I’m not sure about cheaply made cabinets and putting quartz on top. I would stick with solid cabinets
I’m curious about the paint job-it looks great, but you sort of skimmed over how you did it. I’m basically doing exactly what you did, but with 3 cabinets. Curious about prep-did you sand and prime? brush, roller or spray?
Hi!
Once all the paneling was up, I just used the paint I mentioned in the post and did two coats all around the island. The paneling comes paint- ready.
I would use a good angled brush for all the grooves, and then go over the entire surface with a nice 1/4” nap roller. Not a foam roller.
Since I’ve done my cabinets and other wood projects, I be realized that the foam rollers are HORRIBLE .
Let me know if you have more questions!! Good luck!
Beautiful!!! So how is it attached to the floor? I didn’t quite understand one of the previous posts about that. Is there wood flooring under the island?
Thank you! I nailed two pieces of 2 x 4 to the floor at the edges of the inside of the island, then nailed the island to it from the outside once it was in place. I hope that makes sense!
I did similar like what you shared but only exception being its done in basement where the floor cannot be nailed as of now its just floating type with heavy grabite sitiing on 48 inch cabinet. Do you share any insight onhow to avoid any kind of sliding or turning, Thx
I wouldn’t expect that it will move at all with the heavy granite on top. But for sure attach the countertop to the island!
So you said that the deglosser will work on any surface. Does that include Thermofoil? That’s what I’m working with and I am terrified of starting but the white cabinets look so darn dirty and yellowed. Also, is your kitchen floor a wood laminate or solid wood? I’m scared to put wood laminate in the kitchen for some reason. 🙁
I believe thermofoil is a type of vinyl covered MDF? All the deglosser does it make the glossy top coat of a surface, matte. So you are then able to paint over it.
If your cabinets have a glossy top coat (which I’m assuming they do) you can absolutely use the deglosser! It should be just fine ❤️❤️ I would do it!
What color is your paint???? Love this!!
Thank you! It’s Kendall Charcoal by Benjamin Moore ❤️❤️
Where would you suggest to punches counter tops economically?
We purchased ours from Home Depot and they did a great job!
Looks amazing! Would build the same thing but not sure if i want to nail 2×4 on hardwood. Is the whole setup heavy enough that it wont move? We will use it for baking, prepping, quick breakfast. Thank you!
It wouldn’t move, especially with the weight of the countertops.
How many inches are you away from your kitchen cabinets? Trying to measure to see how much room I should have in between the cabinets and island. LOVE your island…totally copying =)
How far from cabinets to island?
Trying to measure to see how much room I should have in between the cabinets and island. LOVE your island…totally copying =)
First of all, thank you for sharing this post! Secondly, your kitchen is *gorgeous*! I do have the same question as Trisha. I’m in the process of planning our island (found your post via Pinterest searches!) and I’d love to know how much space you left between your counter and the island, and also the fridge and the island. Thanks so much!
Hi! I put approx 3.5 feet of space in between the cabinets and island.
XO
In DIY magazine the color of the island is a blue I really love, what is it?
Hi!
Unfortunately the color shown in the magazine is not accurate to the color paint I used. My paint is a gray paint called Kendall Charcoal by Benjamin Moore. There’s no blue in it. Please refer to my personal photos on the blog for the accurate color.
Thank you!!
Hi! So stunning and crafty! Well done you! What are the dimensions of your island? I saw the countertop measurements above but I was curious of the measurements of the actual island.
Hi!
Thank you so much! This island was made by putting two 30″ cabinets together, so it is approximately 60″ long by 24″ wide. Not including the plywood layer and the bead board detailing.
This is exactly what we were looking for and really want to try it! Love the colors! How did you install the quartz countertop? And what were the measurements for the countertop? Again looks amazing!
Thank you so much!
We used Home Deopt in our area, and they were awesome. I believe the countertop is about 38″ x 75″
Would you be able to provide an approximate price for this through Home Depot?
Hey! First off this is beautiful! I have measured out the same size to fit my kitchen and was wondering how many sq. ft you needed for the bead board? One sheet was 32 sqft. I believe. How many did you need to buy to cover the two short sides then the long one?
Hi, thank you!
I don’t recall the amount I used. But your local Home Depot could likely help you out if you bring them your measurements. Good luck!
How did you do the electric to plug in the microwave? Is there enough air flow behind your microwave so it doesn’t overheat?
Hi! The electric is connected through the floor and into the island. If you have an existing island, you can use that. I don’t have any authority on electrical, I have someone else do that part always! When you research microwaves, they generally have a required amount of space all around to give proper ventilation. I believe mine required a few inches all around.
Hi Kelly! I was at a loss as to how to finish the back of an island I wanted to put in my kitchen. I loved your plan, followed it and now have a beautiful island in my kitchen! I have a few minor things to finish. The directions were easy to follow and you made the project very attainable. No one can believe that I did it all by myself!
That is so great to hear!! Thank you for sharing, so glad you love it!
Hello, I love your work. I am having issues finding those awesome bar stools you have for your DIY Island…I went on your link to the website but I am unable to find..Can u point me in the right direction when u get a chance thanks….
Try this! I got the brown wood!
https://rstyle.me/n/c54gk8cegzf
That link worked…Thanks again for the wonderful DIY tutorials!!
Great! You are so welcome, makes me happy that you like them!
If you have 4 people sitting at all the stools do you feel that there is enough room or would you add more? Im looking build an island just like this with seating for 4 people and I love your design!
Yes Plenty! Because there is a seat at the end. So it’s 3 in a row, then a 4th at the end!
I really enjoyed learning about the island! We aren’t to the point of our remodel yet (doing the bathrooms first in this old fixer upper!), but I’m sure the knowledge you shared will com in handy!
If you have time, I would love a little more info on your stools. The link doesn’t work for me and I don’t mind searching so any information/markings you can find on them would help my search.
Thank you!
Whitney
Thank you so much!
Did I send you the link? I will update the link on the post as well!
I love how a bunch of us has recently come across your island on Pinterest. It’s my favorite pin and EXTREMELY helpful!
That is so nice of you! Thank you!
I hope yours turns out great- send pics! XO
I like your kitchen island. I have a question about your floor. I love the color, what did you use and did you put your island on top of your floor or did you cut out an area for it?
Thank you!
I use Lumberjack Hickory by Timberline for the floors. I put the island right on top of the floor. Good Luck!!
Kelly, I’m at a loss as to how to mitre cut the corner peices to frame in my island! Could you possibly provide some instruction or even a tutorial! Thanks so much! Love your blog and all of your work, your kitchen turned out beautifully!
Melissa xo
Beautiful!! You mentioned that you didn’t need the toekick b/c you were planning to make your own later anyway. What did you use for this part? Thanks!
Thank you! I just nailed on a piece of 1 x 4 wood that I first painted to match the cabinet. Super easy fix if you’re missing that part!
I currently have 2 stock cabinets sitting in the middle of my kitchen and needed some ideas. I had the beaded board in my head but needed a way to put it all together. THANK YOU. This article is perfect.
Hi, I love your island. How did you attach the 1×6’s and the 1×4’s to the cabinets?
Thank you so much. After cutting a 45 degree angel on the edge for the corners, I just nailed them in place with my nail gun
This is awesome! Very impressed. How long did it take you to make this once you had all the parts and a total price?
thanks!
Thank you! Once I had everything, just a few days. The entire island, not including the countertop was around…I’d say $300-400, from what I can remember.
This is beautiful!! Do you have to purchse a specific type of microwave for the island, or can any over the range one work?
It is just your basic counter top microwave! Not an over the range one, as those need to ventilate from the bottom
We are going to be creating this as we are moving into our new home together! The cabinets you linked were not working! Could you share the cabinets you found from Home Depot?
Love the work you have done in your kitchen. Do you know the white paint color is on your cabinets? I am looking for a white and as a designer you probably know how hard that is!!!
I am going to try doing this for an apartment I am renting. I am making a few adjustments to it since I want it to be easy to integrate wherever I move. I want to leave seating on 1 long side and 1 short side of the table and use butcher block as the counter-top instead. If it isn’t nailed down since it isn’t going to be as heavy will it move and will it have a potential to tip over due to the uneven weight distribution?
Is there anything I could do to attach the island to the hardwood floors until I move out which wouldn’t damage the floors?
I don’t think you can attach it to the floors without damaging. But if the countertop is heavy, it should hold it stable!
We’re planning to add a large island to my kitchen. My husband told me to find a building plan and he would make it happen. Your plan is exactly what I was looking for. Thank you!!
That’s great!! Hope it turned out beautiful!
Hi KElly,
I finding this diy a little late from your posting but I have a question. How did you install the receptacle on the side of the island?
LOVE this island! Planning on building a similar one next weekend. I noticed in one of the pictures some screws on the side of the microwave cabinet (picture where you are putting on the 1/2″ plywood). Is that from the manufacturing process or did you put on a sideboard?
For the small blocks you added to the bottom of each segment, did you use the miter saw to give those an angle for aesthetic as well? (the top part, not the connecting parts)
What option did you use to mount the corbels?
Hi! I’m basically following what you did. Did you only order 1 panel or 2?
I believe the panels are 4×8 feet. So you’ll just need to order to fit the size of your island. Good Luck!
What do you suggest if I only want to add a new countertop to a small kitchen island to add seating to the island. I want to make an overhang for two bar stools.
Measure the island and then add at least 13 inches for an overhang for seating. You can use a butcher block slab, or even order a piece of granite or quartz to put on top of your existing island
How thick is the plywood you put on the back? I have this exact same cabinet from HD that we just put in for an island and need to finish it before putting on my head board and countertop.
*bead board*
I believe it was 1/2″ thick. Good luck!!
Where did you get the microwave cabinet? Great job!
Thank you! I actually hired someone from Craigslist to make that cabinet with the microwave opening! It was so affordable too!
Your island is gorgeous! I’m updating ny builder grade island and would love to incorporate the “feet” like on your island. I know you mentioned using a 1×6 board – it appears the top of the board was cut at an angle…? Or is it just a straight 90° cut?
Thank you! The corners are cut at a 45 degree angle, so they fit flush together at the edges
I love using this trick. We have rental property and this trick has been one we have used to improve and add work space. My son and his wife did this in their new home and because they are both tall we helped him raise his island 6 inches. It worked out very well.
That is so great! Love that
I am building this island right now. I was just wondering what you did to finish off the bead board edges on the door side of the cabinet. After you put the one piece of trim on did you just paint it to match. I’m thinking there will be a small space because you can’t add the trim in the front.
I didn’t attach bead board on the front. Just the sides and back. I added the corner trim to all 4 corners of the island to finish off the edges. Which also covers the bead board.
Hi, would you mind explaining the front corners a bit more please? Im not quite understanding how the the edge of the bead board is concealed. It looks like the trim is laid over the bead board. What is covering it at the edge please? Thanks
Did you use anything to cover the seam between the two cabinets in front?
Hi, no I didn’t. Once the cabinets are attached together and painted, it looks great.
Thanks!
Thank you for your inspiration! I just completed a similar piece by using yours as my example. Mine is to be used for a crafting/project/desk in a studio area that I’m creating in our home. I wanted a space to be able to spread out and also have concealed storage for supplies and equipment. I put locking wheels on mine so I can move it around the room for flexibility, etc. I also stained a butcher block top that we got at Home Depot. It’s heavy and beautiful!
Such a great idea! I love that!!
Can you share the plans/drawing and measurements you had the carpenter built to please? Thanks!
Hi! I built the island, and all the info and sizing is in this blog post.
Hi. I know this is an old post but hope you will still answer. How did you handle the plug for the microwave? Is the outlet on the outside 2 sided so that you have an outlet inside the cabinet too?
Hi. Can you please tell me how you added the electrical for the microwave to plug in without being visible? Is the electrical that you see in the side 2-sided?
Beautiful work, very creative. How did you get the countertop to attach? I’m hoping to do this and order a granite counter top.
Beautiful! good job!
Did you attached a piece of plywood to the sides of cabinets as well or to the entire back only?
Love this post so much! I’m going to attempt a skinnier version with uppers as a base bc I need shallow depth. What are the wooden brackets you used? Any details about them would be a huge help! Thank you.
The wood support brackets can be found at Home Depot!
How did you attach the island to the floor? Also, did you put it on top of your flooring, or fit the flooring around it?
Hi Kelly, the beauty of your island has withstood the test of time! We’re building our own following your guide 🙂 You mentioned in the comments that the countertop installers laid a thick piece of plywood before laying the quartz on top. How is it that you can’t see the plywood on the sides — the quartz appears to be flush with the top of the cabinets? Thank you!
Hi Kelly! Love this project and I’m hoping to match it! Also, totally in love with the barstools! The link to the barstools isn’t working, could you point me in the right direction?!
Hey Kelly, I’m looking at putting my own island together and want to run power to it. How did you run the power up on the inside of the island? I have an unfinished basement, but I’m looking for ways to hide the wiring.
There was already existing electrical underneath from the old island
So glad I found your design. Simple yet beautiful. Can’t wait to use your ideas for my own project. Thank you for sharing!
Hello,
I wonder why you’re not disclosing the cost of countertop?
Did you find that material cost was most of the expense of getting this project done?
Thanks for any insight.
I’m not disclosing the cost? I have linked the countertop in my post. You can purchase any countertop you choose, and that is in your budget. I believe this one was around 300.
Trisha it usually is recommended to have at least 36-42 inches. Hope that helps.
We are doing the exact same thing in our kitchen. We’ve already removed the original island and we’ve created a plan for the new one. We wanted to use base cabinets from a hardware store, but when we went to lowes, the guy working there told us the quality of those cabinets were not good and he told us to go with something else. My question to you is, how long have you had your new island, and how have they held up?
Why does he think the quality isn’t as good from a hardware store?
As long as they are real wood, you should be good! We sold our home last year, but they were still in great shape. You can also buy a couple base cabinets from an RTA store, and they come finished with paint and you can choose sizes. That is what I am currently doing in our new home. Good luck!
Hi Kelly, love the design. I’m wondering what you did to get the 1x4s nearest the cabinets to sit flush with the cabinets on the front side and hide the bead board from that view (since the trim is mounted against the bead board.) Did you notch those front 1x4s so the front is flush with the cabinets and the back is flush with the bead board? If so, wondering what you used to notch it?
What are the dimension for just the cabinet part? and with the Granite Top?
Came out really nice especially the color choice.
I love the stools but the link doesn’t work where did you get them and how much did they cost.
Hi! Great build. Do you know if it would have been structurally possible to have the countertop hang over on the other short side of the island to provide a couple more seats (as was one on the other short side)? I realize in your kitchen it looks like there would not have been space for seating on that side, but in my kitchen I want an island with overhang on 3 sides because the island will be my dining table. Any advice? Thanks!
Yes it would work! Take a look at my most recent kitchen island- Is this what you are looking for? https://domesticblonde.com/2023/02/01/diy-kitchen-island-build/
I have to say…… you have done a super great job on that island!! It’s nothing short of BEAUTIFUL!!!! I’ve been wanting an island for a few years but they’re so expensive!!! Plus we’ve been doing other projects but…. seeing what you’ve made, and you did a great job in showing pics of the details, explaining the steps of making one, I dont think I’d be afraid to try to build one my self!! 🤗 (I can see my husband’s face now.🤭).I love the idea of having a microwave there!!! Very very good idea!!!
Great job and thanks for sharing!!!
Thank you so much! =)
I think you should go for it!
I love this! I want to replace our odd shaped island, and this would work perfectly in our kitchen. My question is: Did you mount the island onto the flooring, or did you leave a space in the flooring in order to mount the island. In other words does the flooring continue under the island?
For this Island, I placed the cabinets directly on top of the LVP flooring. You are technically not supposed to do that to allow for flexing of the floor. Although, I never had any issues with that.
For my current kitchen island, I cut the flooring out and placed the cabinets inside.