
Happy Saturday ya’ll! It’s the weekend, which means project time… why not refinish your kitchen cabinets?? I’m pretty pumped up about this blog post for two reasons- #1 because I can’t wait to tell you how very possible it is to refinish your kitchen cabinets and make them look fabulous! #2 Writing this post means mine are done. Which means no more work for me. Done.
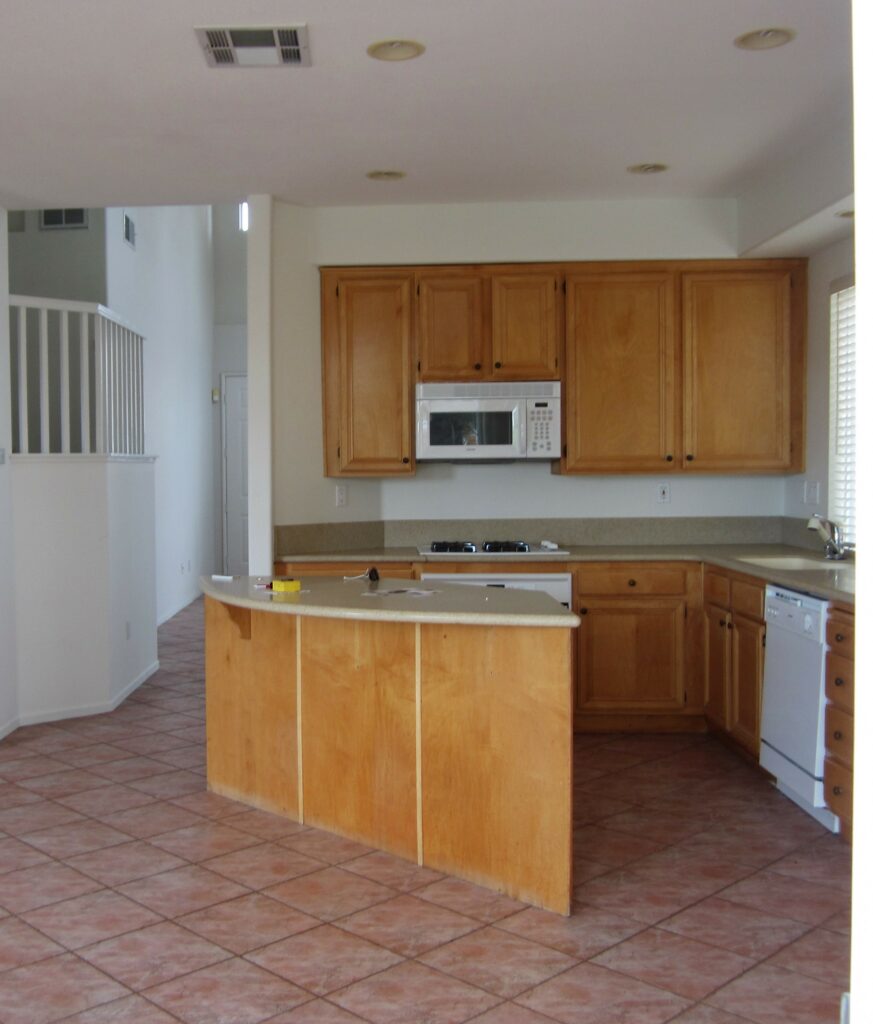
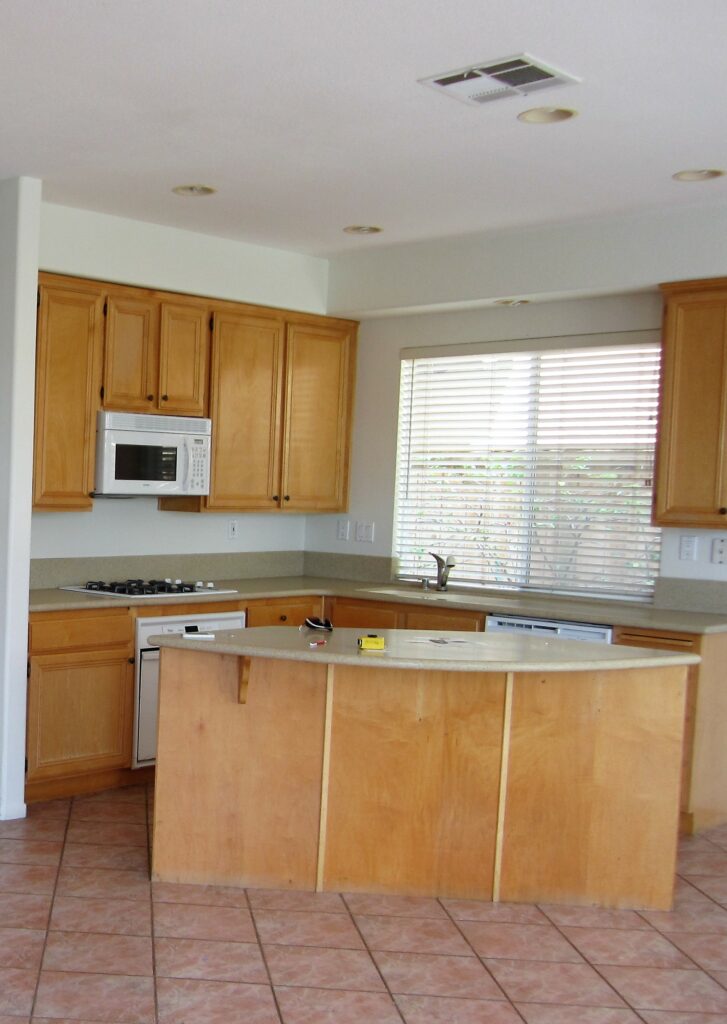
I actually sort of agonized over attempting this task for a looooong time. I stared at about 10 different white paint samples for close to a month ‘deciding on the perfect white undertone’. When in reality I was likely just terrified to screw it up, and then our beautiful, new countertops would be surrounded by some funky DIY cabinetry. That would have been awful! After much research and lip biting, I decided I was going to go for it and pray. I really wanted a fresh, cool white for the kitchen to compliment the quartz we were installing. The paint color we had painted when we purchased our home, was an off-white. It almost had a yellow hue. It had to go! So, in order to save the big bucks- I took on the task myself. Very happy I did, and here is how you can do it as well. Let me just add WITHOUT SANDING A THING.
These are the items you will need for the job (affiliate links included):
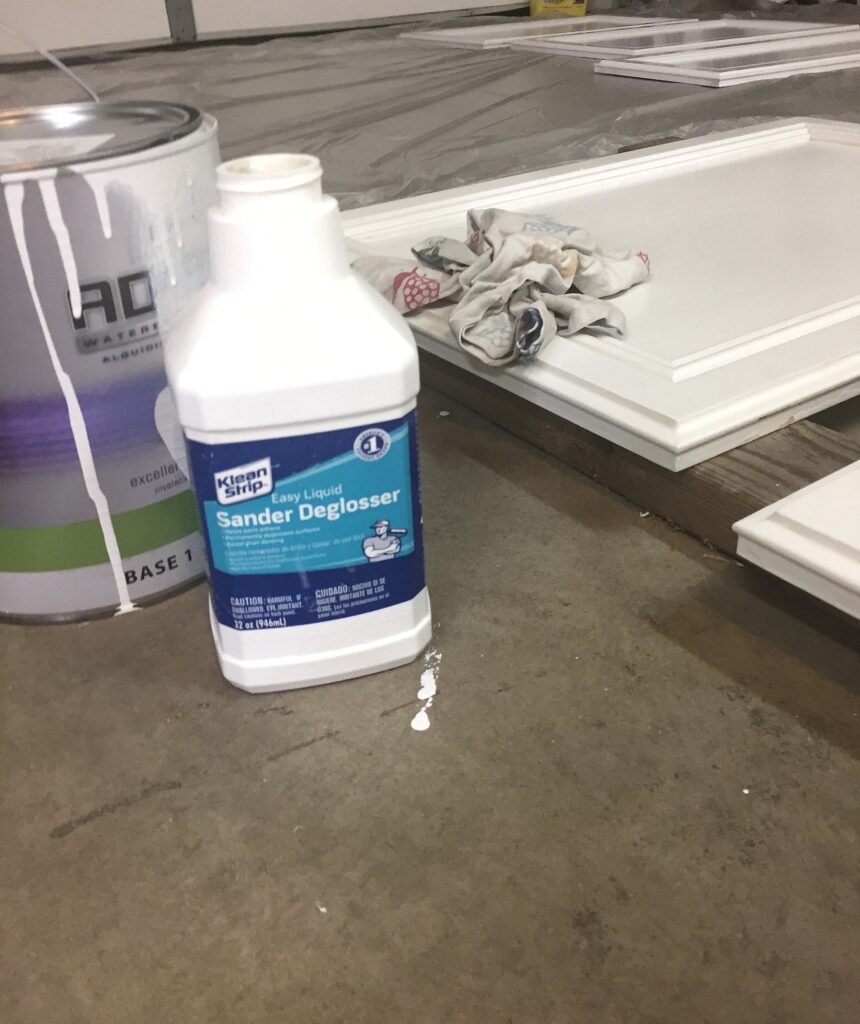
- Sander Deglosser
(your new best friend)
- Rubber gloves
- Lint-free cloth (nothing too soft)
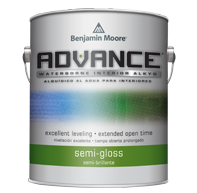
- Benjamin Moore Advance line, Self-leveling paint in semi-gloss
- 1/4 inch nap roller
NOT A FOAM ROLLER
- Good quality angled paint brush
This is all you need for the cabinets- we will have a little extra piece about updating your hinges at the end.
I would recommend taking your doors off in a very organized way. I had this ongoing nightmare that I would attempt to re-install all my doors again, and none of them would line up evenly. Where I just couldn’t find the exact spot the hinges were placed before, and everything was slightly off. So, in order to calm my own nerves and make sure each door was back in its exact spot, I put a tiny little mark on the edge of the inside hinge attached to the cabinet.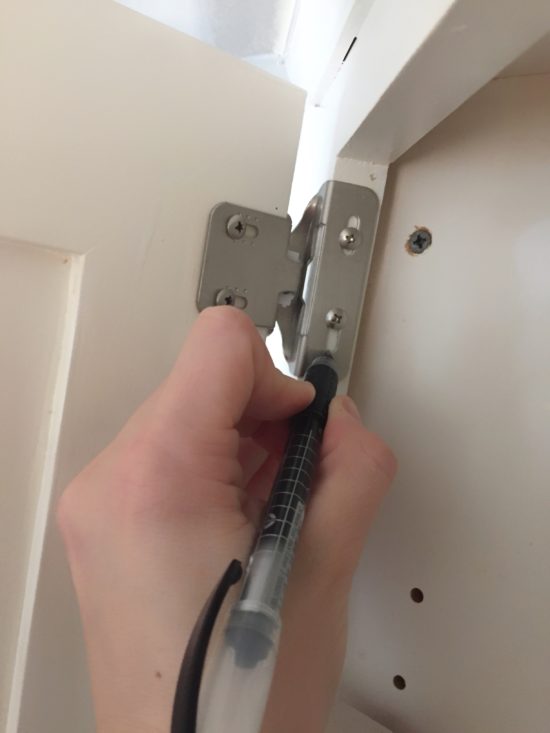
I was able to do this because I did not paint the insides of my cabinets. Figured no one would ever notice my different shade of white when they went inside to grab the cereal. I Still don’t regret that decision, it never has bothered me and also saved me a ton of time.
In addition to the little pen marks, I also made little post it notes and numbered each door as well as the cabinet opening, so I would never have to guess which door belonged there. This made re-installing SO much easier on me.
Now that you’ve got those doors off, let’s get busy!
- Take your doors/drawers and lay them out on a couple 2 x 4’s, I did my kitchen a few doors at a time at first, so the whole place wasn’t totally torn apart.
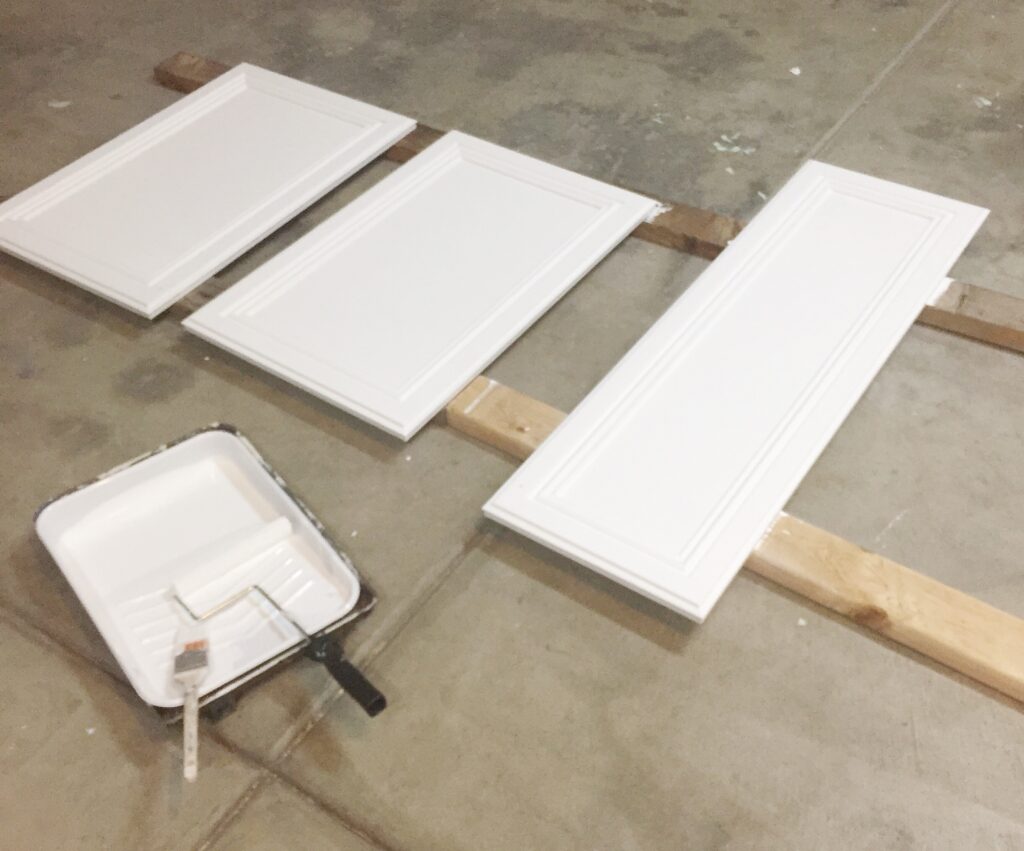
- Put on your gloves and grab your lint free cloth. Pour a little deglosser on the door and start rubbing in a circular motion. Use a good amount of pressure, and don’t miss any of the grooves or edges. Put some muscle into it. You will know it’s good to go, when you feel the door and it has a matte finish to it. Let completely dry, maybe 15 mins.
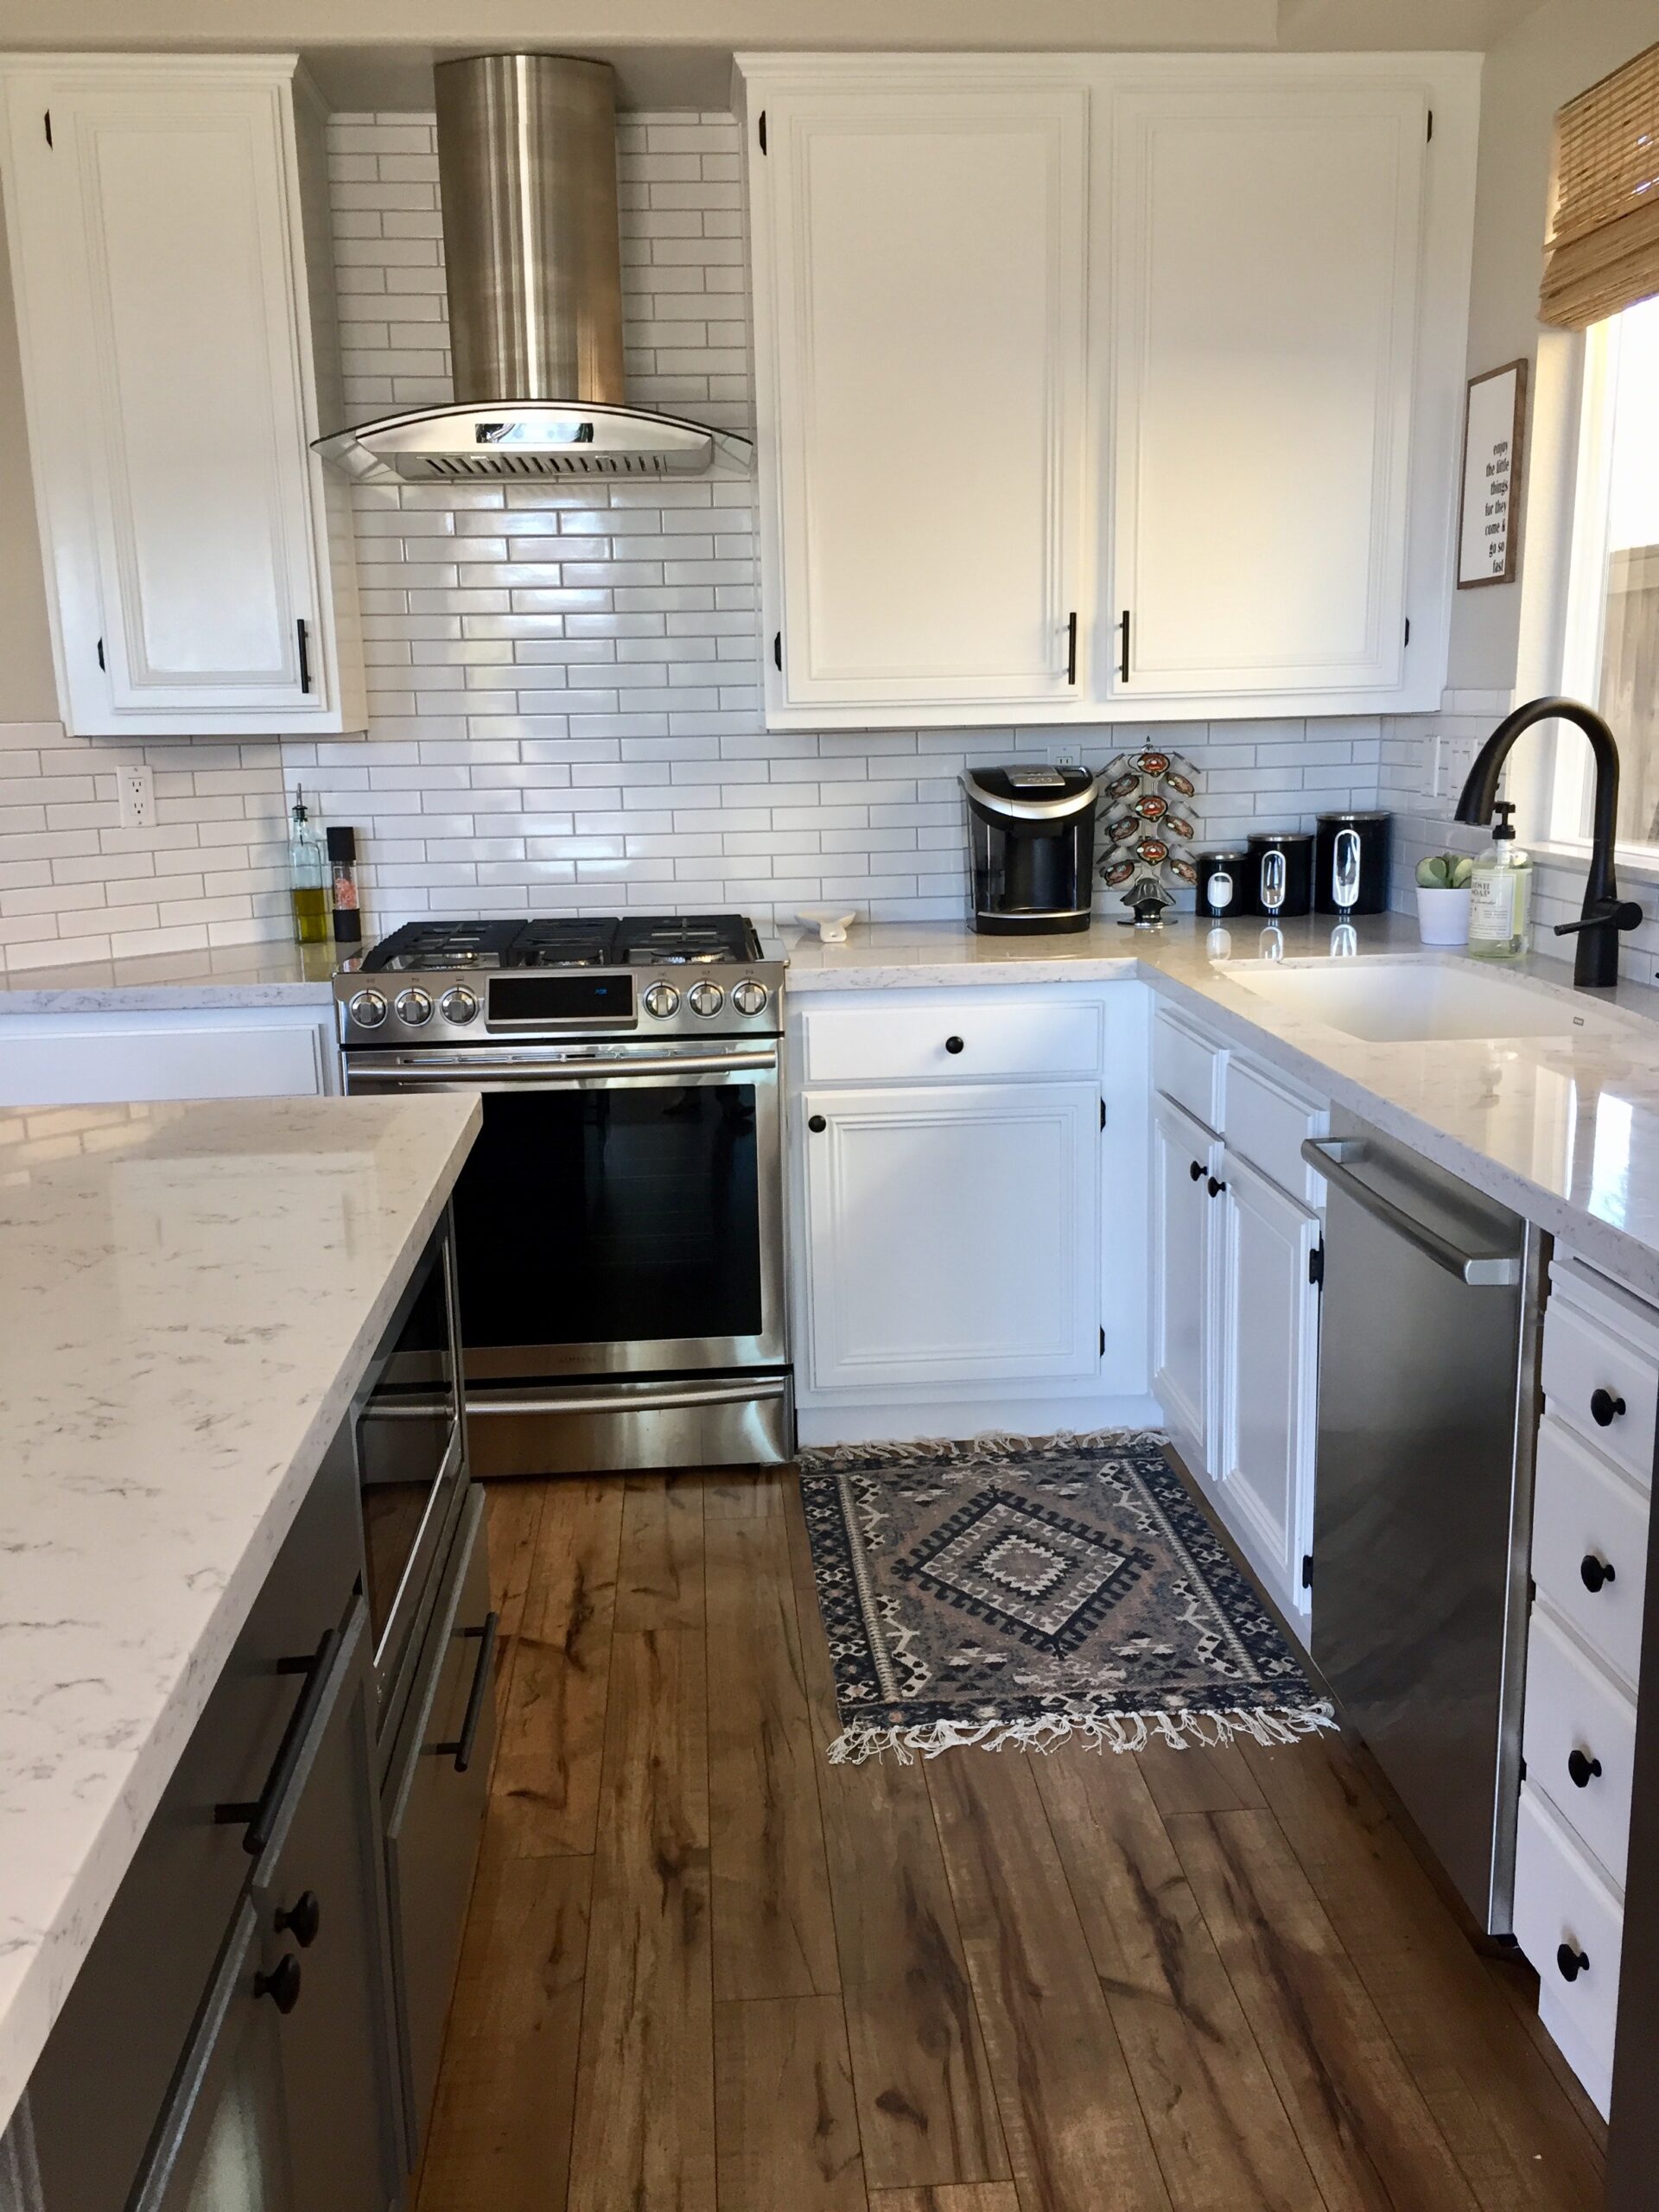
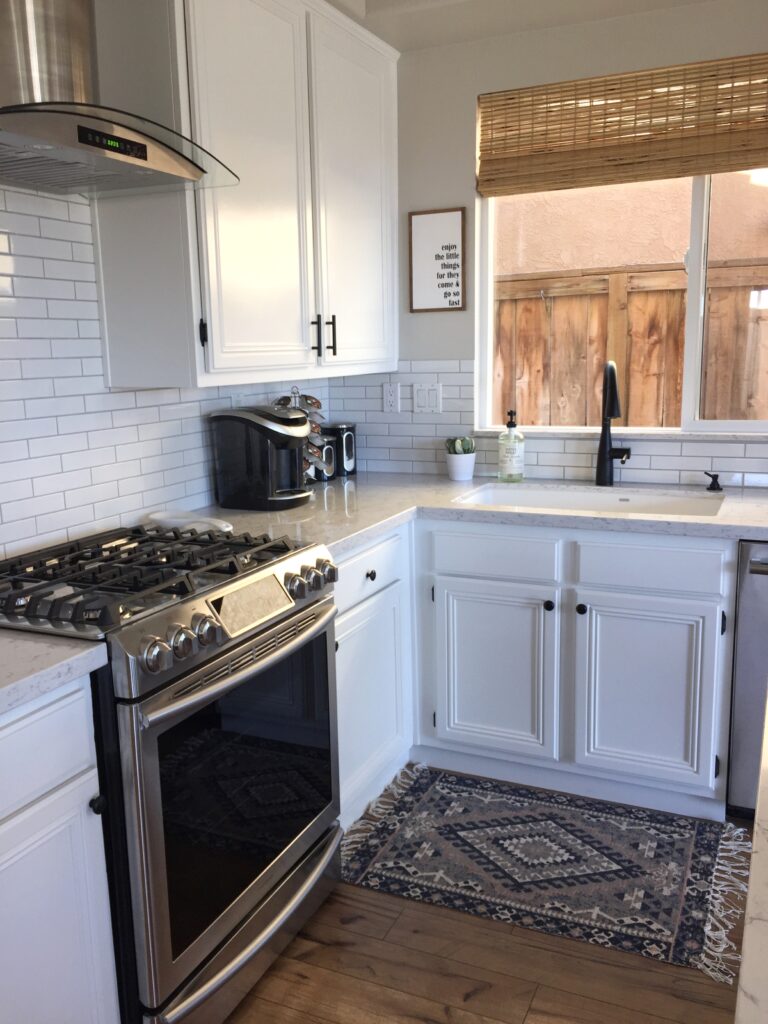
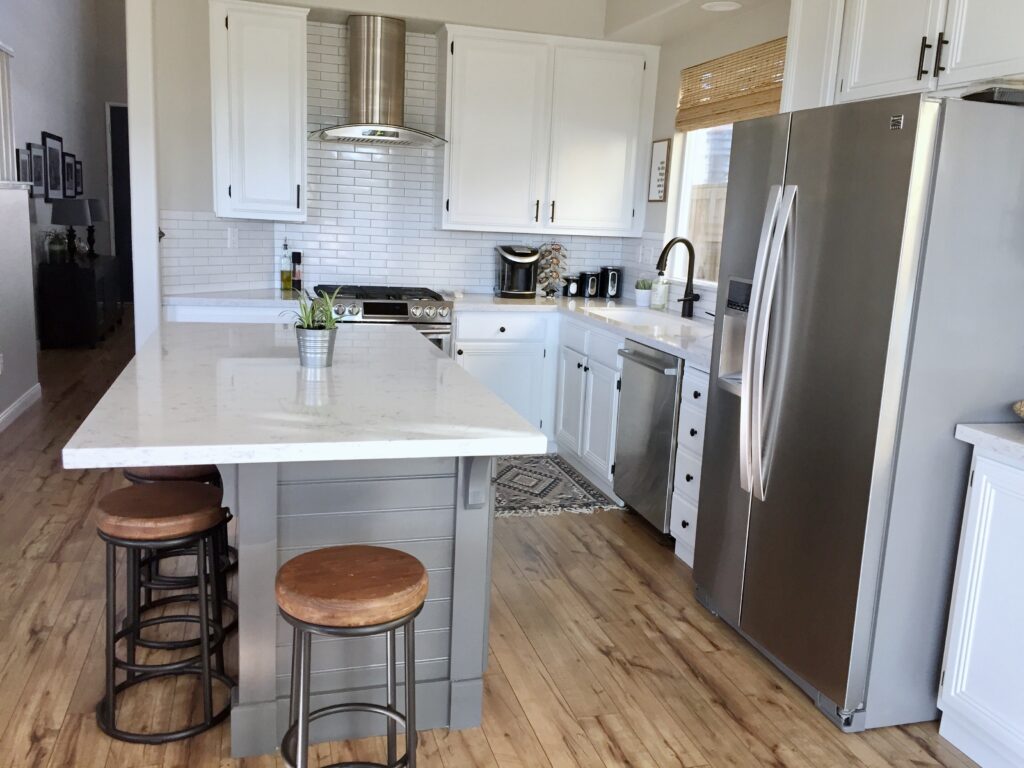
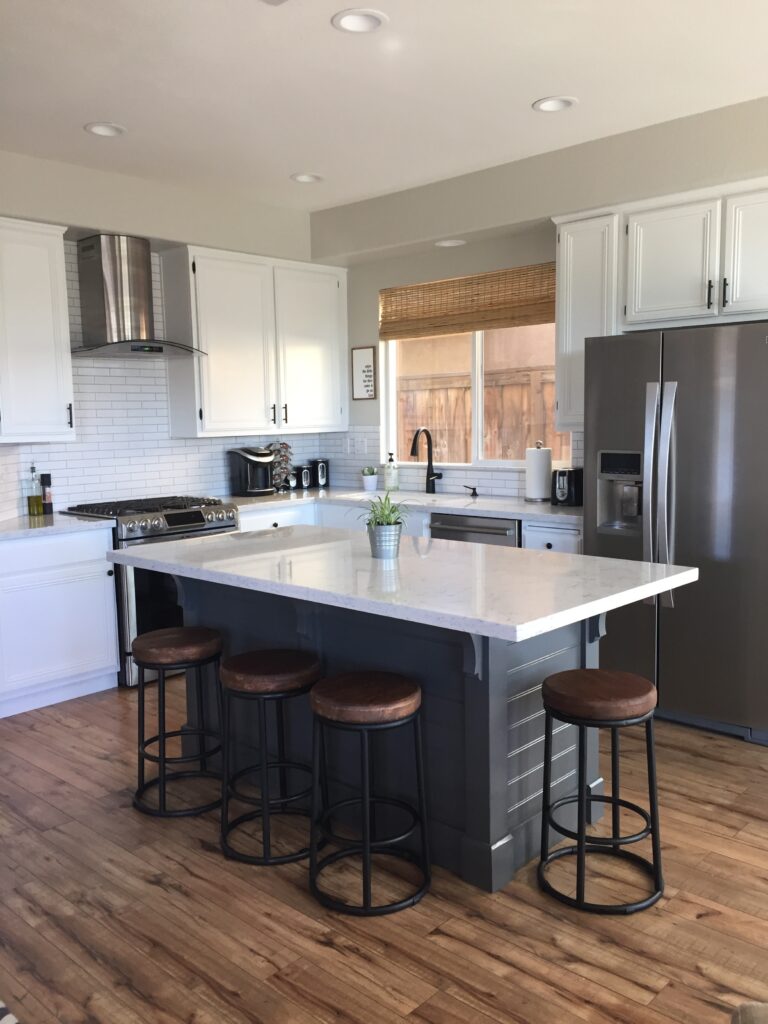
- Now listen to me, DO NOT cheap out on the paint! I am the queen of color matching for a more affordable brand, but your kitchen cabinets are not one of those times. Buy the Benjamin Moore Advance Line. This stuff is amazing! It coats so well, I only did ONE coat (and touch-ups), and it is self-leveling. So all those little mess-ups or lines that you leave behind will magically be smoothed out. It’s just sooooooooo good. After much white paint debating, I ended up going with Benjamin Moore in Oxford White. I am telling you, white is THE hardest paint color to choose. Check those undertones, friends.
- Use your 1/4” nap roller (wipe it off in your hand first to get rid of any loose fuzz), use the roller for as much as you can, and then your angled brush for hard to get to spots. The roller will give the smoothest finish. Did I mention the paint is amazing??
Even my own Mother was saying ‘Kelly, are you SURE you want to do this. Just hire somebody please. I cannot deal with the freak out once this idea goes south.’ Mom, we’re good. We came out of this alive and well. Thank you for the vote of confidence though. Lol
Ok, the deglosser works wonders. It will make any previous finish paintable. Even if your cabinets are now wood stained and clear coated. I promise, I was blown away. And the fact that I didn’t have to sand ONE thing, cherry on top!
- Let dry at least 4-6 hours and then do another coat as needed. I loved my coverage and opted to only do some touching up to my doors. This type of paint takes a longer amount of time to fully harden, so waiting a couple extra days to hang your doors is ideal. While my doors were all drying the last 2 days, I went in and deglossed and painted the cabinets in the kitchen.
Done! Put your hardware back on and put those bad boys back in your new, fabulous kitchen. Do you see a streak? =)
Updating hinges–>
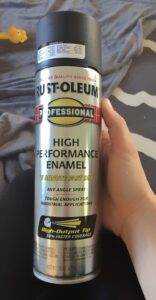
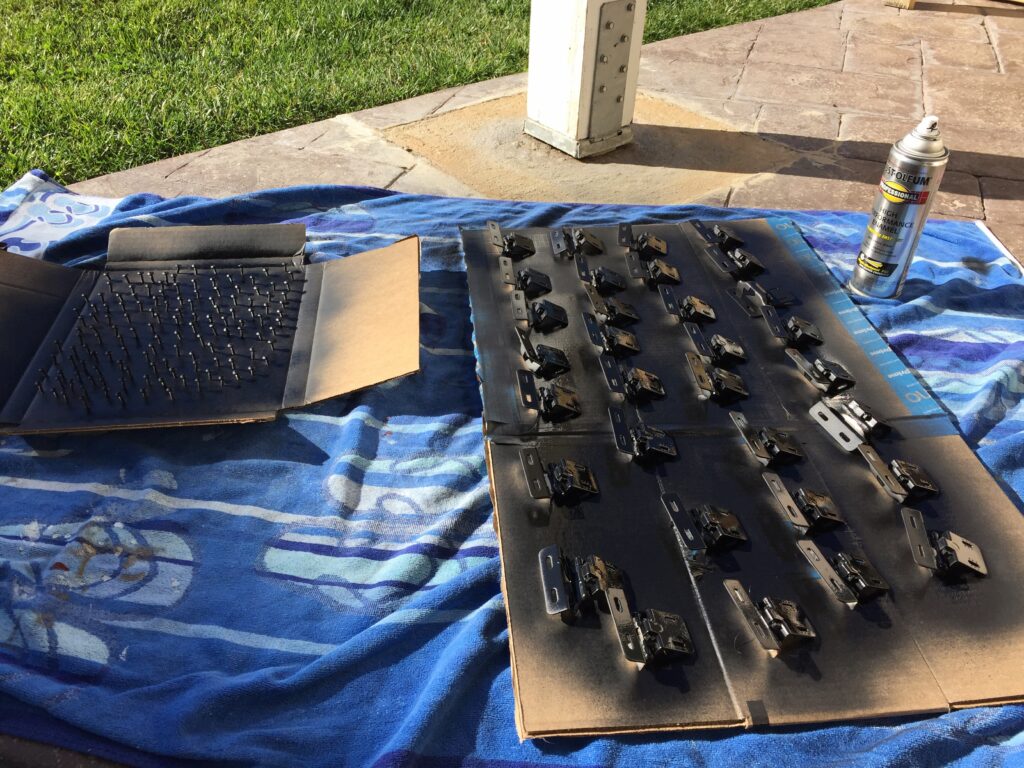
I couldn’t find the exact same hinges that I had on my doors, in a black color, so I went ahead and spray painted them myself. As I said above, I was scared to death to move any hinge or screw hole a millimeter in any direction. So the hinges needed to stay the same. This is another way for you to save some dollars. I used Rust-Oleum Enamel Spray Paint and coated my hinges and screws a couple times. I purchased all new black door pulls
and knobs
to match. The knobs were great, the pulls were not the very best quality, but once on the door, who can tell that they are lighter weight material. So I kept them and am happy.
These are all things you can absolutely do on your own to make a HUGE statement in your home. What a difference a coat of paint and new pulls can make! Good luck with your cabinet refinishing, I would love to see your results!!
XOXO,
Kelly
Here are some photos of our home when we moved in in 2012. I guess you can say we have been busy since then! What a difference 4 years can make!
Find these bar stools HERE!! Looooove these stools!
Beautiful job! Your kitchen looks just fab now. I love it????????????????????
Thank you so much, Marie! I can tell by your title that you can appreciate a white kitchen. Have a great day!!
Love the kitchen!!! What color is the island??
Thanks! It’s Kendall Charcoal by Benjamin Moore
So gorgeous! That kitchen is beautiful! I keep hoping I can sell my husband on switching our cabinets to white… ☺
Thank you, Tara!
Oh just tell him that white will always go with everything, and will never go out of style! 😉
Hi, I love your kitchen makeover. I’m about to begin mine soon and was wondering if you used a primer? I didn’t see it in the directions or supply list, but just wanted to make sure I don’t need one?
Thanks so much!!!
Hi Lisa,
I did not use a primer. My cabinets had been professionally painted an off-white color previously, so the colors were similar enough that I felt safe not using one. If you are drastically changing your paint color, you may consider using one in the same Advance line as the paint- that way you will still have the self leveling feature.
Beautiful kitchen! I will be starting mine soon and I noticed you did not need a top coat to protect the paint from wear and tear? Is that because the Benjamin More product did not require one or was it a personal choice?
Hi! I did not use a top coat, but that is absolutely something you can do. I believe it can be done either way and work well.
Hi, what color is the wall paint in your beautiful kitchen?
Great job on all of your mad skills! I’m inspired to redo my master bath floors and repainting my kitchen cabinets. 🙂 Your tips are very helpful.
Thank you! That is so nice!
The color of the wall paint is Revere Pewter by Benjamin Moore- lightened by 50%. You can ask the store mixing your paint to lighten it by any percent you choose.
Wonderful! Thanks. 🙂
Hi Kelly,
I love this post so much. I live in a house that has a kitchen that looks incredibly similar to what yours looked like (probably designed by the same architecture firm; we live just north of LA county). Anyway, we also have the stove and oven that were separate – did you have trouble changing it into a single stove-oven unit? I’d love to upgrade my kitchen like this. I also want to get rid of the microwave above the stove and put a real venting system in there because the microwave vent is awful at getting rid of cooking smell.
If you have any more posts that show your kitchen remodel, I’d love to see them for inspiration.
Kind regards,
Fernanda
Hi, thank you!
It is actually a fairly easy process to remove the microwave and upper cabinet. Unscrew the microwave from the cabinet and remove. Take off the door, frame and moulding to the upper cabinet. Remove the venting. You’ll be left with just the vent opening and that’s where you will attach your new vent hood to!
Such a huge difference to take the microwave down. Good Luck!!!
I have a question. I am in the process right now of painting my bathroom cabinets. I followed your instructions to a T! Do you apply a coat of polyurethane after? If not why? I am just curious. I am going to do my kitchen cabinets after this. I will post pictures. Oh..and no polyeurthane on your kitchen cabinets either…right?
Kristie
That’s so great!!
I didn’t apply a coat of poly. But you absolutely could, I am sure that would only help the project to last even longer!
Excellent results! Just wondering – do you have to wash off the deglosser after you use it? Or just wipe and then start painting? Thanks!
Thank you!
No you don’t need to wipe it off, just paint over it!
I am currently doing a white-on-white kitchen. Your back splash. What color grout did your use?
Thanks!
Love your style!
I believe I chose the color Platinum
What luck discovering your work! Everything looks amazing. Thank you for sharing. Did your microwave vent outside? The new hood looks like it would need to do so. Cooking aromas are great when cooking; not so much when odors remain. But not every kitchen has hoods that vent out! Our microwave has a metal filter that is not very effective and does not vent out. 🙁 But love your redesign. Again, thank you for all the beautiful ideas!
I love your island! Can you share the dimensions? Wanting to build an island just like that! It’s perfect!
This was our previous home. I believe the island was about 85 inches long, and 38 wide