
A few years back, I created a diy kitchen island for our home. You can find that island design HERE. It saved us a ton of money! And we were able to design it to fit our needs. When we purchased our new home back in July, I knew I would be updating the kitchen right away, and planned to design and build an island again. This time, instead of seating on just one side, it would have seating surrounding one entire half, and would be much longer.
This is a project that truly anyone can do. Just have the proper tools and follow the steps. You will absolutely love the result. Let’s get started!
Tools needed for kitchen island build
-Chop Saw
-Table Saw (optional, can be completed without one)
-Finish nail gun
-Screw gun
-Impact drill
Steps to building the kitchen island
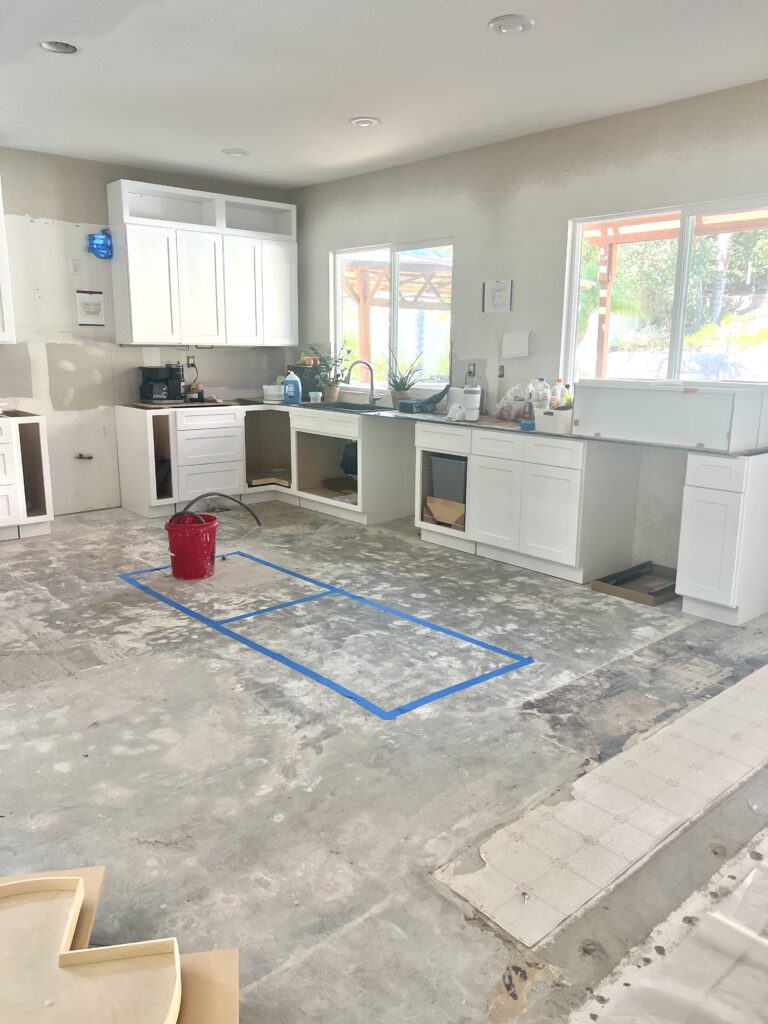
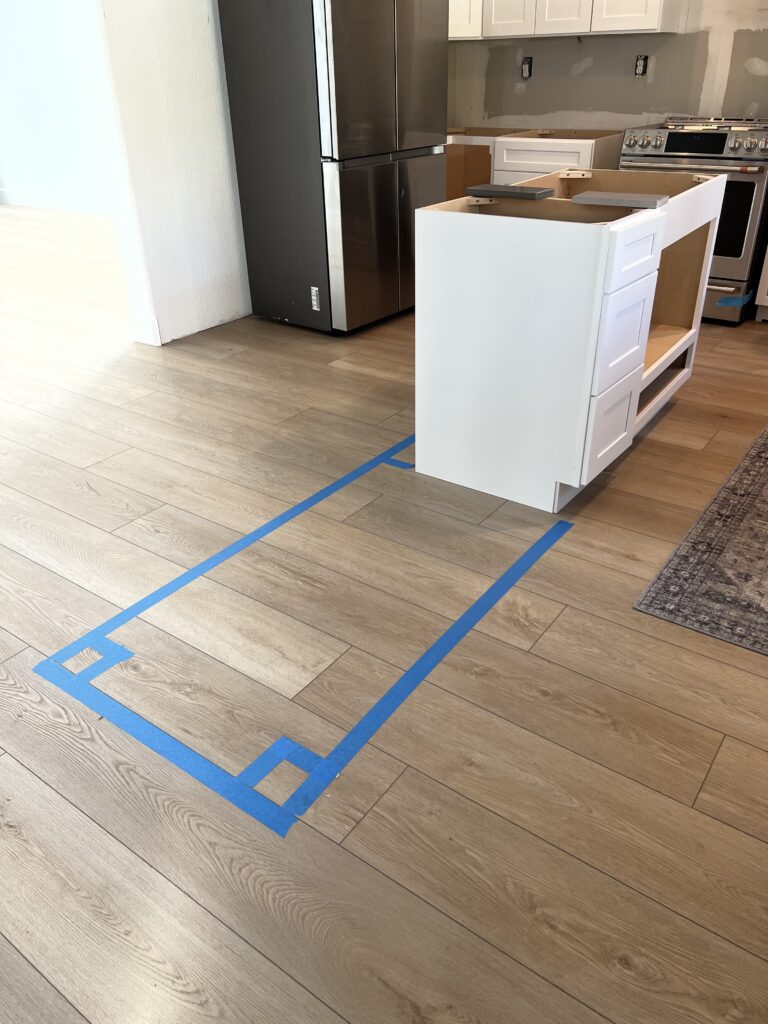
The first step to designing your kitchen island is to tape off the floor with painters tape. This will give you a good visual of the sizing that would work best. A general rule of thumb for the distance from the surrounding countertops to the island top, is approximately 36-42″ walk through space. In this kitchen, I have about 42 inches around the entire island. On the side where the oven is, I gave myself about 48″ of space. If you have the extra room, take it! I love that the area in front of our oven is spacious, allowing the family to all pass through that area if needed.
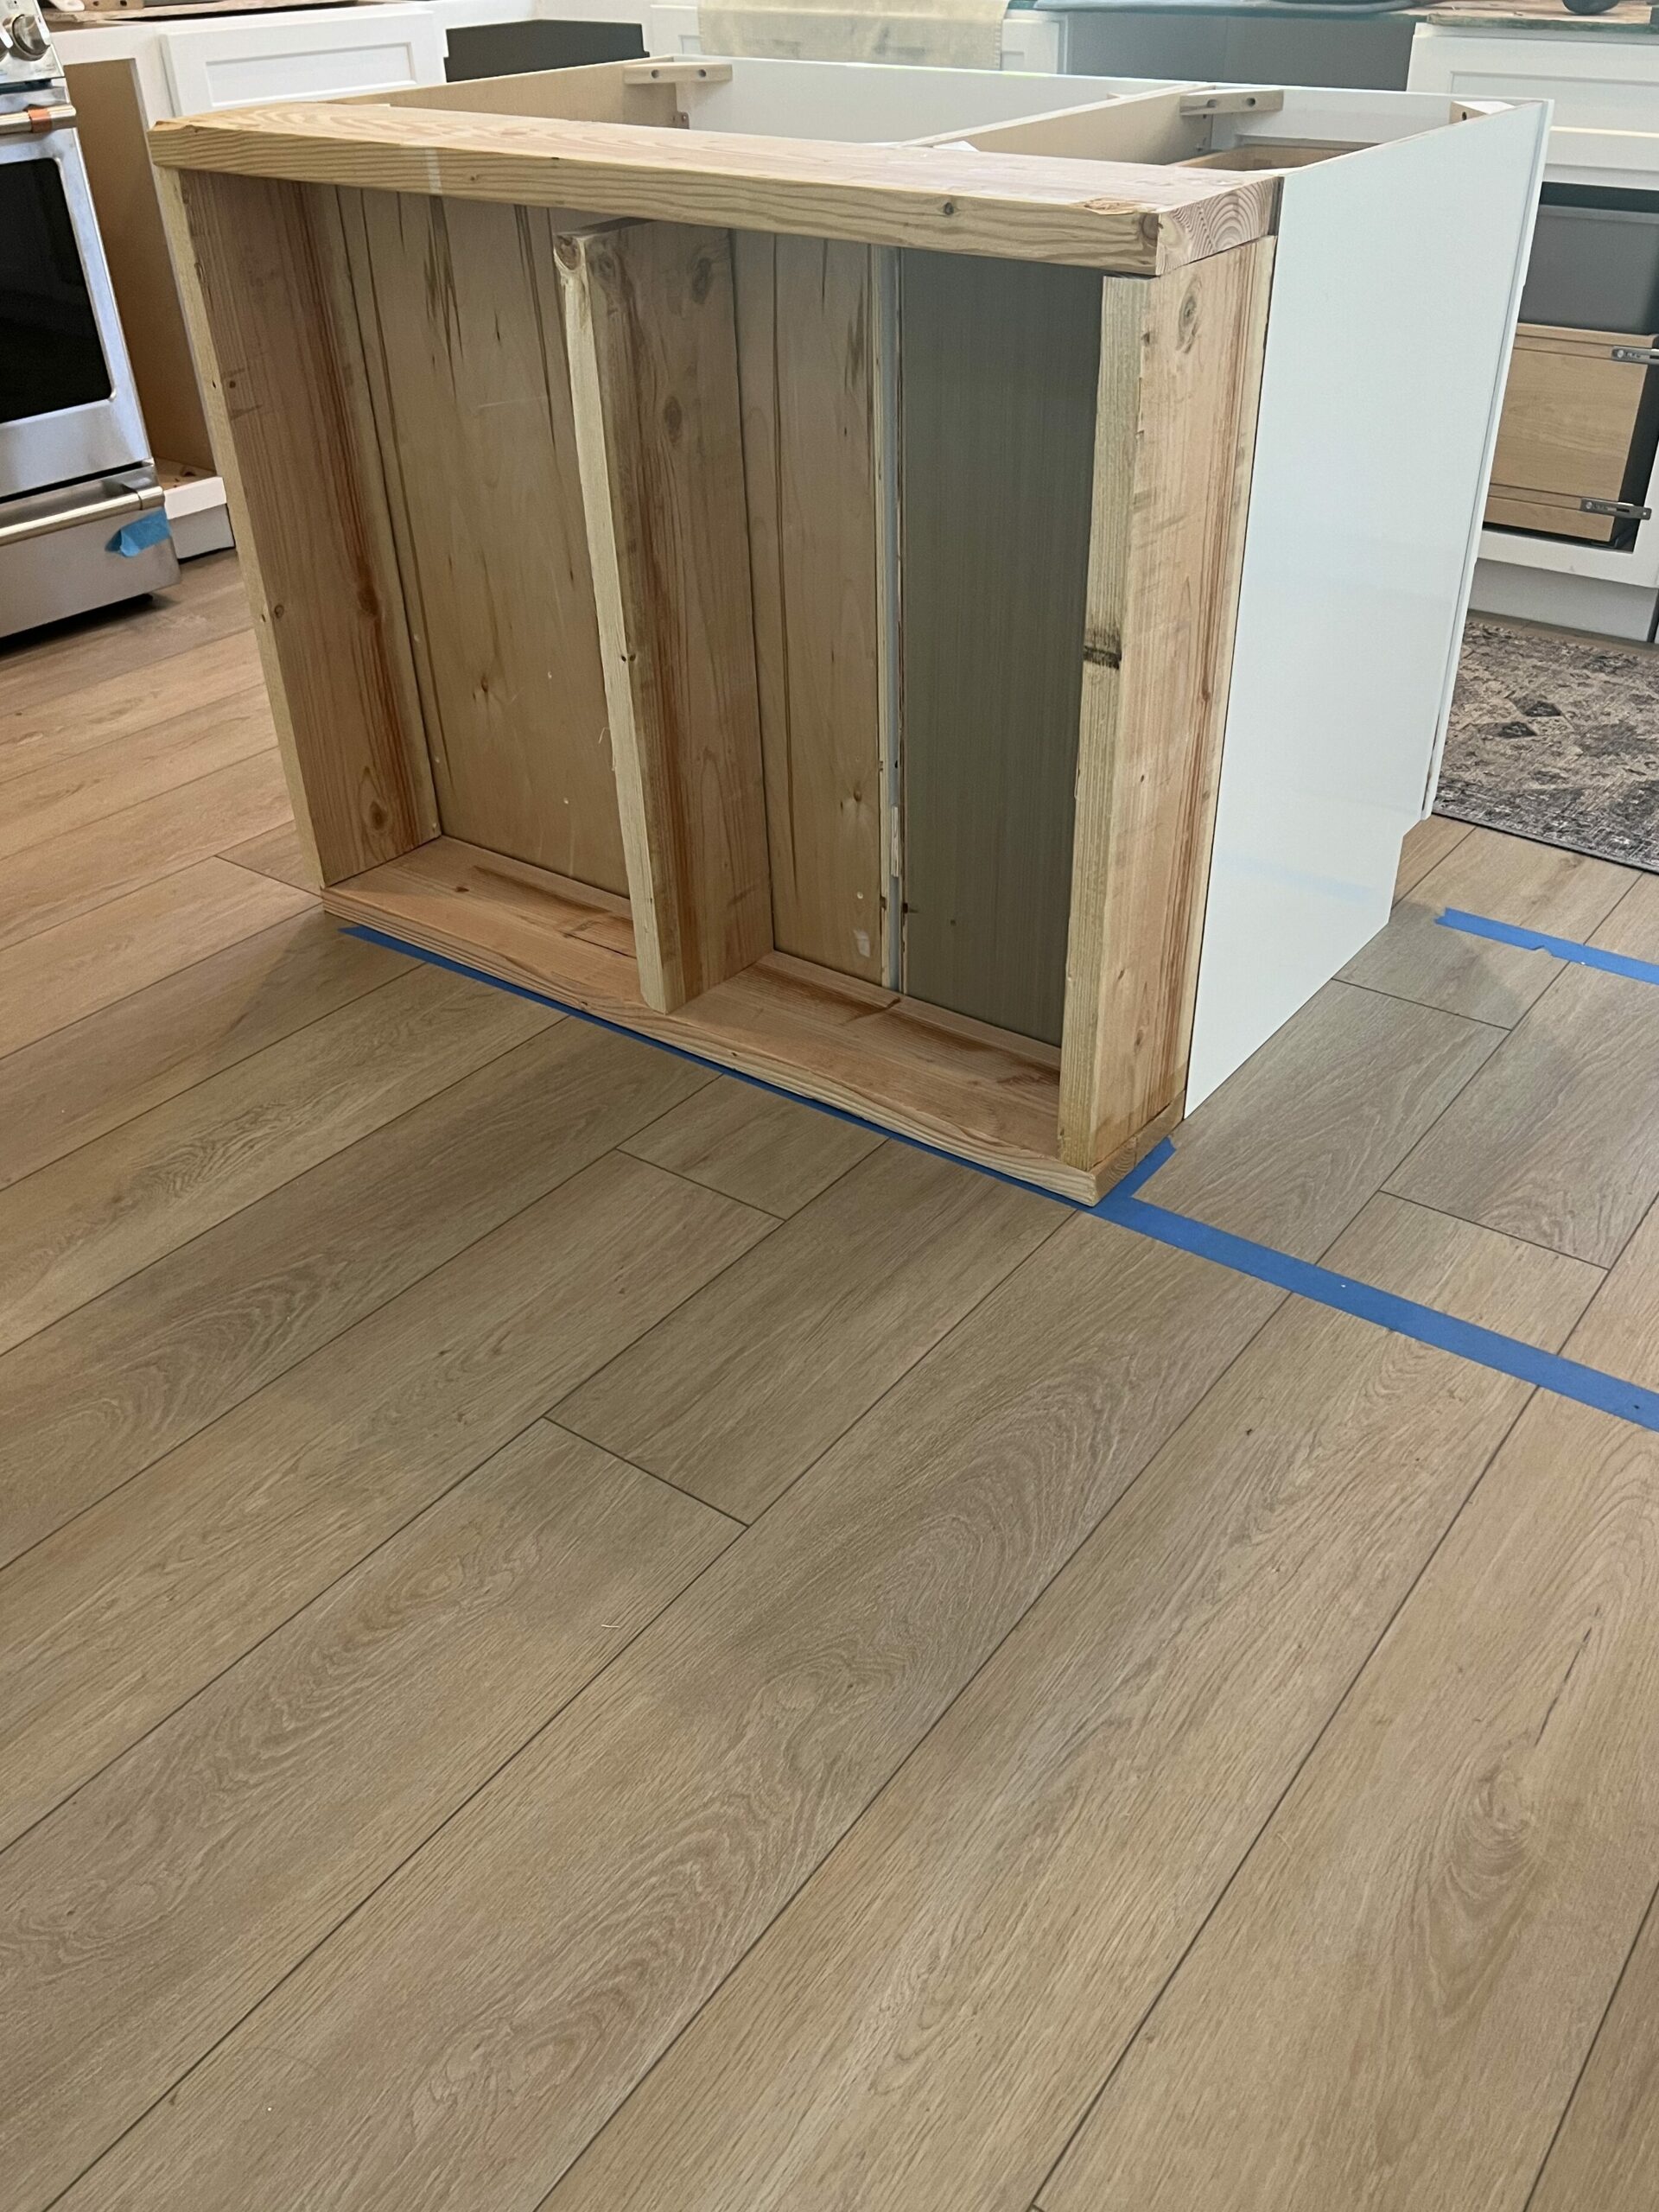
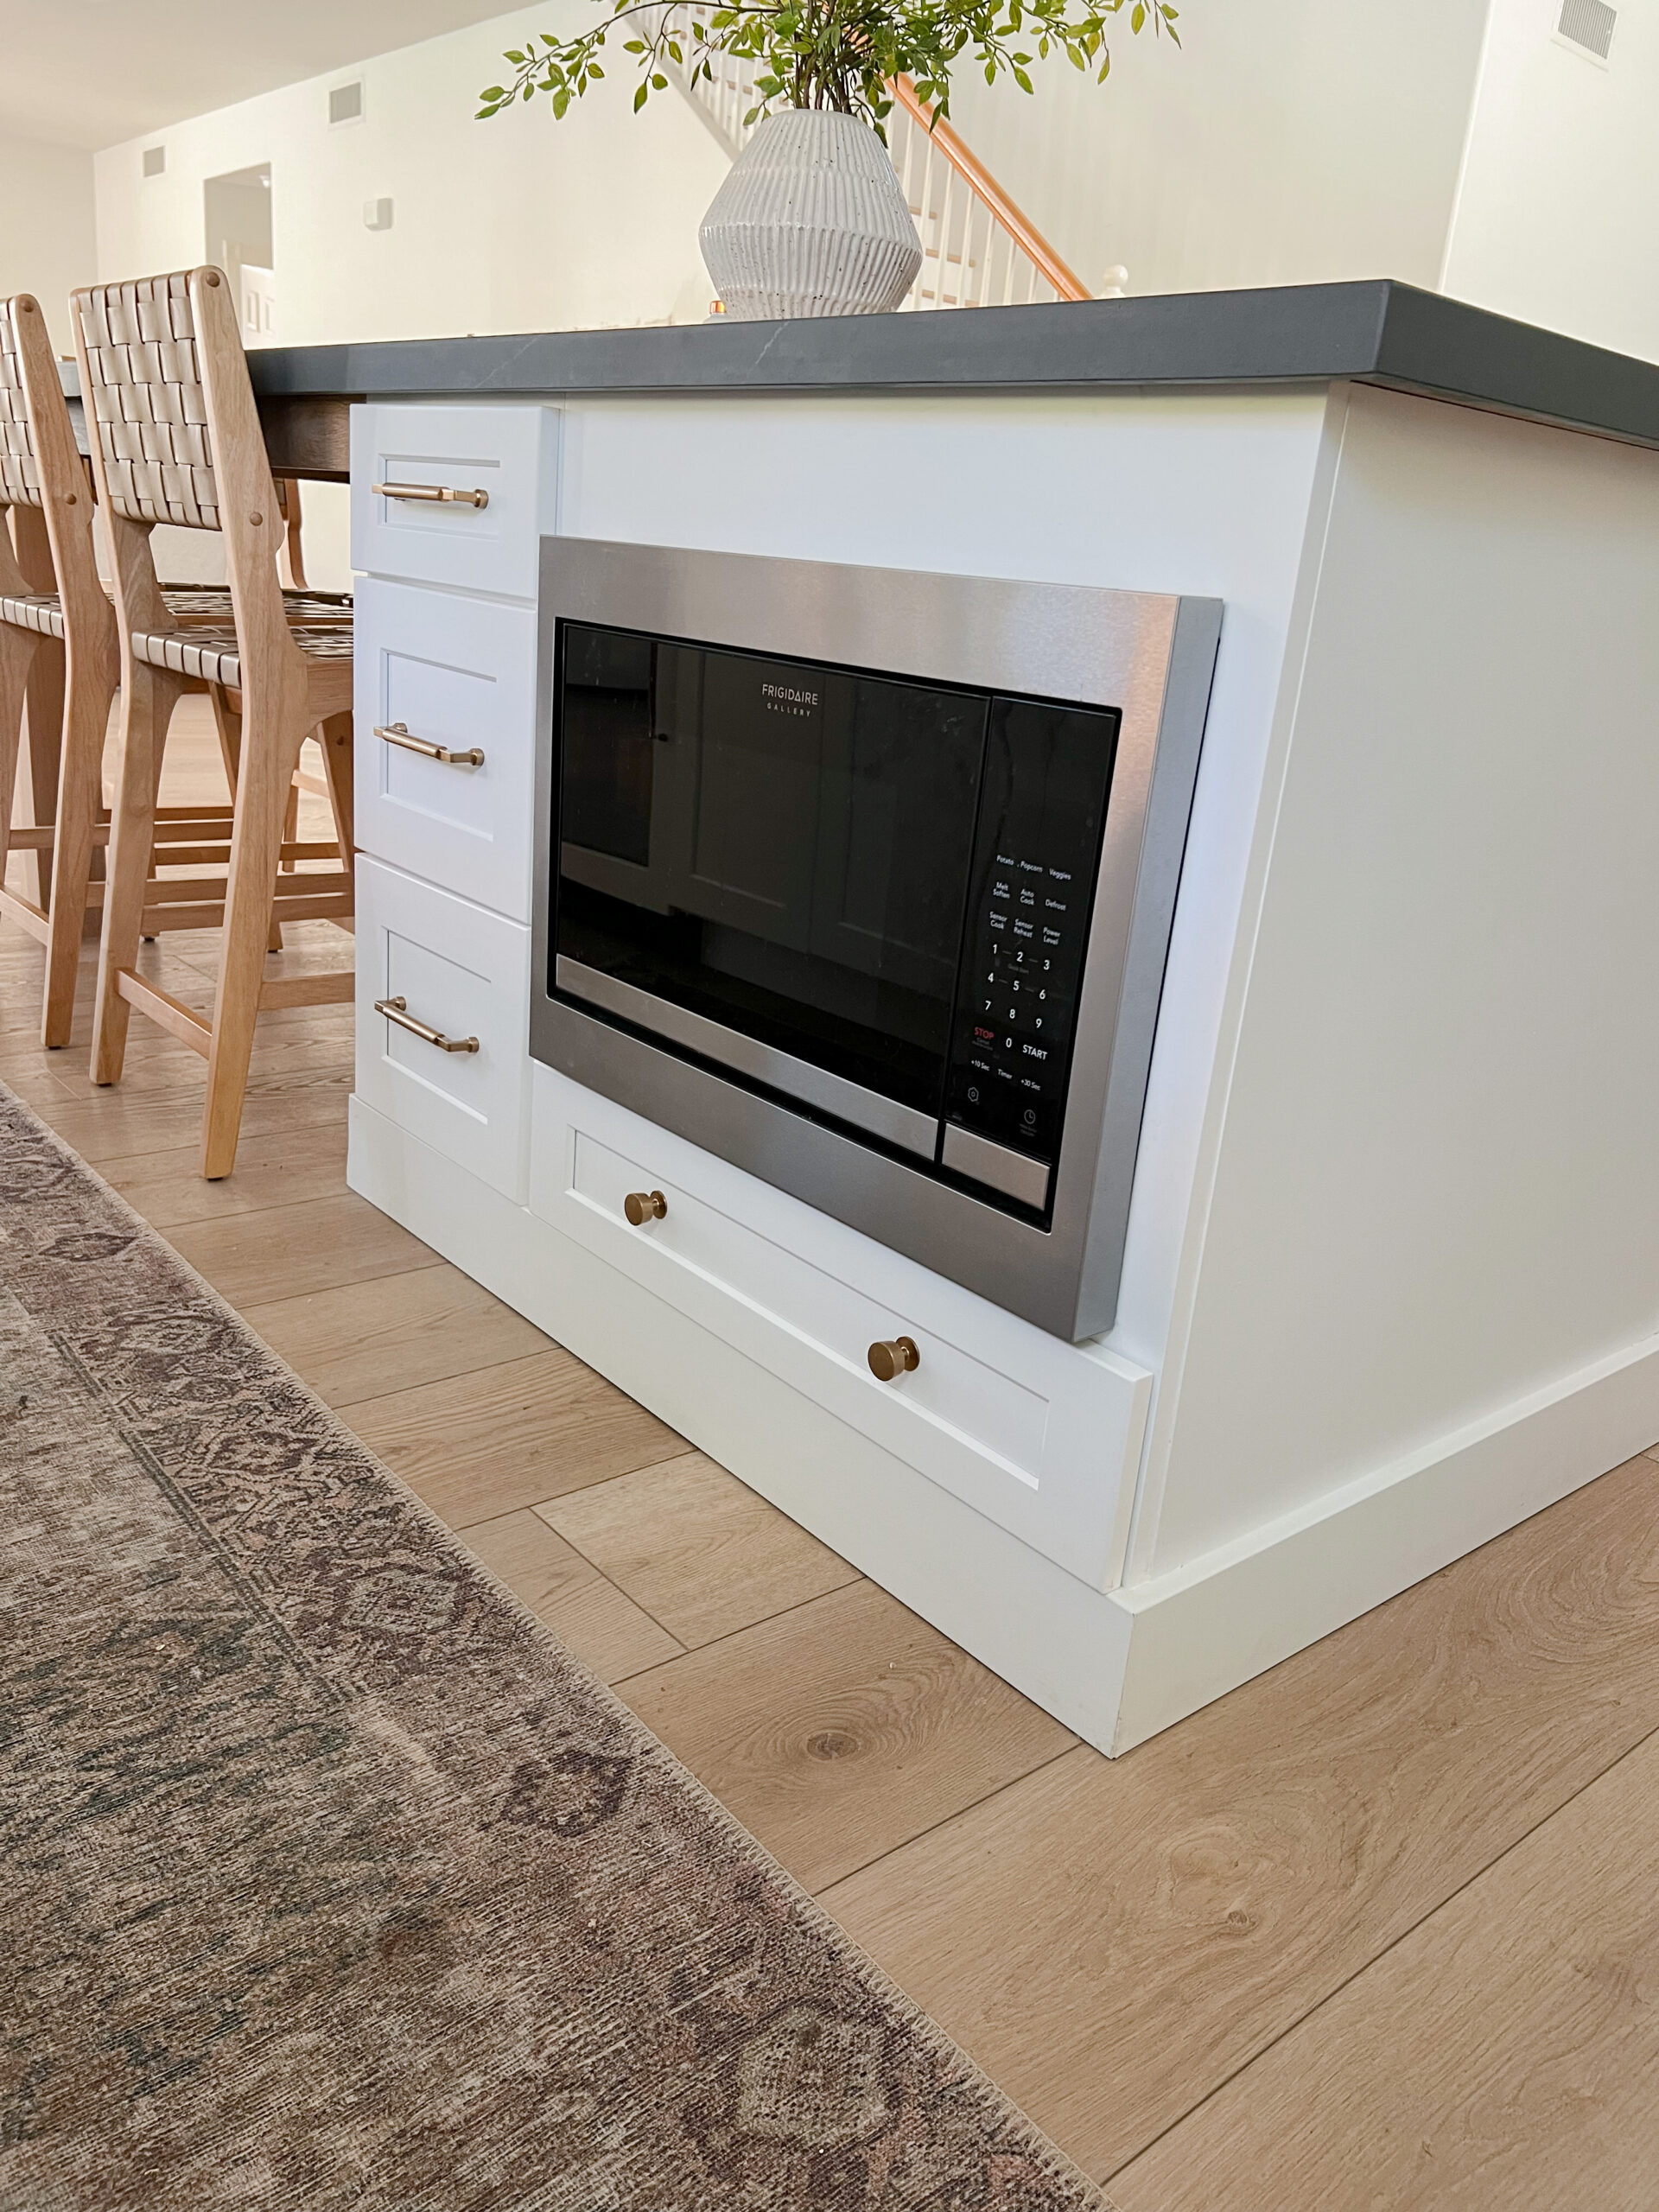
I ordered all of my kitchen cabinets from a place called RTA Store. The cabinets are delivered to your house in pallets and you have to put them together yourself. I chose to also order base cabinets from them to use for my island as well. This is something you cam also do for yours.
I ordered 2 base cabinets. (Here are two very similar options)- A 15 inch wide one with drawers, and a 30″ microwave base cabinet. So, my island base is 45 inches wide.
To attach your cabinets together, use a small piece of scrap wood and screw through the insides of the cabinets to connect. Do this at the top and bottom of both sides of the cabinets. They should naturally have about a 1/2 inch gap in the back, so that should be the size of your scrap wood.
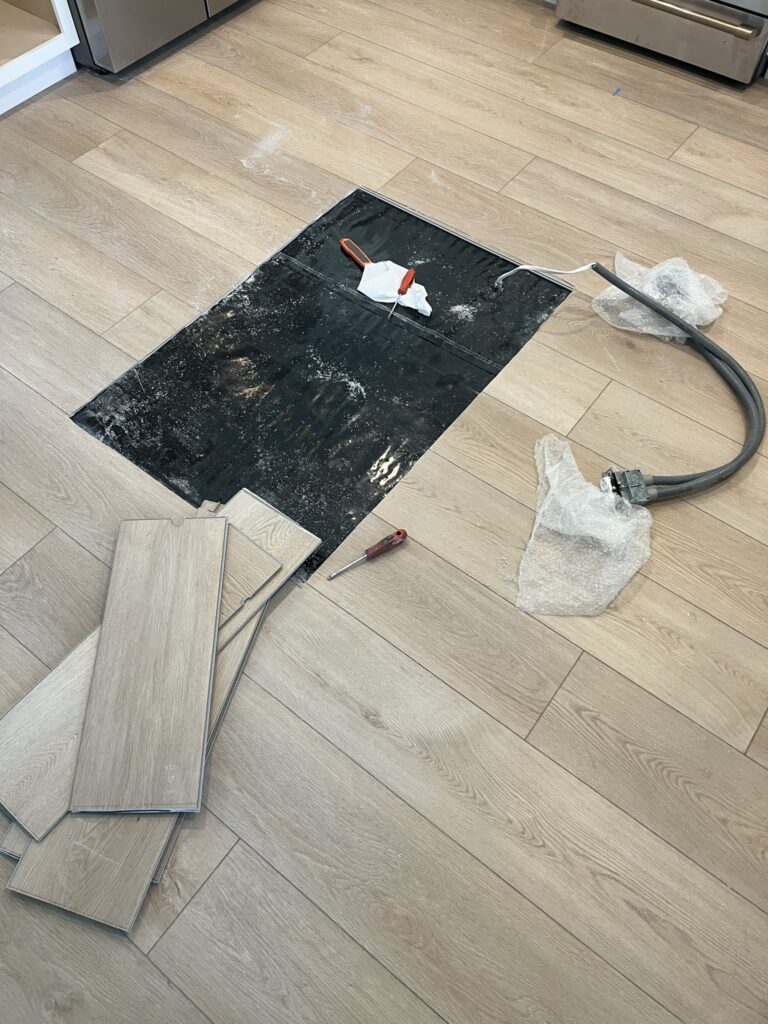
We cut the flooring out to allow the island to sit at the same height as the surrounding countertops. If you have LVP, it is fairly easy to cut with a skill saw that is adjusted to the depth of the cut you need to make, which was actually TERRIFYING because we just put these floors in!
Another reason we decided to cut out the flooring, is that you aren’t really supposed to have anything affixed to floating floors (like LVP). These types of floors are made to float as the temperature changes.
Side note– The kitchen island I built in our previous home WAS sitting on top of the floating floor, and we never had an issue with it. Although, I cannot speak to long term if there could possibly be an issue. I personally wouldn’t be worried about it- but the correct way is to cut around it.
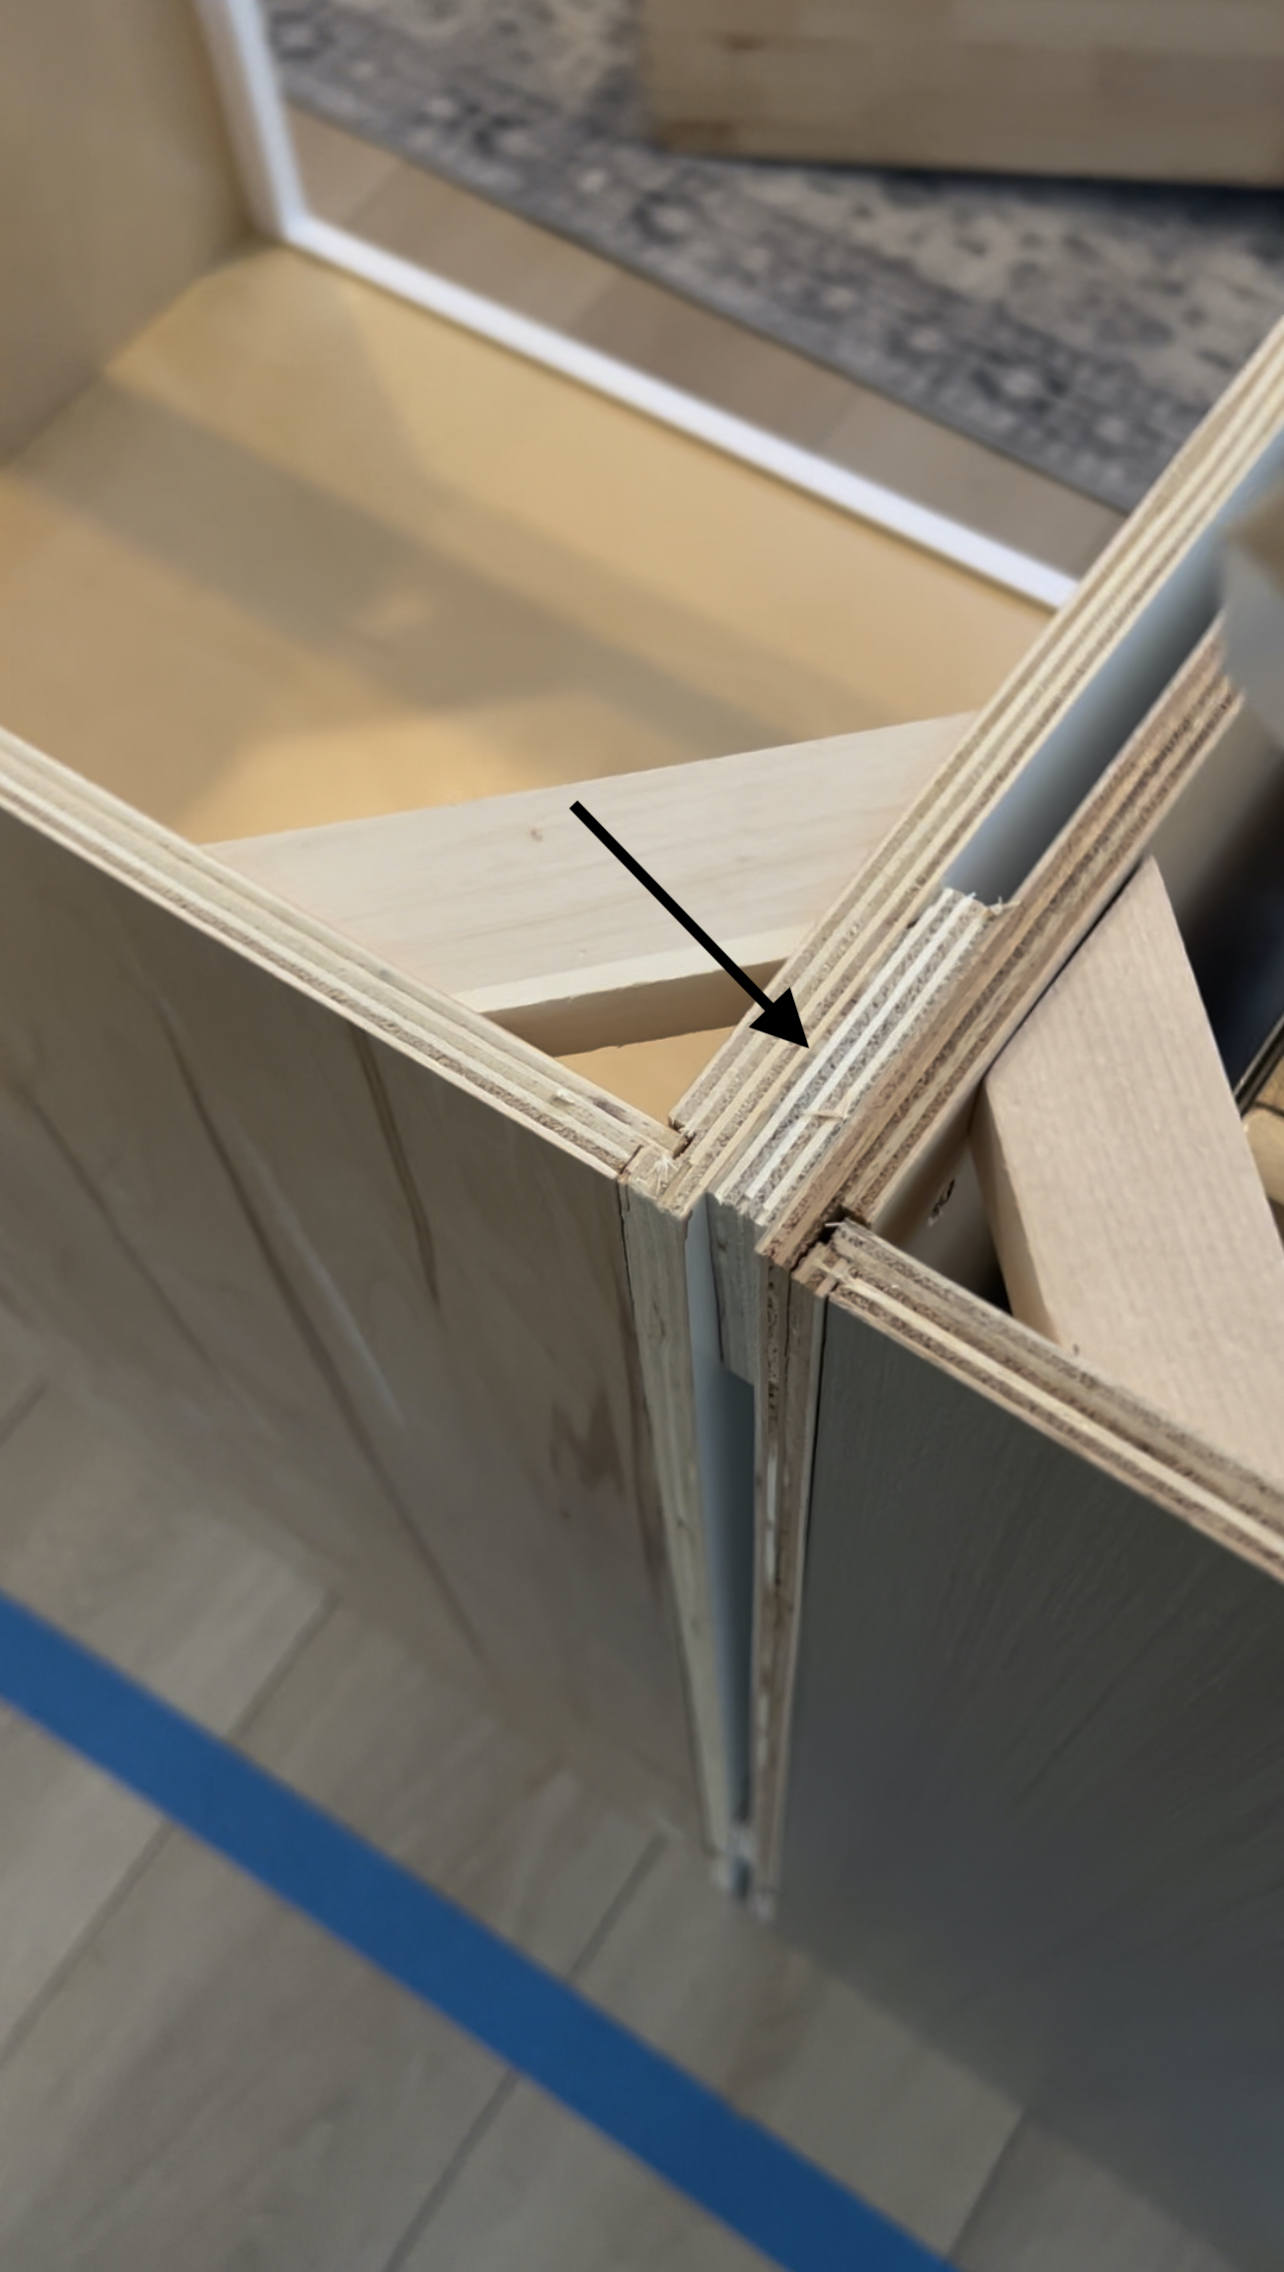
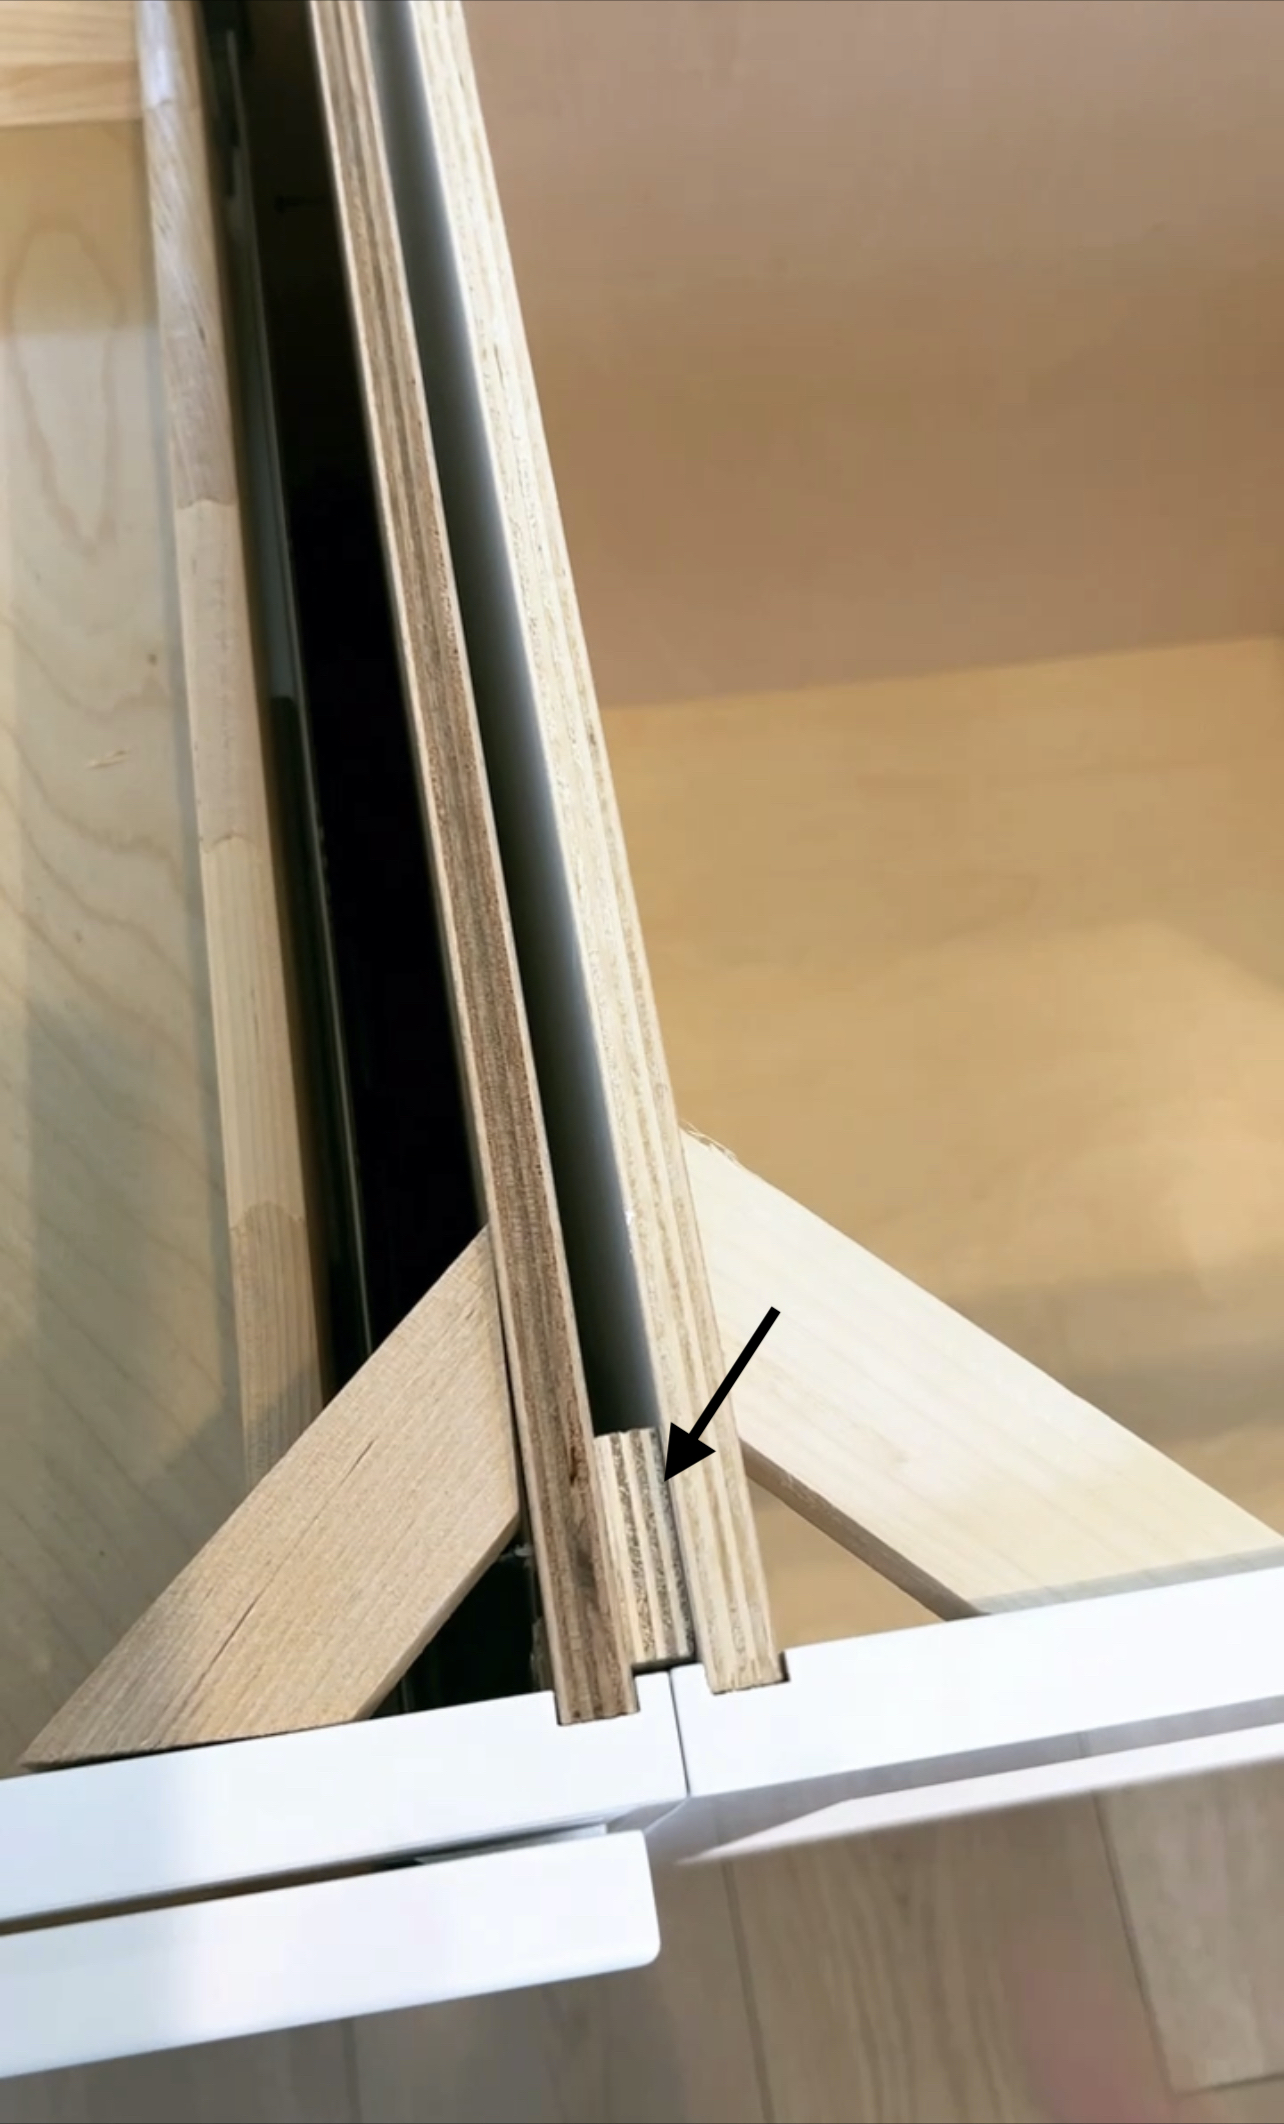
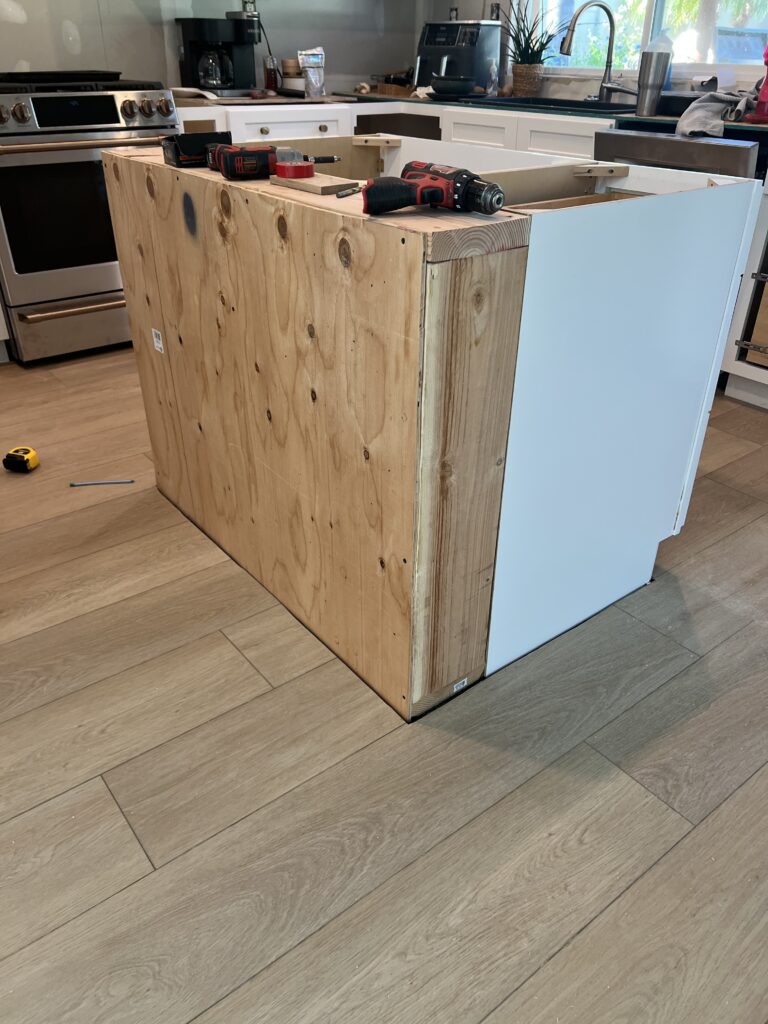
Once the cabinets are attached to one another, I added 2 x 8″ boards to the back side to create a frame. I wanted the entire island to be wider that the 24″ depth that base cabinets come in. This makes the island look more substantial and custom made. The center board shown was cut too short but I replaced it.
Essentially you will just create a box out of the boards, with a center support board. This will eventually be covered with plywood and the island backing. Screw all boards together and then screw the frame to the cabinets from the inside.
To secure the island to the floor, you will need to use concrete screws and an impact drill, and screw through the bottom board of the frame. The screws should be about 4 inches long. Two screws should be fine and will keep your island from shifting in any way.
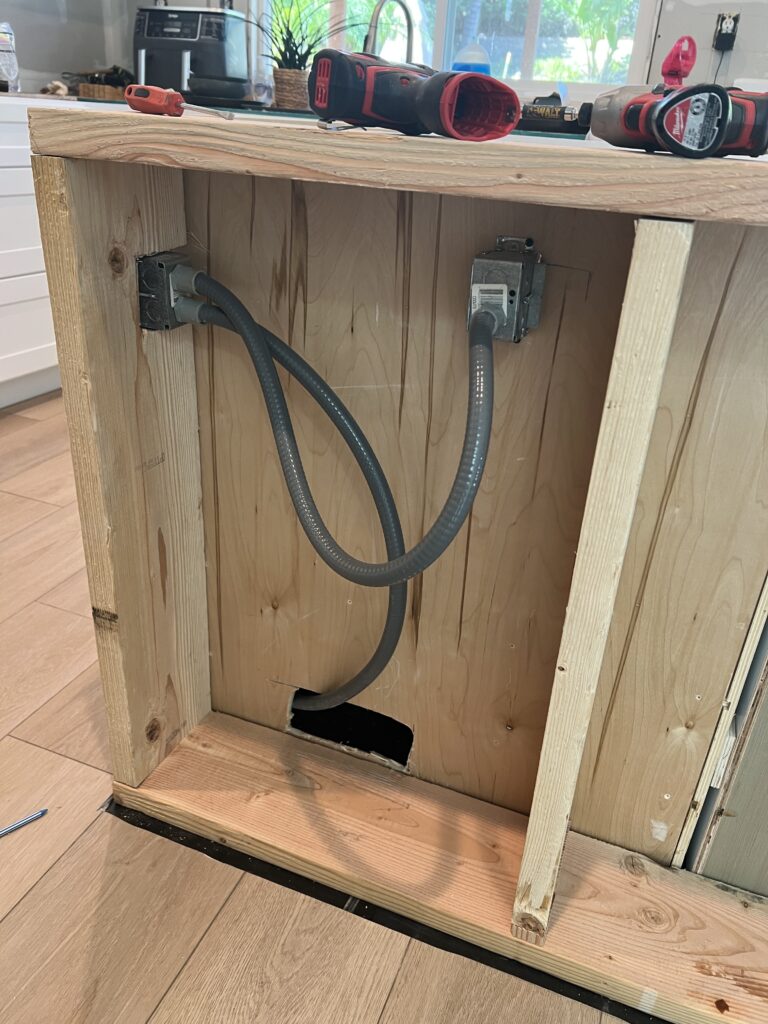
These outlets were already in place in the floor from the previous island, so I cut holes and fit them in. One inside for the microwave, and one on the outside for everyday use. (You will need to consult your electrician/ or handy electrical friend for how to tackle your own electrical situation)
Just ignore the massive mess.. my entire house was a mess for about 5 straight months. No real way around that with kids and a construction zone. Yikes. Anyway…
I attached a piece of 1/4″ plywood to the back opening. Then, covered all three sides with 1/4″ MDF panels. You will need to prime first and then paint these panels. I recommend this primer. Most primers are water based, and if they aren’t quality, thick primers, they can cause the MDF to slightly bubble. This primer is excellent for MDF. I would do all the painting before you install- so much easier.
As you can see, I didn’t get around to this step until after the countertops were installed.
Once the painted MDF is glued and nailed into place, I attached 1×5″ boards around all four bottom edges. Mitering the edges first with my chop saw at 45 degree angles.
TIP** For the corner edges on the sides of the island. I found these corner pieces of treated MDF in the trim section at Home Depot, and I had to try them out for the corners. They worked so well! I would call this a shortcut trick for sure! Not having to miter these corners saved a lot of time.
Here is a photo below- I just primed and painted to finish.
Caulk and touch up paint all over the island. Add any other detailing with trim that you chose. I haven’t added anything yet. Not sure I even will!
That is all you need to know to create your kitchen island. Just adjust cabinet sizes to fit your individual space. For the island overhang, I decided to order solid white oak leg posts, and apron trim pieces to add some warmth to it.
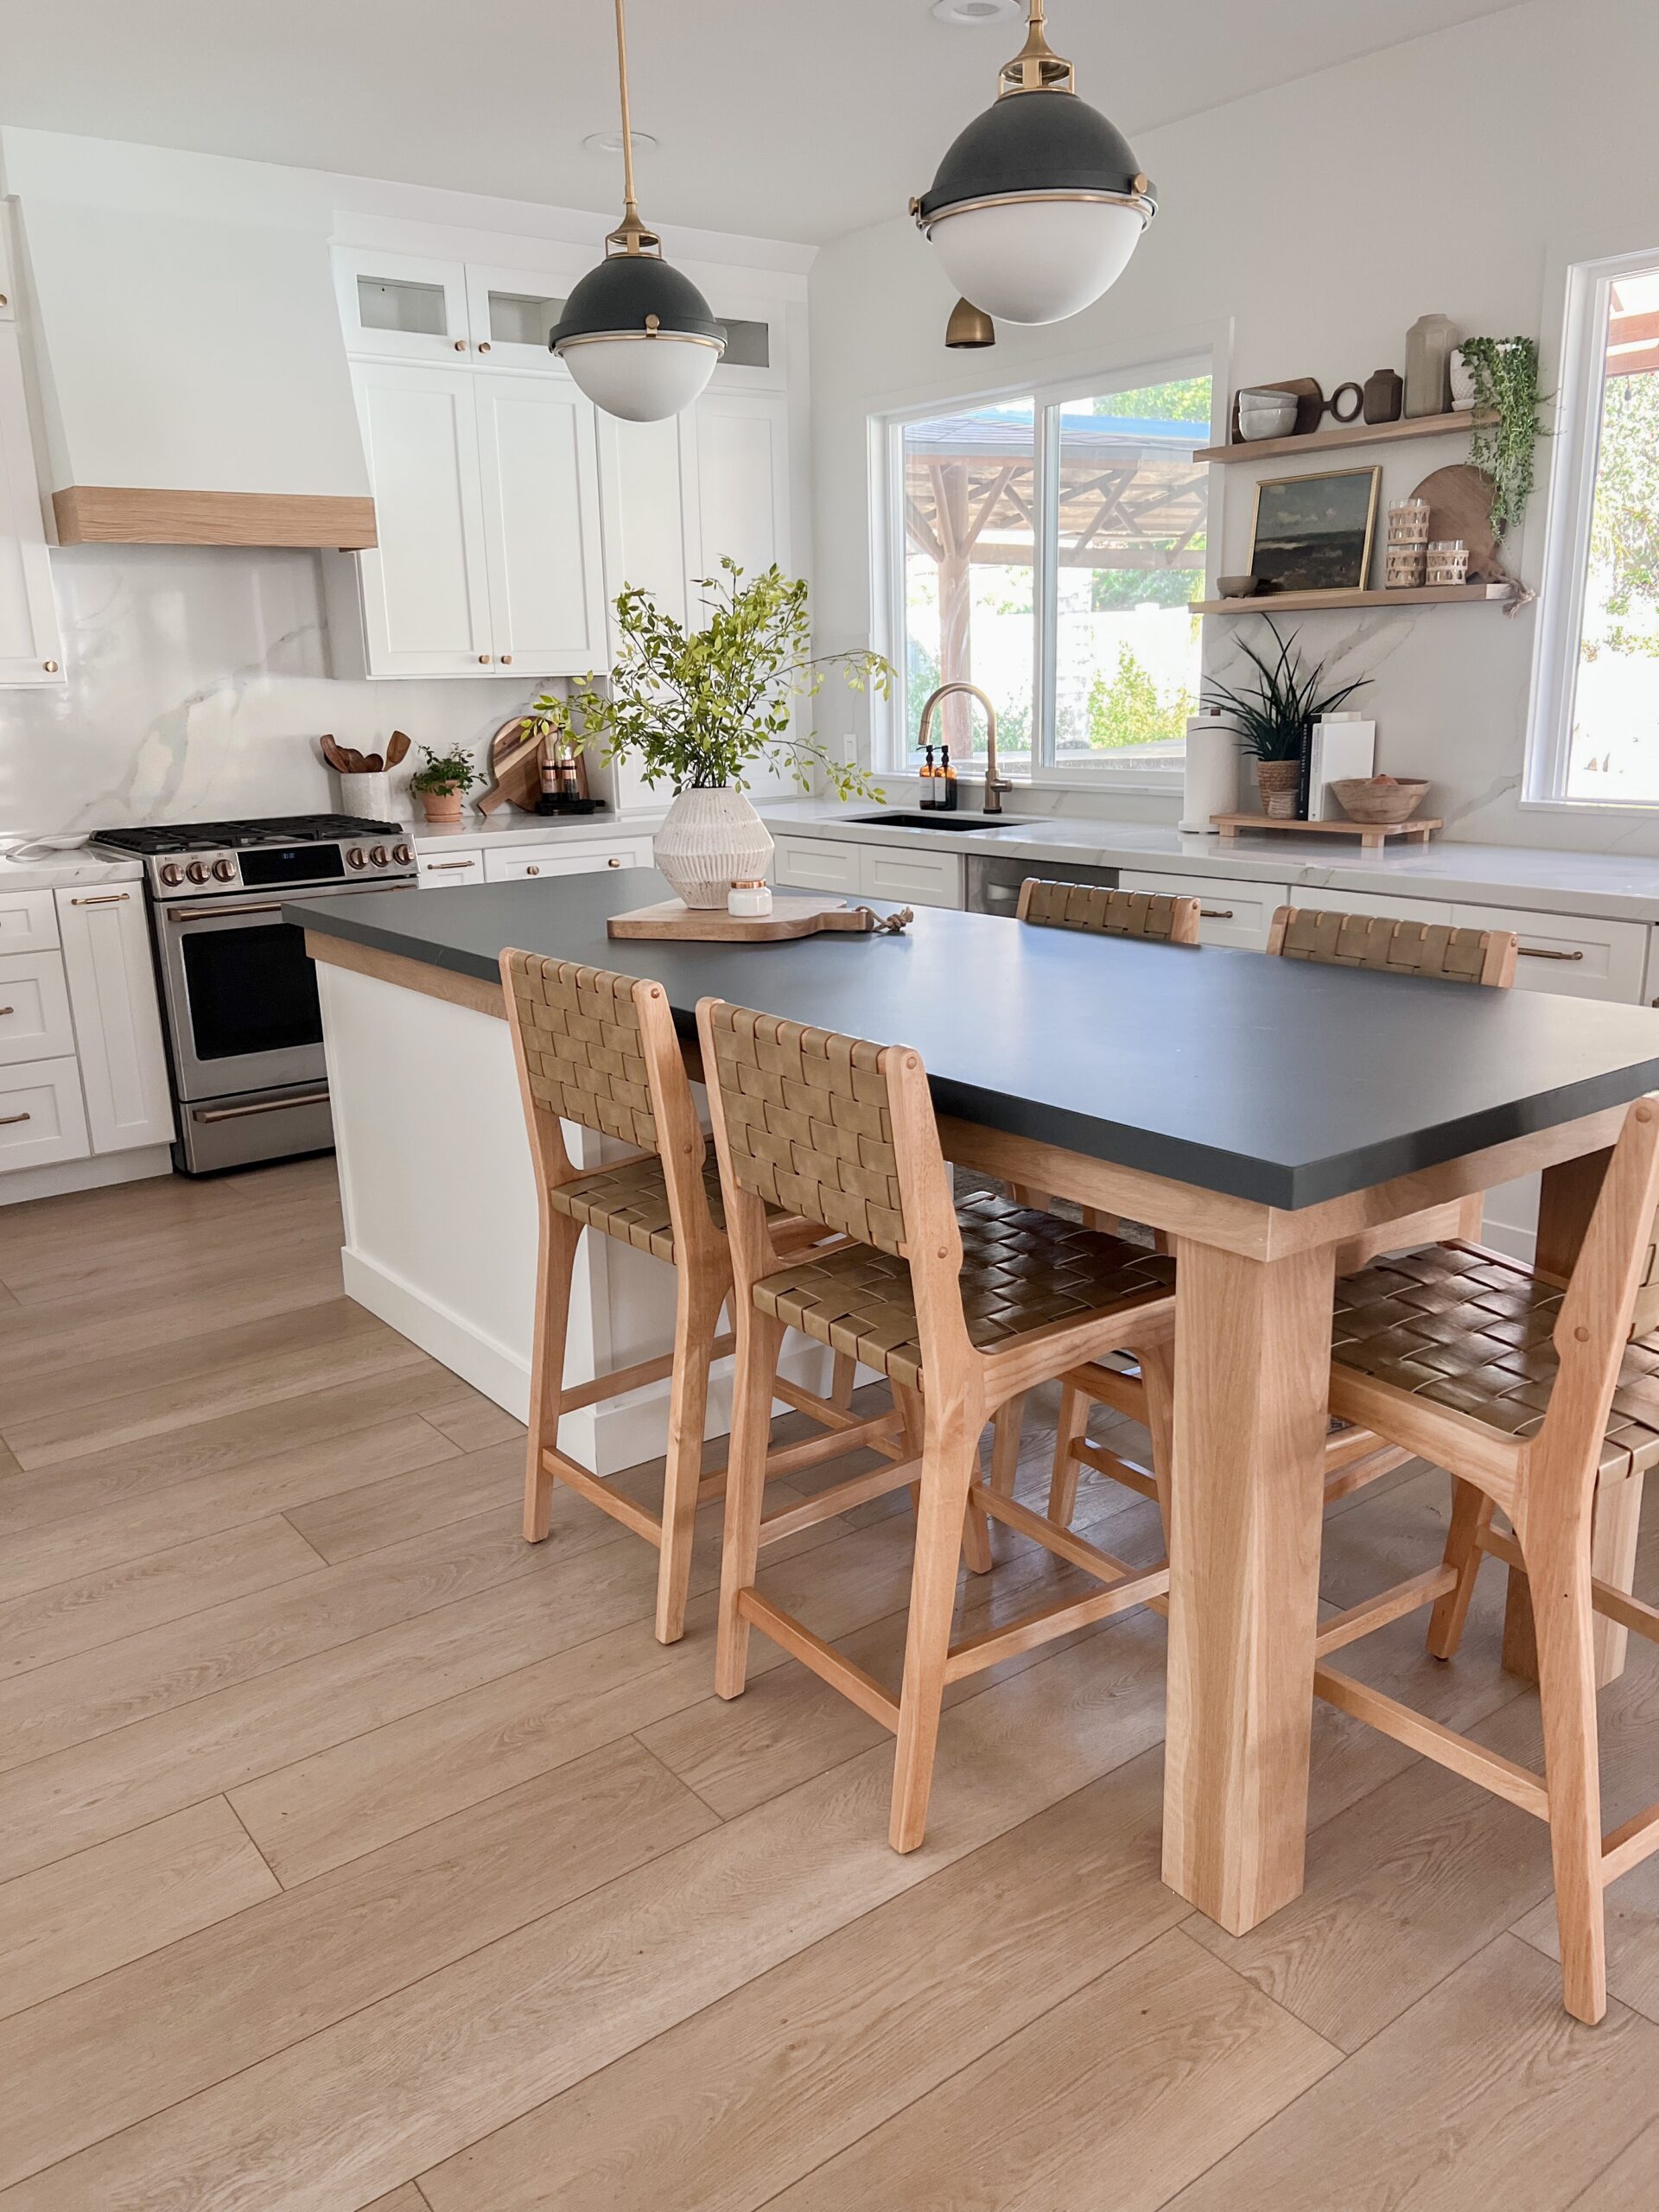
These are the Table Legs I ordered (obsessed).
And these are the Trim pieces I ordered.
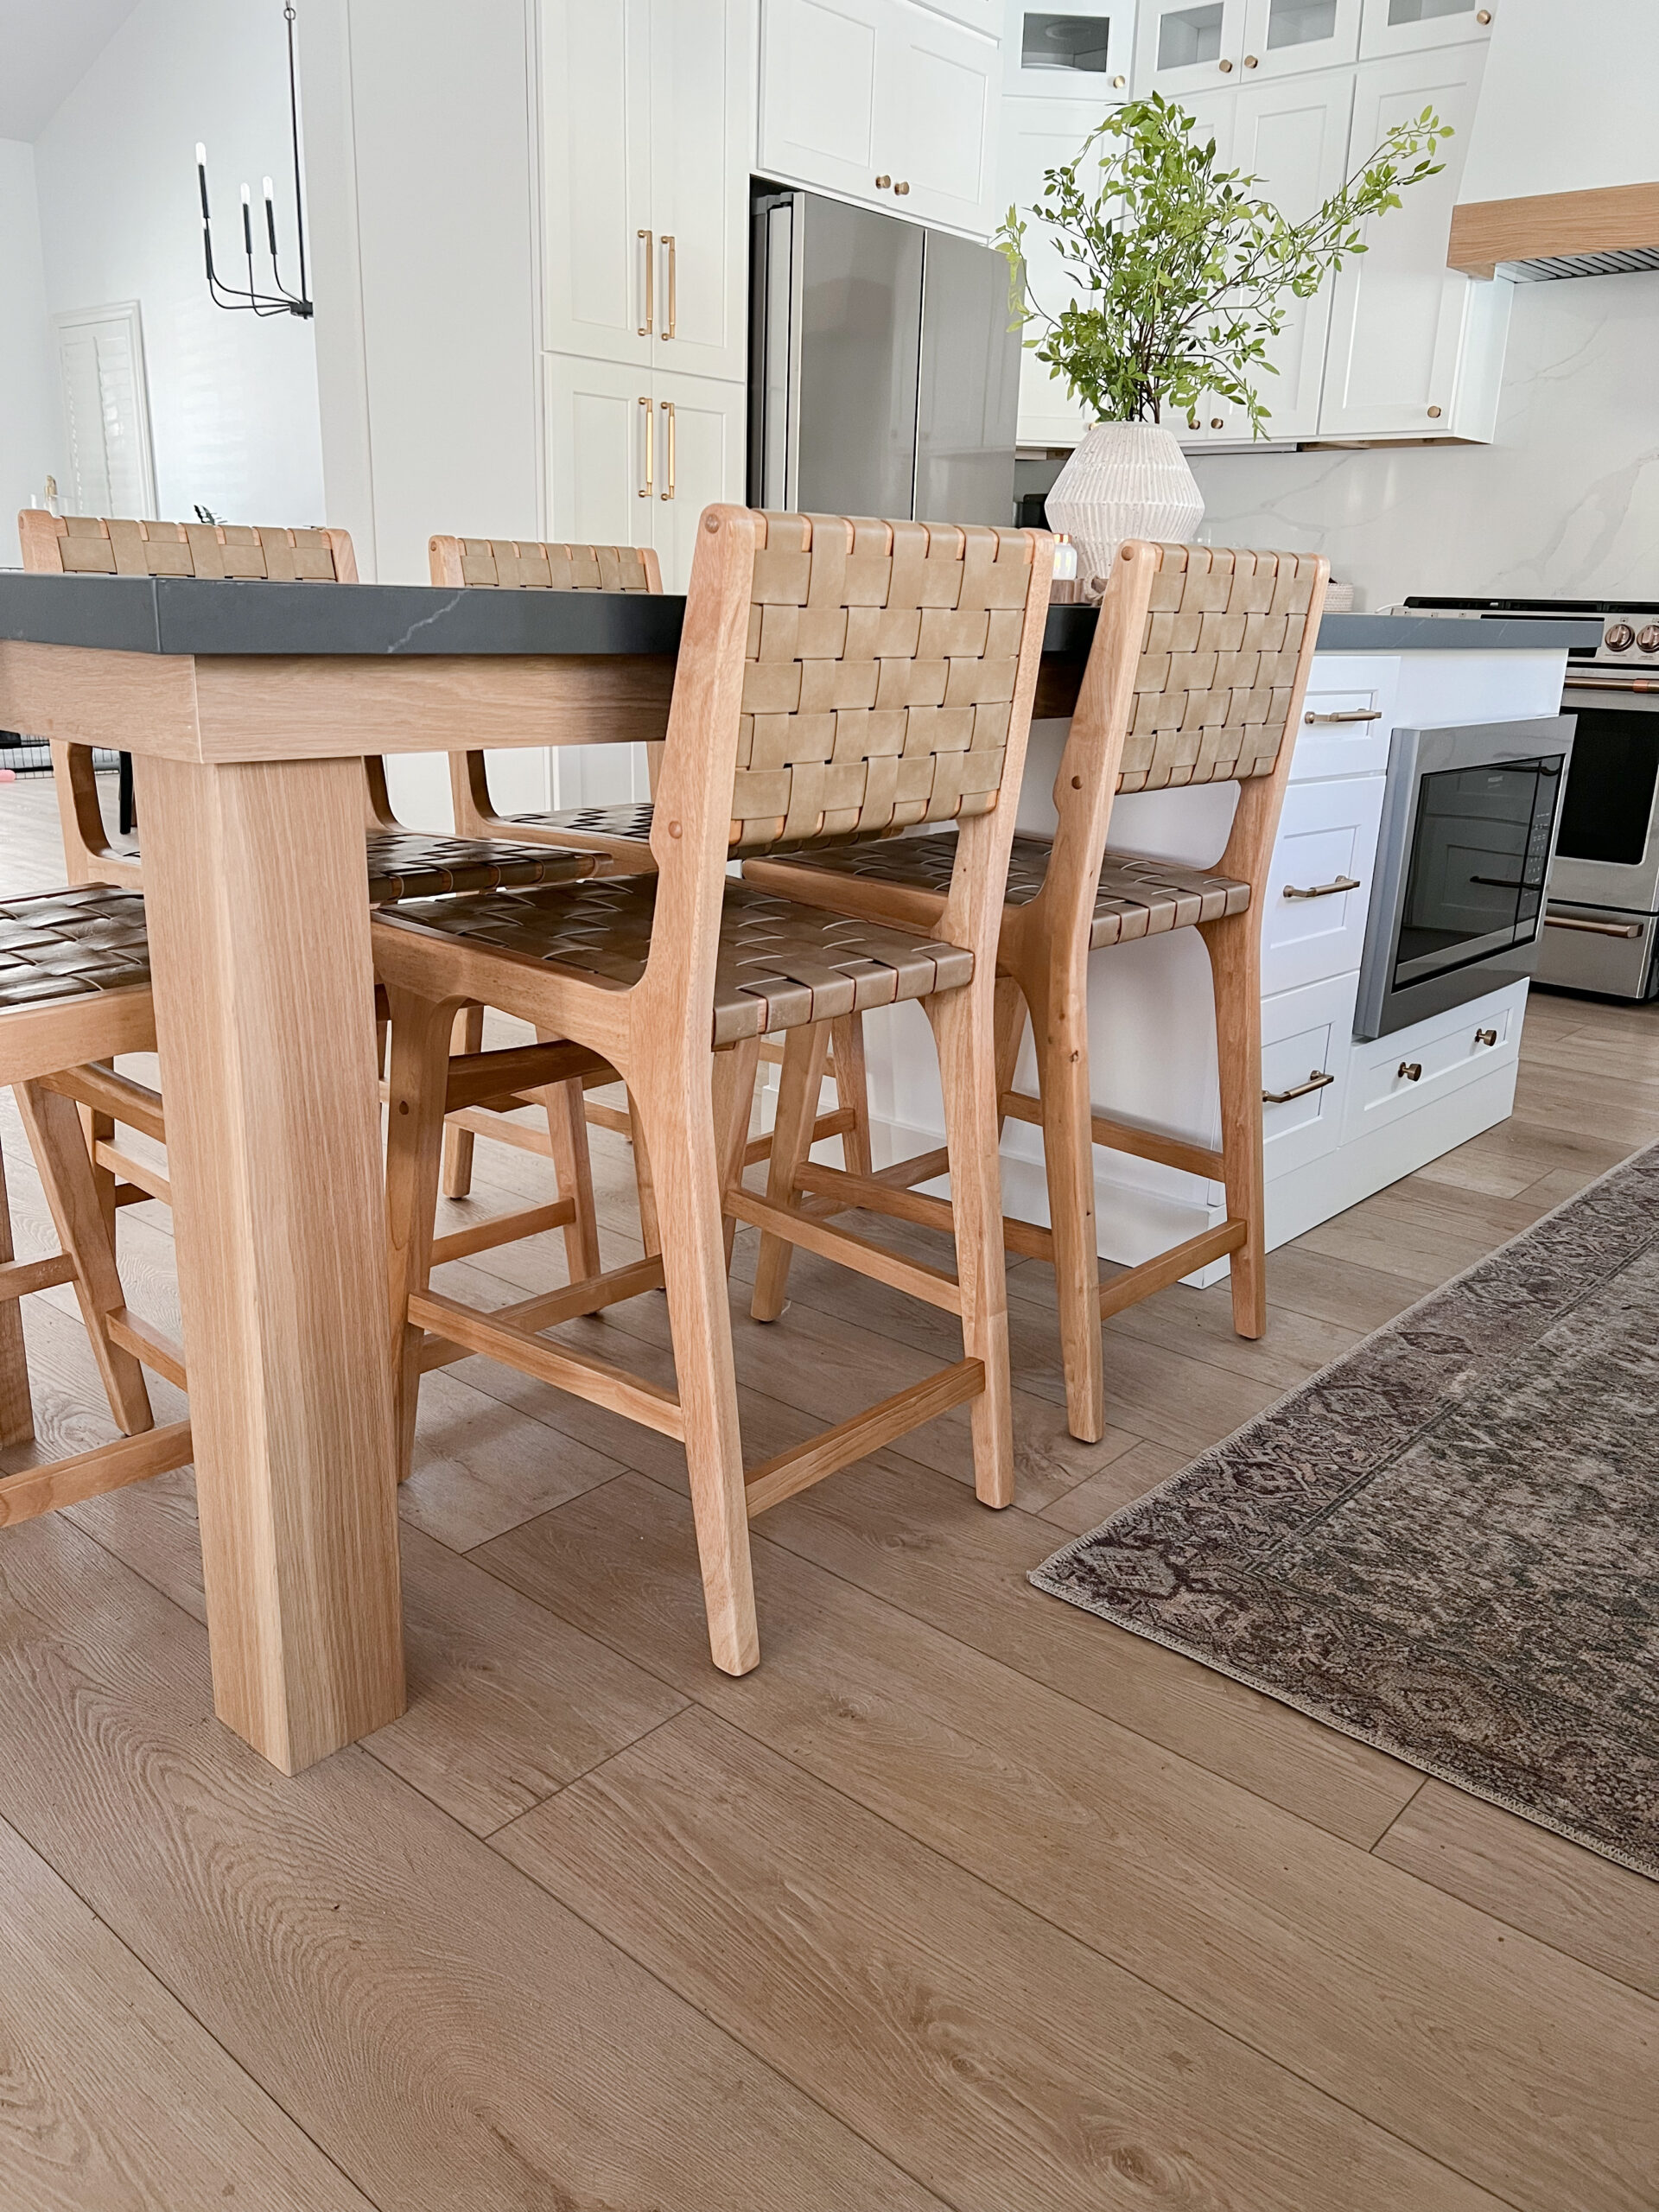
My favorite barstools here.
It can be a little daunting to take on a project like this, but in the end it is so worth the results. Can’t wait to see what you come up with!
XO,


How did you do the overhang? Is it just plywood running from the top of your island to the top of the legs with the trim pieces around the sides? I’m trying to do a table off the back of my island and I can’t figure out how to get from point A (the back of the island) to point B (the legs). I want to put a countertop on it so I’m not worried about what it looks like. I just want to make sure it’s sturdy. And I really like the “table apron” pieces you shared!
Yes, under the quartz is a long piece of plywood. It’s just under 3/4″ thick. After doing research, I found that this is absolutely strong enough
Both this island and the other one you previously built are awesome! I am going to incorporate elements of both into the island I’m going to build. I’ve already bought the cabinets and just trying to figure out the overhang piece for seating and the support. So for this island, you have a piece of plywood underneath the entire countertop, including on top of the cabinets, then extending out to the legs? How are the legs attached to the plywood? And the plywood to the top of the cabinets? Finally, how to you hide the plywood from showing between the counter and the cabinet? From your pictures I can’t see it under the counter at all where it’s on top of the cabinet. Thanks in advance! 🙂
So sorry I missed your comment! Do you still need these questions answered?
Yes, can you please answer her questions? Specifically, does the 5/8″ sheet of plywood extend from the two legs all the way over the top of your cabinet? Thanks
Yes it covers underneath all the way from end to end on the island.
How can you not see the plywood that’s over the cabinets?
hello- can you please provide info on the black top?
How large is the island over hang? And Length of entire island? We are doing almost the exact same set up and i’d love to get 5 chairs around like yours.
Thank you!!
Total length is 105″ with a 45″ cabinet as the island
Hey! Awesome design! Just finish my attempt at recreating. Where did you get the chairs!?
That’s great! These are the barstools https://rstyle.me/+05be3xTE7Ne6sLizXmf1vg
What size table legs did you use?
They are 5″ square
How many inches did you use for the apron and how much space was left in between the seat and bottom of apron?
Do you mind sharing the dimensions of the seating area? I’d like to do something similar!
The total size of the island is 105″ x 34″
Hi Kelly, its all beautiful, as always! I love the your flooring and dark quartz choice as well. Can you share the brand/name of flooring and quartz color as well?
Thanks,
Sandra
Hi! Is it absolutely necessary to cut into the flooring?
In our previous home, I did not cut the floor and we didn’t have any issues. I think many people just place the island right on top. The correct way to do it is to cut the floor, and allow the floating floor to shift as needed around the island.
Hey! We love this design! What was the total length of this design to fit all 5 chairs?
Thank you! The length of the island is around 105″ total
How did you fix the legs to the floor? I noticed you didn’t use the mounting blocks. Thanks!
I drilled a hole in the floor and I actually put the leg upside down- putting the metal piece at the end of the leg down into the floor to secure it. Hope that makes sense!
Wow , that was a good idea
Hi, what size and wood did you use for your accent on the trim and legs?
The trim/apron is 3″ wide and the legs are 5″ wide. Both are white oak. I purchased both from tablelegs.com
Hi there! What is the space between your island and wall / base cabinets in the rest of the kitchen?
I believe I have around 42″ on the sides, and more like 48″ to the front where the oven is.
This not really nice and I appreciate you going through the exercise as I’m making my own plans. I have an existing 2 x 3 island that I want to extend out to a 9‘ x 3‘ island. My plan is to really just extend the existing island out and use vertical support much like what you did. I was thinking about using iron toppers on top of the post but this seems like a better idea. Did you build any additional infrastructure on the interior? Cross supports? I’d love to see a picture of underneath. Thanks. Will
Hi! I asked the countertop installers and they let me know that additional support other than the 5/8 plywood underneath. Underneath the quartz is just the full length piece of plywood attached to the cabinet and the legs at the end.
so once you attached the apron pieces and legs you put a sheet of 5/8 plywood over the entire thing from the cabinets to the new legs then counters on top of that?
Hi! I love everything about this. I am hoping to send this to my contractor so he can follow step by step.
Can you tell me the dimensions of just the over hang/seating portion? I have to build my island a little smaller than yours, but I need all 5 seats. Im just curious how wide it needs to be to put two bar stools next to each other comfortably. Thank you in advance!
how did you attach the aprons to the table legs?
They aren’t actually attached to the legs, they are attached underneath the plywood. We drilled screws down through the plywood into the table legs as well as the aprons
You’ve had this installed for a little over a year now…
How do you feel about having the microwave so low to the ground? Any drawbacks or changes you would make next time?
Thank you!
The microwave doesn’t bother me. I would rather have it out of the way, even though it is low. The only change I would make is adding a larger pantry!
What are the dimensions of the countertop? It’s just a lovely design!
I believe it’s around 33 x 104
Awesome idea! Going to build one for my wife. I had the same question other commenters had about the area between the cab with and the countertop. How did you hide the plywood from showing between the counter and the cabinet?
When the countertop company installs the quartz, they automatically add a lip around the edge which covers the plywood. You are usually able to choose your thickness
Love this! I was just curious about the table legs. Are they on flooring or was flooring cut as it was for cabinet placement? I am curious if I do this but plan to replace flooring at a later date. Thank you !!
They are on top of the flooring
Do you have the table legs sitting on the finished floor or the subfloor?
They are on top of the finished floor, but I made a hole in the flooring to put the metal piece into the floor that is attached to the bottom of the leg
Can I ask what floors you have here?