• Home
  • DIY Projects
    • Home Office
      • Home Office Desk for 2
    • bathroom projects
      • Kid’s Bathroom Makeover
      • Guest Bathroom Makeover
      • Update: How to Refinish Bathroom Vanity
      • Stencil Bathroom Floor
      • Refinish Bathroom Counterops
    • Living Spaces
      • Easy Window Trim
      • Board & Batten Wall Family Room
      • Board & Batten Wall Living Room
      • Sliding Barn Door
      • Hanging Succulent Wall Garden
      • Hairpin Tables
      • How to Shorten Bamboo Shades
    • Kid’s Bedrooms
      • Platform Twin Bed Frame
      • Kid’s Bed Headboard
    • playroom
      • Magnetic Chalkboard
      • Hanging Basket light With Macrame Cord
    • Kitchen Projects
      • Kitchen Island
      • Refinish Your Kitchen Cabinets
  • Home
    • Holiday Decor Centerpiece
    • Best Gray Paint Colors
    • Top 5 Stencils for your home
    • Playroom Makeover
    • 10 Neutral Floor Poufs
    • Family Room Decor
  • Contact Kelly

Domestic Blonde

DIY - LIFESTYLE - MOTHERHOOD

  • Home
  • DIY Projects
    • Home Office
      • Home Office Desk for 2
    • bathroom projects
      • Kid’s Bathroom Makeover
      • Guest Bathroom Makeover
      • Update: How to Refinish Bathroom Vanity
      • Stencil Bathroom Floor
      • Refinish Bathroom Counterops
    • Living Spaces
      • Easy Window Trim
      • Board & Batten Wall Family Room
      • Board & Batten Wall Living Room
      • Sliding Barn Door
      • Hanging Succulent Wall Garden
      • Hairpin Tables
      • How to Shorten Bamboo Shades
    • Kid’s Bedrooms
      • Platform Twin Bed Frame
      • Kid’s Bed Headboard
    • playroom
      • Magnetic Chalkboard
      • Hanging Basket light With Macrame Cord
    • Kitchen Projects
      • Kitchen Island
      • Refinish Your Kitchen Cabinets
  • Home
    • Holiday Decor Centerpiece
    • Best Gray Paint Colors
    • Top 5 Stencils for your home
    • Playroom Makeover
    • 10 Neutral Floor Poufs
    • Family Room Decor
  • Contact Kelly
DIY Magnetic Chalkboard

DIY Magnetic Chalkboard

This website may use affiliate links. When you purchase products from an affliliate link, I make a small commission.

Happy Holiday Season to ya’ll! I gotta say, it’s been so fun prepping for the Holidays this year. I think it’s because the kids are both at ages where everything is exciting and they can participate in all the fun. Tree decorating, lights, music, all of it.

We just had Black Friday, and I’m guessing you’re going nuts buying whatever deals you can scoop up before sales end. But, I’ve got a Christmas gift that you can’t buy in the stores. (well actually you can) Why not make your kiddos, or even your partner a magnetic chalkboard for the house?? Your kids will love the versatility of it- writing with different colored chalk and using all types of magnets. Your significant other would love this too, for grocery lists, tacking up reminder notes, etc! Plus, you made it with love. Such a great gift. Woop!

I recently updated the kid’s playroom downstairs and made two of these boards (because sharing is an issue in this house) one for each of them. They have been a hit. So I totally recommend! Let’s get to it shall we?

Here’s the step-by-step to make your own DIY magnetic chalkboard:

This post contains affiliate links

Items/tools you will need to make your DIY magnetic chalkboard:

    • 2 – Galvanized Metal Sheets (24″ x 36″)
    • Sheet of plywood (approx 1/8″ thick)
    • 4- 1 x 2″ Furring Strip Boards ( 8 feet long each)
    • Liquid nails
    • Chalkboard Paint
    • Primer
    • Paint of Choice for trim
    • Wood Screws/Drill
    • Jig Saw
    • Chop Saw
  • Level

Step 1– Paint a light coat of primer on your galvanized sheets.

This will help the chalkboard paint adhere so much better,  I wouldn’t skip this step. Once dry apply 2-3 even coats of the chalkboard paint with a nap roller, allowing the paint to fully dry in between each coat. This particular paint needs to sit for about 3 days without use, so set the boards aside while you work on the rest!

DIY Magnetic Chalkboard

Step 2– Cut your plywood.

This will be the backing to your boards. Leave about an inch around each side of the sheet metal. You will cut the plywood to 37 x 25″ or so to accommodate your wood frame. Now, you can ask Home Depot to do this for you before you leave the store if you like. I already had this wood in my garage from a previous project, so I needed to cut it myself. I just used my handy jigsaw. It’s not the best way to do this, I know people! But hey, when the kids are only at school for a few hours, you do what you gotta do! So the line is a little rough…. oh well, it’s going to be covered by the frame, right?

DIY Magnetic Chalkboard

This reminds me of my Dad actually.. he always says “it’s rugged but right” when he’s doing a project at home. I swear I get that from him- it may be a little rugged, but it’s still RIGHT. Hahaha, oh man that’s funny. To me.

Step 3–  Measure and cut your furring strips with chop-saw (or jigsaw, just kidding) to create the frame around the plywood.

The frame will overlap the chalkboard all around.  Paint the pieces of the frame with your chosen paint, or stain.

Step 4– Apply liquid nails to the plywood and firmly press down your chalkboard sheets.

WHAT I WOULD DO DIFFERENTLY**** In the photo below you see that I used streaks of the glue. I noticed after the project was dry, that you could see my glue design underneath the metal sheets! It isn’t too noticeable, but it drives me crazy. So, when you do yours, put a good amount of the liquid nails all over the plywood, and then smooth out the glue to a nice even layer before attaching your metal sheet. You should be just fine that way.

DIY Magnetic Chalkboard featured by top DIY blog, Domestic Blonde

Step 5– Glue ONLY the sides of the frame down.

Leave the top and bottom of the frame off. This is how you will attach your boards to the wall. They aren’t attached here, I just had them clamped in place to be sure the side pieces were attached right where I wanted them.

DIY Magnetic Chalkboard

Step 6– I didn’t want to drill holes through my frame or have screws visible on my boards, so I decided I would attach the board into the wall before attaching the frame, so the screws were covered up. Soooo…. find your studs and attach your boards to the wall. You’ll need to pre-drill your holes in the plywood and wall first, of course. Attach your top and bottom frames with liquid glue and hold in place with tape until dry.  If you ever wanted to remove the boards, you would just need to pop off the top and bottom frames.

DIY Magnetic Chalkboard featured by top DIY blog, Domestic Blonde

DIY Magnetic Chalkboard

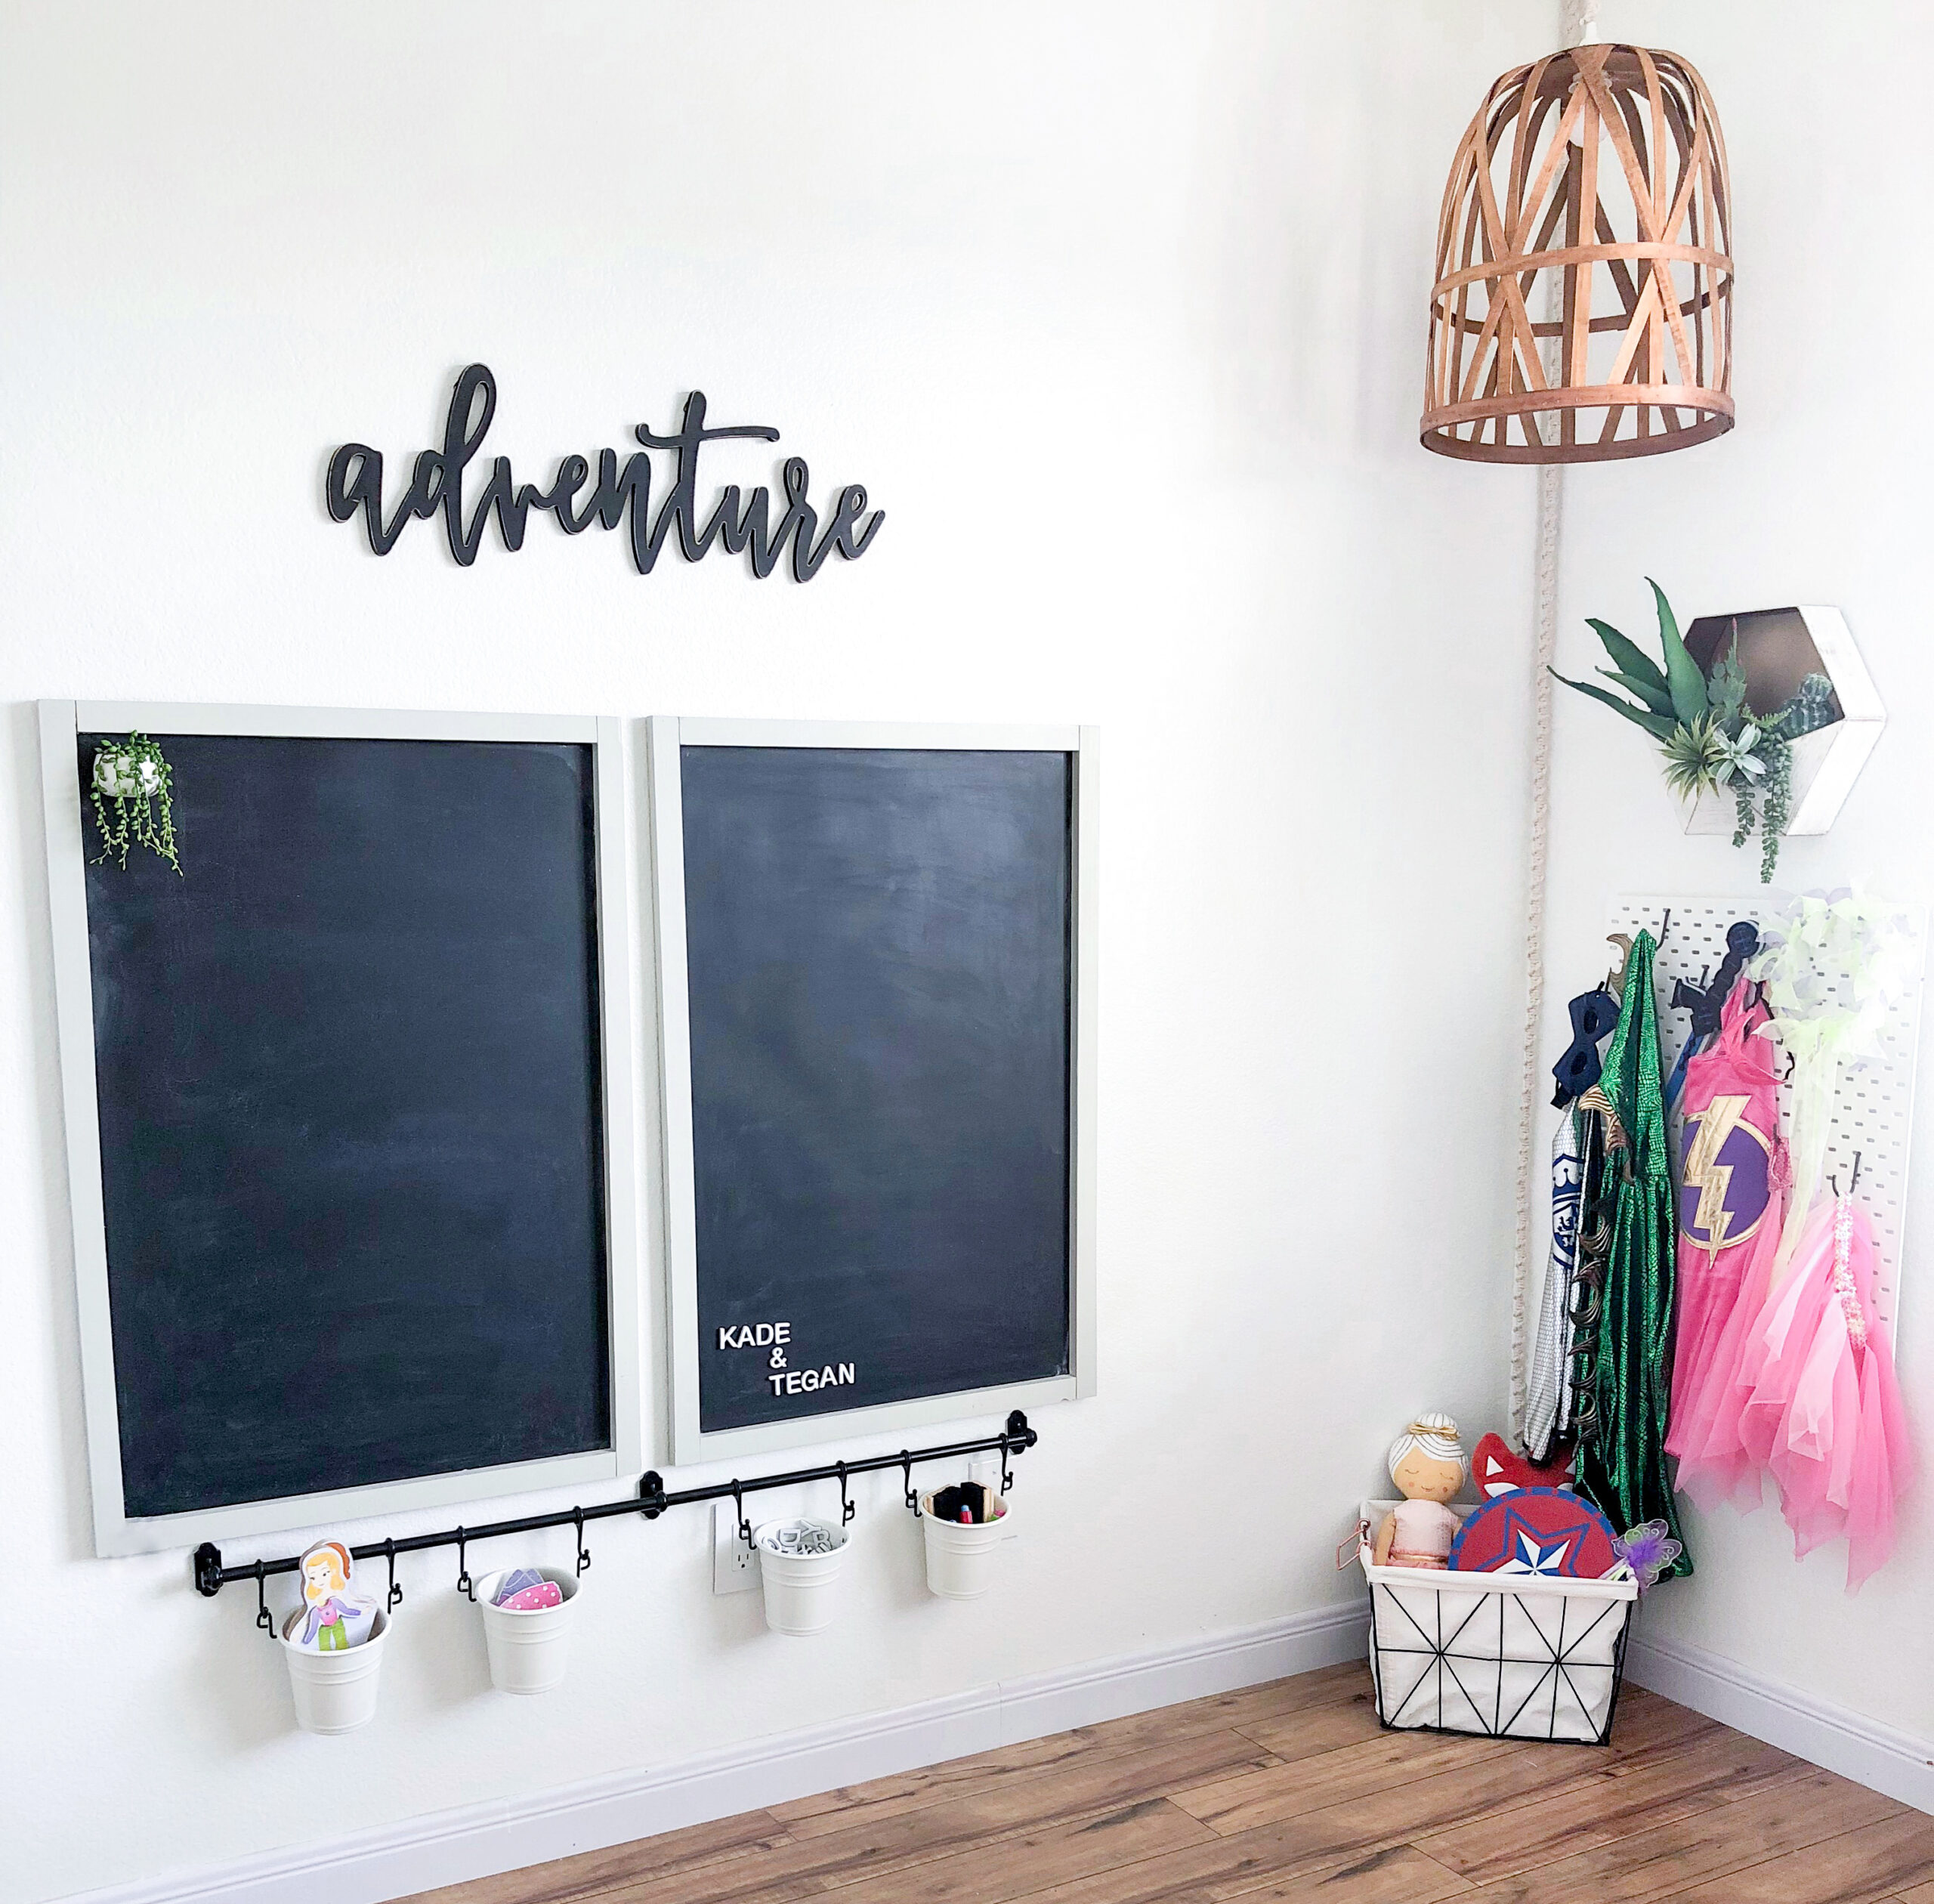
That’s it!! Your DIY magnetic chalkboard is done! I added some little buckets from Ikea underneath to hold fun magnets and chalk. The kids love it, and I love that it keeps them entertained for more than 30 seconds! The dress-up clothes shown are by Little Adventures.

DIY Magnetic Chalkboard featured by top DIY blog, Domestic Blonde

DIY Magnetic Chalkboard

DIY Magnetic Chalkboard featured by top DIY blog, Domestic Blonde

DIY Magnetic Chalkboard

Can’t wait to see your DIY magnetic chalkboard masterpieces! Click here now for the tutorial to make this pendant light!

XOXO,

DIY Magnetic Chalkboard

DIY Magnetic Chalkboard

You may also like

Comments

  1. Megan

    December 4, 2018 at 12:16 pm

    I did this in my kids’ playroom and they absolutely love it.

    Reply
    • Kelly

      December 4, 2018 at 12:56 pm

      It’s so versatile- That is so great!!

      Reply
  2. Christi

    January 6, 2020 at 4:28 pm

    Thanks for sharing! Where did you get the hanging buckets underneath? Thank you!

    Reply
    • Christi

      January 6, 2020 at 4:29 pm

      Nevermind! I missed that description!

      Reply
    • Kelly

      January 18, 2020 at 4:07 pm

      Those are from IKEA!

      Reply
  3. Samantha

    September 17, 2020 at 10:09 am

    Did you create the holders for the buckets or buy it all together at ikea?

    Reply
    • Kelly

      October 15, 2020 at 11:02 am

      The set is all from Ikea!

      Reply
  4. Linda

    December 3, 2020 at 8:46 pm

    Such a great idea! Where did you get the magnetic letters?

    Reply
    • Kelly

      December 11, 2020 at 4:02 pm

      Amazon!

      Reply

Leave a Reply Cancel reply

Your email address will not be published. Required fields are marked *

Recipe Rating


Search The Blog

Hey, I’m Kelly!

Hey, I’m Kelly!

I love DIY Home Improvement, and I'm sharing all of my projects with you! Not only that, but my favorite products, family life, and more! xoxo

  • Email
  • Facebook
  • Instagram
  • Pinterest

Pinterest

Follow @domesticblonde

Hardest paint color to choose? WHITE. My favorite Hardest paint color to choose? WHITE.
My favorite white paints—> 

•Oxford White (fresh, crisp, white-white. Used on my kitchen cabinets and barn door) 
•Simply White (Softer white.. but not too warm. Great for rooms, and larger spaces.Just painted my master and hallway in this and REALLY LOVE it)
•White Dove (Warm white, makes a room feel cozy and beautiful. Used in my master bath)
All by Benjamin Moore. *Money saving tip* Ask your paint guy to color match a more affordable brand to the color you choose from Benjamin Moore.

It feels like I’ve tried out all the whites out there😆 And you cannot go wrong with these 3.
13th Valentines Day with this guy. 🥰If I could 13th Valentines Day with this guy. 🥰If I could tell you ladies one thing when choosing your husband.... make sure you are on the same page. Values, beliefs, direction. It’s so important, especially now, as the world is in such turmoil all around us. The foundation you create with your Valentine, for your family, is EVERYTHING. The world has no power over this. 💕
What’s the emotional-roller-coaster level at you What’s the emotional-roller-coaster level at your house? I’d say ours is at a solid 6 most of the time.. it pretty much goes back and forth between photo #1 and photo #2 all day. 😳 #siblinglove
New year, new rug! I love the way this @ruggable r New year, new rug! I love the way this @ruggable runner has brightened up the kitchen. Isn't she pretty? 😍 I also love, that when my clumsy-self spills something here, I can just pull the rug up off of the pad and throw it in the washer. Seems like that should be an absolute must for a kitchen rug, right? Since I’m a #ruggablepartner I have a sweet discount code for you today! Use FUNDOMESTICBLONDE10 for 10% off your own rug 🙌🏼
The one I chose is the Kamran Coral Rug
I haven’t introduced myself in a long time... I’m Kelly! I tend to post a lot of home improvement diy projects, family adventures and well...whatever else I feel you’d like! So happy you are following along on IG and Pinterest and the blog. 
If you haven’t stopped by the blog yet, you can find all of my tutorials for diy projects there- Domesticblonde.com
Love to you all ❤️❤️
People always ask how I keep my house so clean. Th People always ask how I keep my house so clean. The answer is, ITS NOT CLEAN. I literally push the crap in the room to one side so I can take a photo. Then, when the photo is taken, I shuffle the crap back. 😆
-
Coming this week—> Instagram vs. Real Life photos. Y’all can’t go on thinking all of the picture perfect photos you see on this app are everyday life. I’m sure there are some people who are always very tidy, but let’s be real.. that’s not #real.
Not shown, a pile of towels on the floor next to me, a broken toilet paper holder, and toothpaste in the sink.
Do you ever look at your kids clothes, shoes, bedr Do you ever look at your kids clothes, shoes, bedrooms, lives, and think to yourself- Man, they’ve got it good. Can I please be you?  #kidsin2021
Putting together entire pieces of furniture that c Putting together entire pieces of furniture that came in a box is not my favorite activity.. 329 pieces later and this baby is done.  Therapy or torture? Depends on which part of the process you find me in. 😆

Copyright © 2021 · Theme by Blog Pixie

We are using cookies to give you the best experience on our website.

You can find out more about which cookies we are using or switch them off in settings.

Domestic Blonde
Powered by  GDPR Cookie Compliance
Privacy Overview

This website uses cookies so that we can provide you with the best user experience possible. Cookie information is stored in your browser and performs functions such as recognising you when you return to our website and helping our team to understand which sections of the website you find most interesting and useful.

Strictly Necessary Cookies

Strictly Necessary Cookie should be enabled at all times so that we can save your preferences for cookie settings.

If you disable this cookie, we will not be able to save your preferences. This means that every time you visit this website you will need to enable or disable cookies again.