
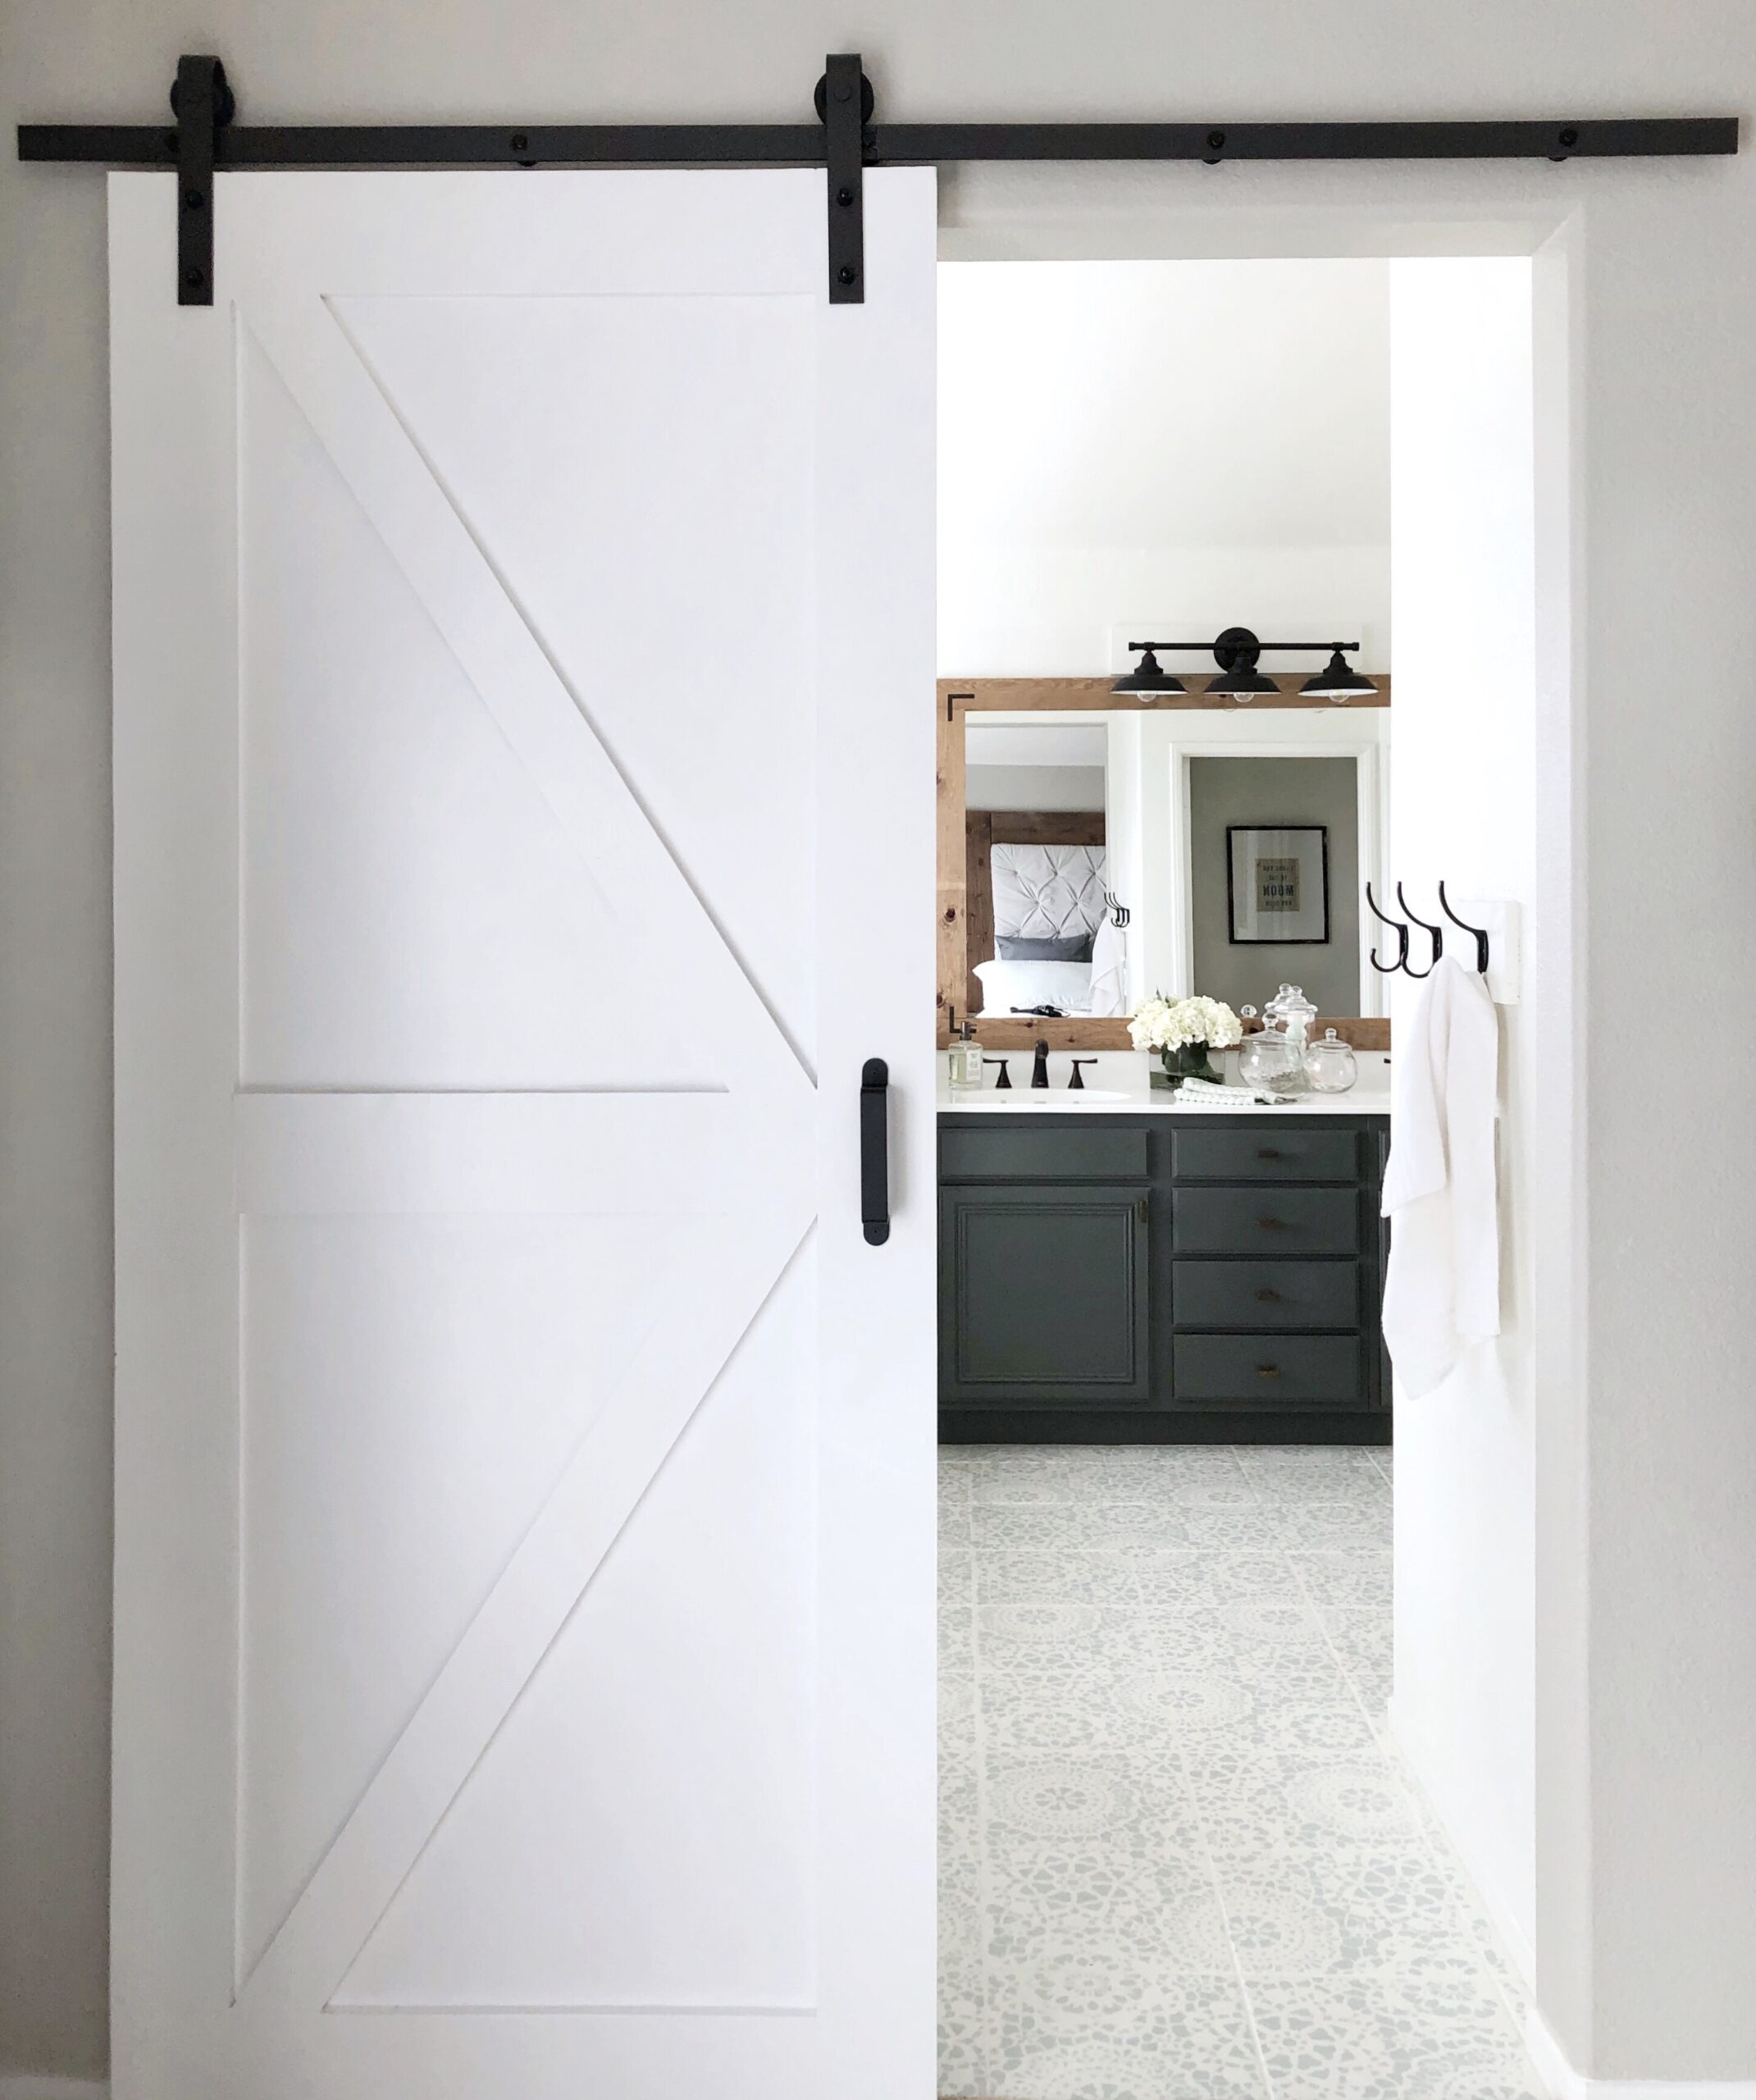
Who doesn’t love a barn door? Well, the answer is EVERYONE loves a barn door. Not only are they the perfect decor for any space, but they are functional too… And guess what? You can easily make this door for your own home.
I am going to give you the step-by-step. You don’t have to have experience with big DIY projects, and minimal tools are required. Let’s get right to it, and impress those guests shall we?
Items Needed for your DIY Bathroom Barn Door:
-
-
- Chop Saw (optional, a skill saw will work too)
- Skill saw or Miter saw
- Liquid Nails
- High grit sandpaper (at least 250)
- Primer
(this is the one I use for everything)
- Paint color of choice
- Barn Door Hardware Kit
- Barn Door Handle
- Wood for door/trim (I have listed my choices below)
- Hot husband/neighbor/friend to help you hang it at the end
-
(this DIY bathroom barn door tutorial contains affiliate links)
That’s it! Please don’t go to Home Depot or Lowes, and buy that ridiculously expensive bathroom barn door kit. It’s flimsy, and aren’t things just so much more fun when you have made it yourself? So here is the step-by-step.
DIY Bathroom Barn Door Tutorial:
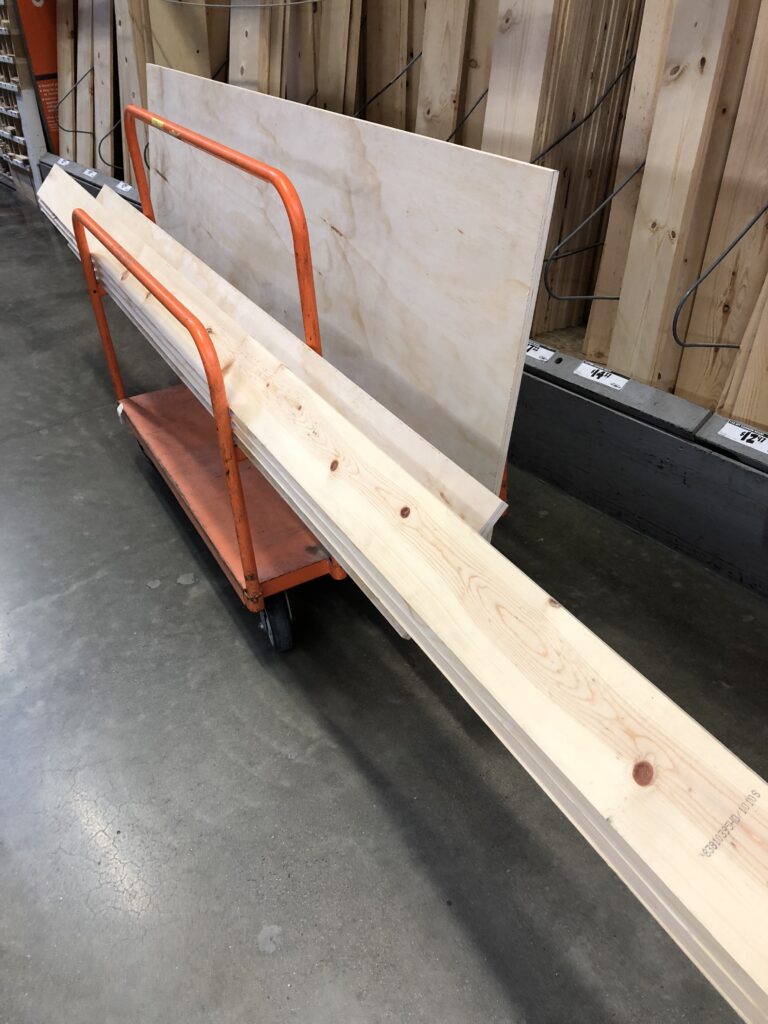
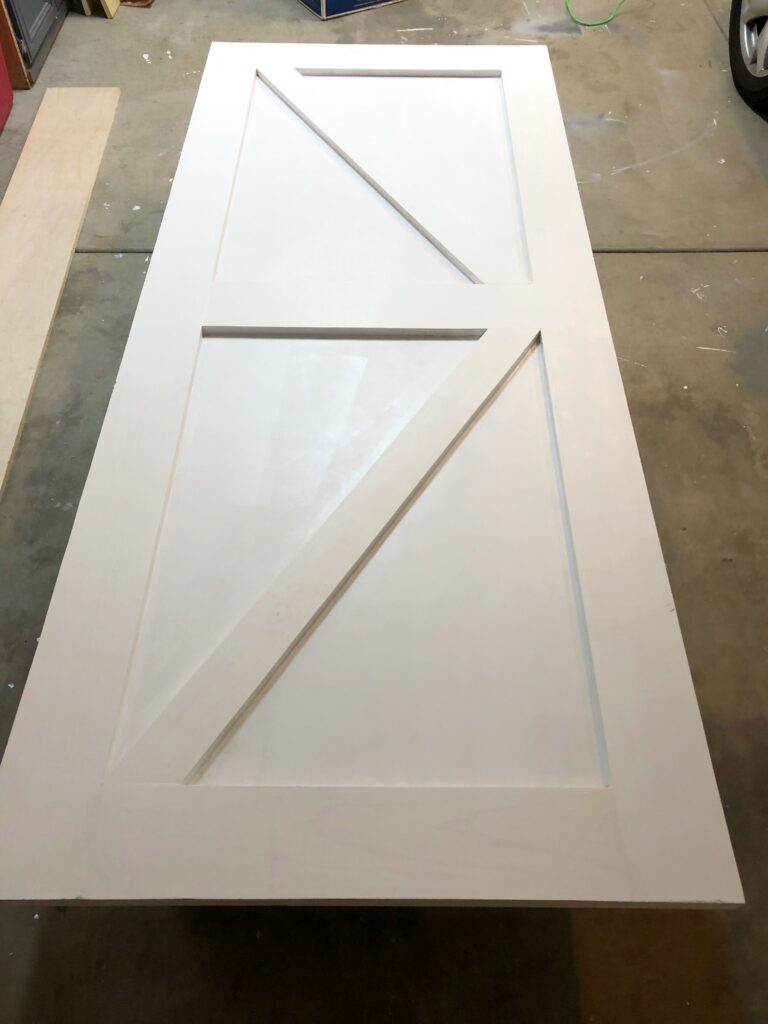
Step 1- Go to Home Depot. See how easy this already is?? Go to the lumber section and find the nice plywood. Not the rough, yucky plywood. There is an area with cabinet grade, smooth plywood. That is what you want, you don’t have to do much of any sanding with this particular wood. They come in large 4′ x 8′ pieces. I chose the .75″ thickness. This will be your door.
Ask one of the lumber guys to come help you grab one and cut it to the exact size of your door. Have your measurements all written down, to make it easy. I made my door a couple inches bigger on the top and sides , than the actual opening was. Mine was 90″x 38″. Pretty big door.
Next go to the common board area and grab a couple extra long 1″ x 6″ boards, and two 1″ x 4″ boards (these will make the center diagonals). I believe I purchased the pine. This will be used for your trim. The length you get will depend on the size of your door.
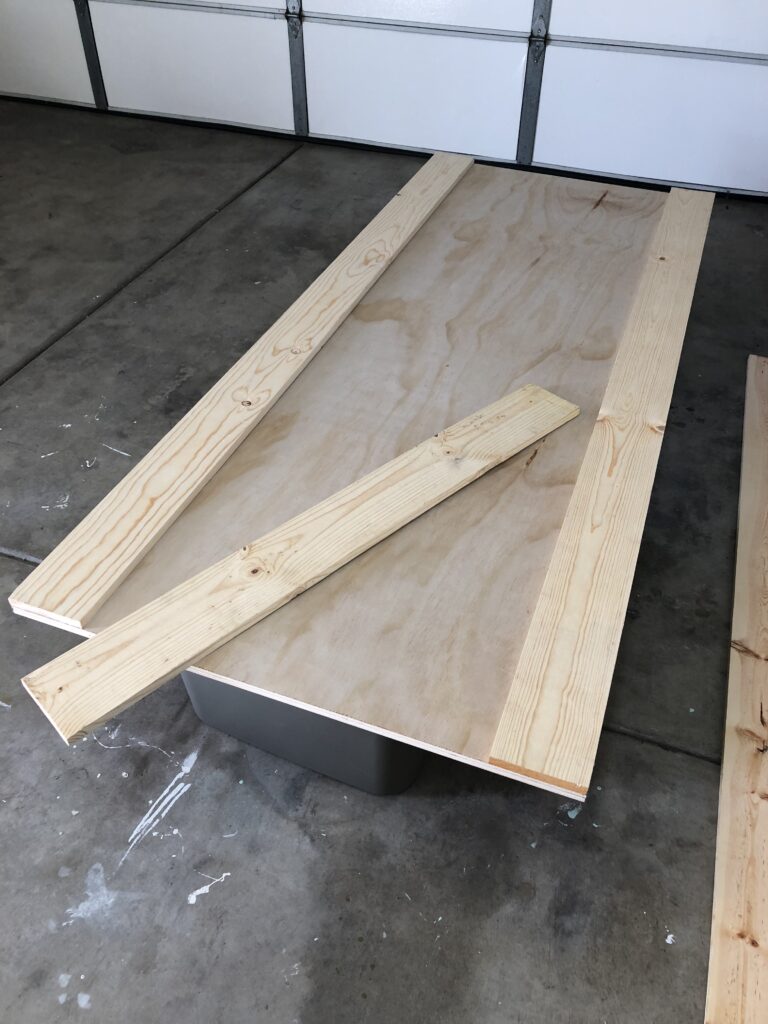
Bring it home and plop your large piece of wood down on a couple sawhorses. In my case, I am using storage bins to hold up the door. I am pretty fancy, so try to keep up. 😉
Always measure your door again, Home Depot’s cut likely wont be exact. It will be straight, but not a perfectly accurate length.
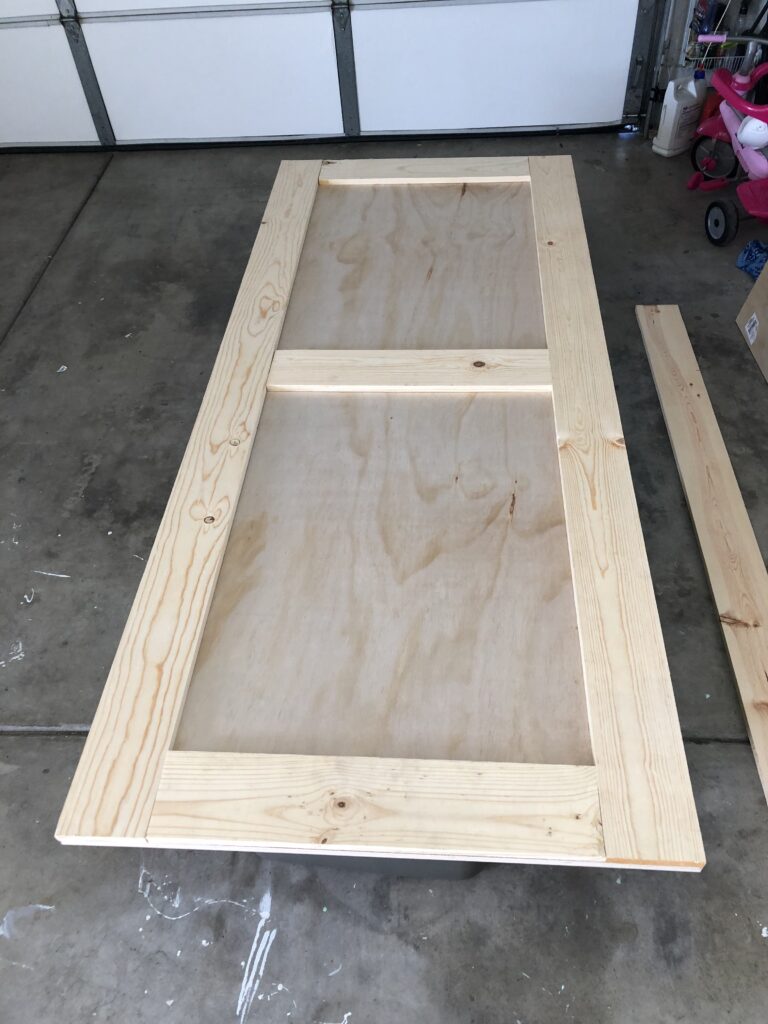
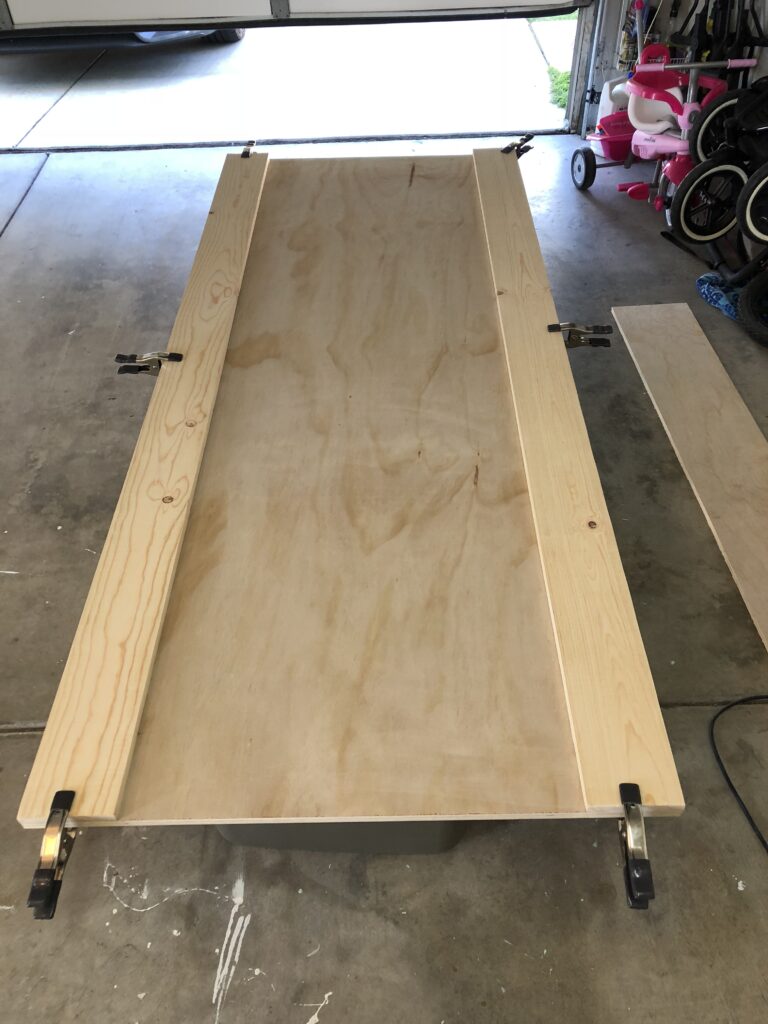
Cut two 1″ x 6″ boards the length of the door for either side. Then, measure the distance between the two boards at all 3 spots- top, middle, and bottom. Cut the remaining pieces for these spots.
 I lightly sanded all the wood, just to give a smooth surface. This wood is already fairly smooth, but I was going for a more finished look for this project.
Apply liquid nails to each board, and push into place. This stuff is strong, I am not at all concerned about this ever coming loose. I also bought these little clamps at Home Depot, and love them! They hold the wood down tight so it can dry, and for the rest I just put heavy items on top until dry.
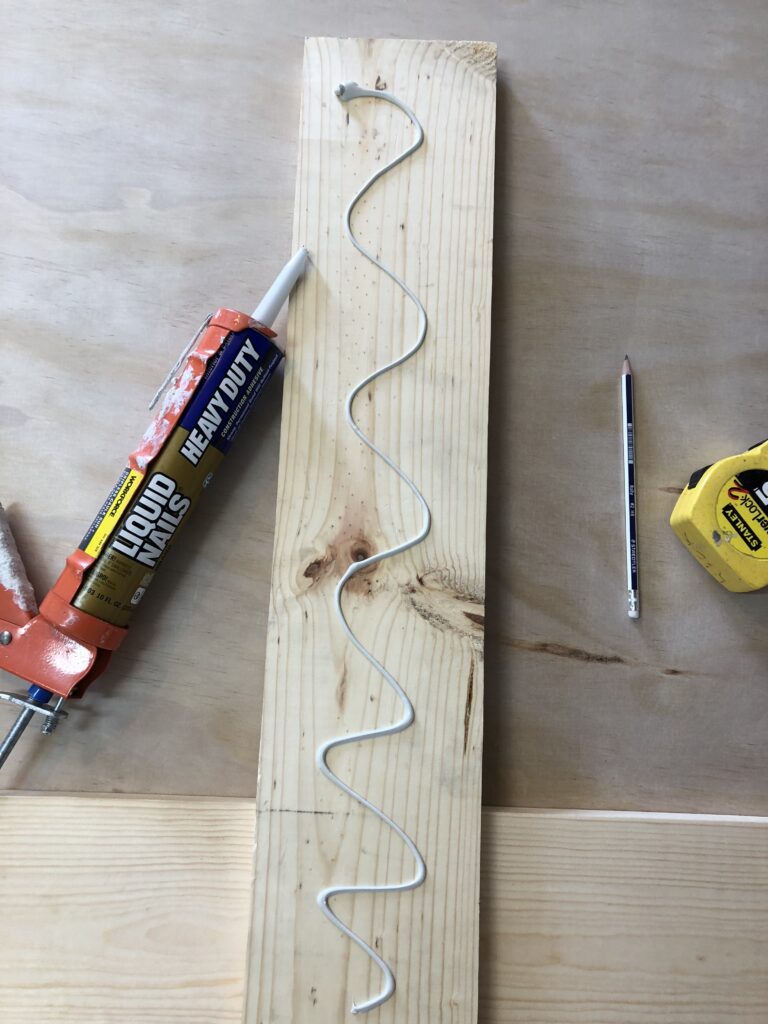
This is the trickiest part of the project- cutting the diagonal trim. I chose to only cut one angle at each end of the wood, because I HATE angles. If a project includes cutting angles, I lose my crap at some point. So, if you want a fancier version of the door angles, you’ll have to find another blog post. This girl is all about the easy way. Alrighty?… So.
Lay your 1″ x 4″ board diagonally across one of the squares you created. Put the corner of your board RIGHT AT the corner of the square on both sides, then with a straight edge, mark the line to follow the board underneath. That is where you will make your cut. (see below)
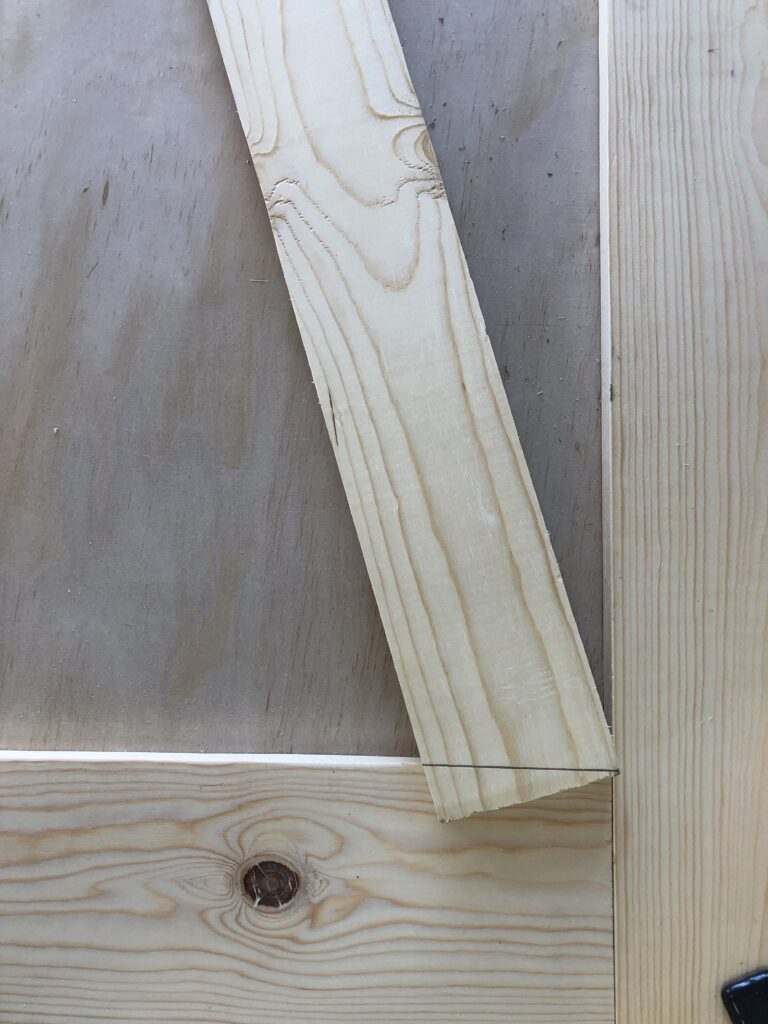
I used a skill saw to cut these angles, which was a little tricky because its such a small cut. But, it worked. The chop saw won’t be able to follow the angle exactly.
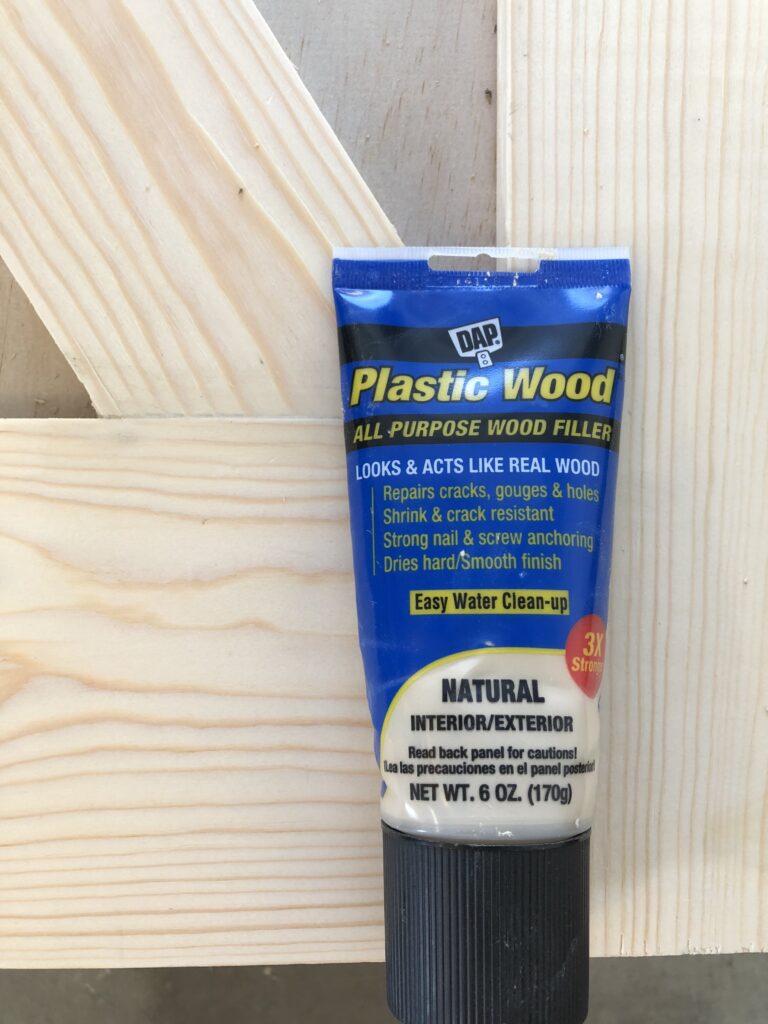
Apply liquid nails and press down until dry. I then went all around the trim with this Wood Filler that I had in the garage already, but I recommend it because it really smoothed out and filled in any small gaps or cracks in the wood.
Apply one coat of your primer, and one coat of your paint. I chose to use white, and actually just ended up using my left over paint from our kitchen cabinets. So, that saved money too! The color is Oxford White by Benjamin Moore. I always recommend the Benjamin Moore Advance Line for any wood painting project, because it’s self-leveling, really thick, and always looks great. (The door is wet in this photo, so you can still see paint lines)
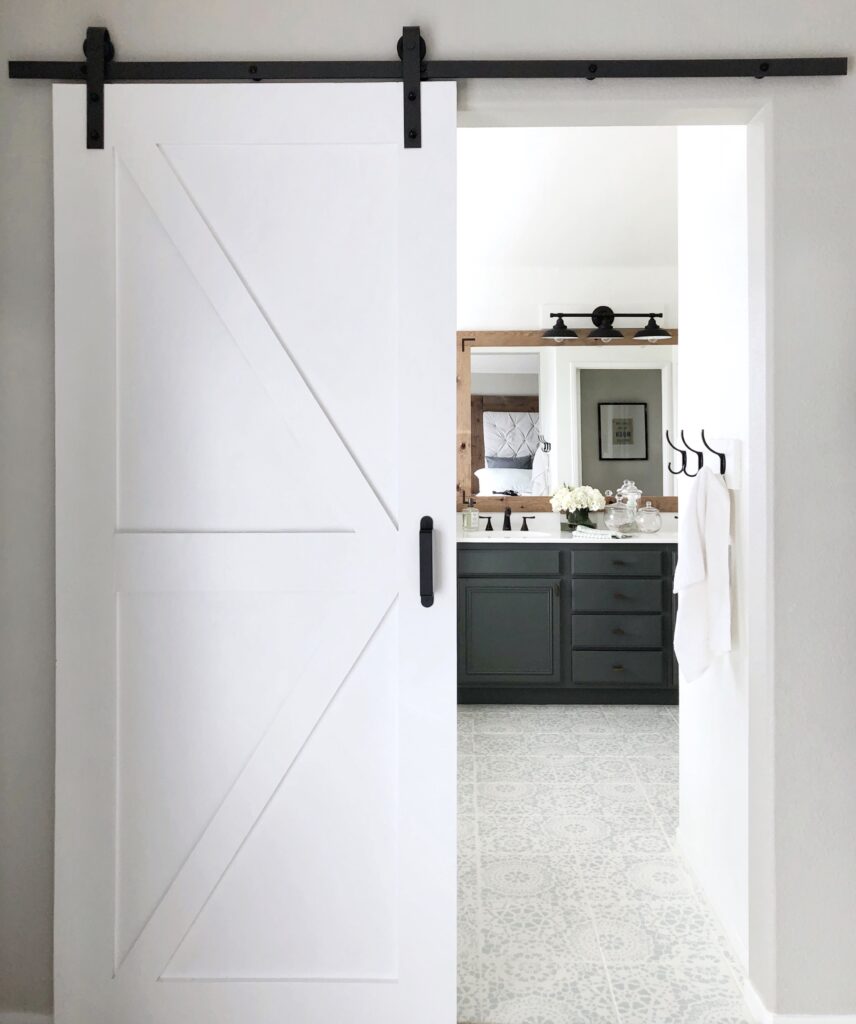
Once dry, follow carefully the instructions that come with your door hardware to hang. I was very happy with the one I purchased, it was nice and solid and the price was like 40 bucks! Can’t beat that. I also bought this handle. There are a lot of handle options depending on the style you are going for. I just wanted simple and black. So this worked and it was also affordable! (I have an Amazon Prime obsession.. But I swear, I looked other places, too!)
The door is so pretty (which is why I of course, wanted one), and it blocks any light from our bathroom (which is why my husband, of course, loves it too). Oh and look, here he is, helping me hang this very heavy door up!
![]()
Have fun and let me know what questions you may have!
Happy ba-ba-ba-ba-ba-barn door making. ????
XOXO,

PS: Loving this DIY bathroom barn door tutorial? Click here now for the prettiest stenciled tile floor tutorial!

Love this, Kelly!!! Totally going to try it now – I’ve been so hestitant!
That’s so great, Jenna! I hope this guide will make it easy for you ❤️❤️
Wow – the finished door is really impressive. Things generally look better when they are made from scratch (and tend to last longer too!)
Thank you so much, and I absolutely agree!
This is the first time I’ve seen this. It’s cute and looks like it’s easy to make!
Thank you so much, Kate!
This is beautiful! I need to do this in my future home but maybe in pink instead of white 🙂
Oooh pink would be super fun!
The barn door looks so cute and pretty. I would love to try it out at my own home. Thanks for sharing.
Omg this is a DIY? This is awesome! Great job!
It is! Thank you so much!
So cute! This project turned out great! Also, I love The Beach Boys!
Kelly, This is amazing! I love it! Now I figure out where I can do this in my home. Your home is beautiful!
Thank you so much, Chrissy! You should do it! ❤️❤️
This looks awesome and looks very professional! I would definitely love to give it a go!
You make it look so easy and doable.
Appreciate the tips.
Wow, cool! Hands down to you. You’ve done it professionally.
I LOVE this and would love to do this to our bathroom doors as well. It looks so simple(for the hubs, not me, lol). Do you mind sharing a ballpark cost for this? I’m assuming it’s still cheaper than a kit but curious as to how much cheaper.
Thank you! It was around $120 I would say for everything including hardware!
Did you do anything on the floor to keep the door from swinging? And do you feel like it gives complete privacy to the bathroom? I am considering this for a hall guest bathroom but want to make sure it really gives privacy and wont swing around when opened and closed. Thank you!!! Looks beautiful!
Thank you! Yes it gives full privacy. Be sure to make the door a few inches bigger than the actual opening so it fully covers when closed. There is an optional piece for the bottom of the door to help it glide and stay in place. I didn’t use it, but you can add it to yours. ❤️❤️
This is amazing! I have been wanting to do this to my bathroom forever!
xoxo Christie
http://www.icanstyleu.com/blog/
Thank you! You should go for it!
I love this idea!!! But we currently have a door on our bathroom, but I want to take it off and add a barn door because our current bathroom door backs up to a closet door:( how do you hang the barn door hardware with a framed door way?
Hmmm…. I would think you’d need to remove the door frame first to hang a barn door. Unless you could have the barn door hardware somehow attached so the door could slide in front of the frame. Not sure!! There’s always a way though- LOL
This is so beautiful!! Did you wood fill the edges/sides of the door as well?
Thank you so much! Yes, I caulked all around the door to make it appear as one solid piece.
This looks really nice! What does the bathroom side of the door look like?
solid white. You can add a handle on the inside also, to make it easier to close when you’re in the bathroom!
This door looks so awesome & easy to make! Dumb question, but will the plywood warp or withstand the steam from a bathroom?
Thank you!
I believe it will be just fine! Be sure to prime well before you paint and use a semi-gloss finish if you are near the steam often.
Have Fun!
I have a dumb question…I’m looking to do this to my bathroom entryway from our master bedroom, there is already two doors there. How would I measure for this if I’m doing two doors? Measure the two doors currently there then add a few inches to the sides?
I would add to the top some length as well! So there’s no gap
I love this! Only question I have is did you do both sides of the door?
Hi, thank you! I just painted the other side white, but I didn’t add the trim. Just looks like a solid white door from inside the bathroom
Where do you place the handle on the inside of your bathroom door? Would be great to see a photo of that perspective (since you also mentioned in the comment above that you didn’t put the trim on that side)…
I originally didn’t have a handle on the inside, but just recently bought this handle which has a handle on both sides, and I love it! Here’s the link-https://www.amazon.com/gp/product/B06Y5TFL2J/ref=as_li_tl?ie=UTF8&camp=1789&creative=9325&creativeASIN=B06Y5TFL2J&linkCode=as2&tag=domesblond-20&linkId=a24085adbe9d26d5e5d6e02e298f2b4e
Hi! I love love love this!! My husband and I are going to do this for our master bath. Can I ask what color your bedroom wall is? That kind of grey is exactly what we are looking for in our guest room 🤗
Thank you! It’s Revere Pewter by Benjamin Moore
This looks beautiful! So I finally convinced my husband to help me try this project. A question I had was did you only do one side of the door when you used the common boards? I’m trying to envision what the door looks like on the other side.
Ooop! Never mind, I see someone already asked my question earlier! Thank you!
Hi Kelly. Thank you so much for all the details. I was thinking to put a barn door for my daughters closets, but I couldn’t figure it out until I saw your post, nice and clear. I m just wondering if you did the both sides the doors exactly the same, or one side is just simple wood with no trim installed ?
Thank you so much! the back side of the door is solid, and painted white like the front. The plywood that you attach the trim to, will be the backside. Hope that helps!
Wanted to know if it was possible to but a barn door in a door opening that is from the floor to the ceiling if I make one any bigger it won’t fit if I make it smaller it would have a gap do they have hardware to put on the ceiling
Hi, I don’t think you can attach it to the ceiling. I would consider adding a wood piece at the top of the door opening, that would create a spot to put the railing for the door. It would almost just make the opening shorter at the top. Hope that makes sense!
Yes it does thank u
Love your ideas!
Fantastic project! Thank you for the great instructions. Where did you get your hardware for hanging the barn door?
Just what I’ve been looking for a simple, looks great design. Thanks a lot. Darn! married??? Do you have an older sister who isn’t? LOL