• Home
  • DIY Projects
    • Home Office
      • Home Office Desk for 2
    • bathroom projects
      • Kid’s Bathroom Makeover
      • Guest Bathroom Makeover
      • Update: How to Refinish Bathroom Vanity
      • Stencil Bathroom Floor
      • Refinish Bathroom Counterops
    • Living Spaces
      • Easy Window Trim
      • Board & Batten Wall Family Room
      • Board & Batten Wall Living Room
      • Sliding Barn Door
      • Hanging Succulent Wall Garden
      • Hairpin Tables
      • How to Shorten Bamboo Shades
    • Kid’s Bedrooms
      • Platform Twin Bed Frame
      • Kid’s Bed Headboard
    • playroom
      • Magnetic Chalkboard
      • Hanging Basket light With Macrame Cord
    • Kitchen Projects
      • Kitchen Island
      • Refinish Your Kitchen Cabinets
  • Home
    • Holiday Decor Centerpiece
    • Best Gray Paint Colors
    • Top 5 Stencils for your home
    • Playroom Makeover
    • 10 Neutral Floor Poufs
    • Family Room Decor
  • Contact Kelly

Domestic Blonde

DIY - LIFESTYLE

  • Home
  • DIY Projects
    • Home Office
      • Home Office Desk for 2
    • bathroom projects
      • Kid’s Bathroom Makeover
      • Guest Bathroom Makeover
      • Update: How to Refinish Bathroom Vanity
      • Stencil Bathroom Floor
      • Refinish Bathroom Counterops
    • Living Spaces
      • Easy Window Trim
      • Board & Batten Wall Family Room
      • Board & Batten Wall Living Room
      • Sliding Barn Door
      • Hanging Succulent Wall Garden
      • Hairpin Tables
      • How to Shorten Bamboo Shades
    • Kid’s Bedrooms
      • Platform Twin Bed Frame
      • Kid’s Bed Headboard
    • playroom
      • Magnetic Chalkboard
      • Hanging Basket light With Macrame Cord
    • Kitchen Projects
      • Kitchen Island
      • Refinish Your Kitchen Cabinets
  • Home
    • Holiday Decor Centerpiece
    • Best Gray Paint Colors
    • Top 5 Stencils for your home
    • Playroom Makeover
    • 10 Neutral Floor Poufs
    • Family Room Decor
  • Contact Kelly

How to Refinish Bathroom Countertops: a Step by Step Tutorial

How to Refinish Bathroom Countertops: a Step by Step Tutorial
This website may use affiliate links. When you purchase products from an affliliate link, I make a small commission.

Man oh man, am I behind on this post or what?? I know you have been on the edge of your seat like, ‘When is Kelly going to let us know how to so frugally refinish bathroom countertops!?’ haha.. Well, I went searching through my 1000’s of iPhone photos to find the documented process, and I took not ONE photo as I was refinishing my bathroom countertops. Not one. I can pretty much guarantee that was because I was so focused on not screwing it up, that taking pictures went out the window! With that said, I still feel like I NEED to give you a mini version of this, because it’s just too good. So, I will still give you a basic run down on the how-to’s of this project.

How to Refinish Bathroom Countertops:

First of all.. here is a little before picture of our 1990’s beauty in our master bath.

How to Refinish Bathroom Countertops: a Step by Step Tutorial

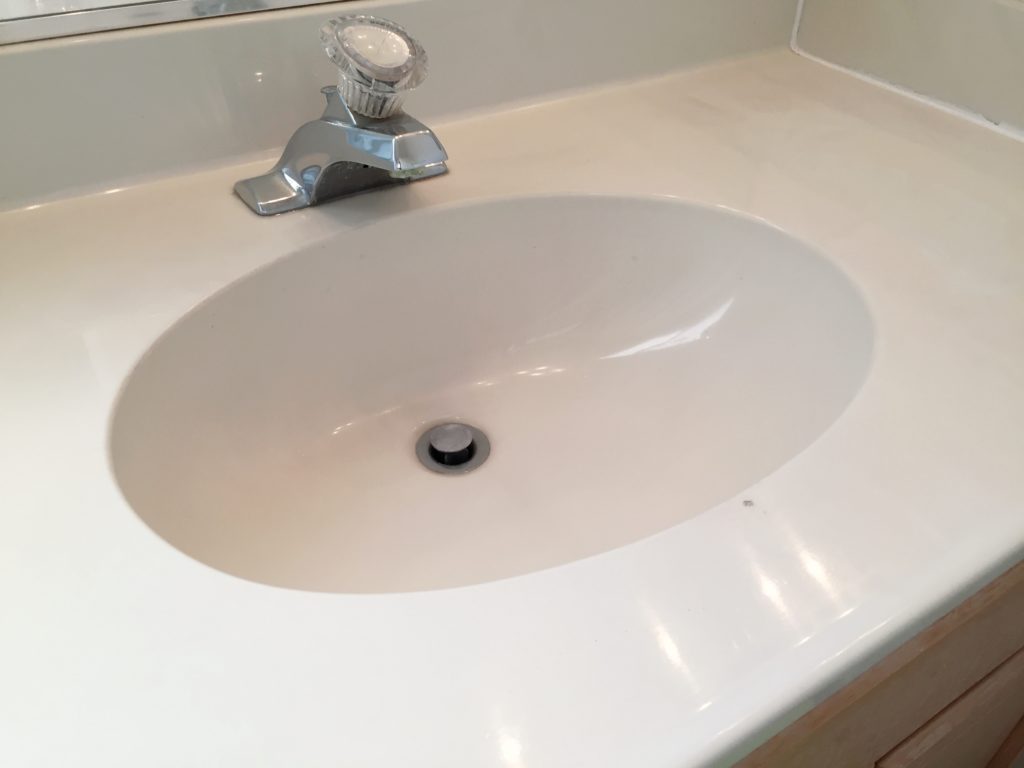
Don’t you feel a little sad looking at it? Who knew it could be possible to change something so awful in one day!

Here are the things you will need to refinish bathroom countertops:

  • Good quality short nap roller for kitchen use
  • Rust-Oleum Tub And Tile Refinishing KitHow to Refinish Bathroom Countertops: a Step by Step Tutorial
  • Angled 1-1.5″ paint brus
  • Tack Cloth How to Refinish Bathroom Countertops: a Step by Step Tutorial400 Grit Sandpaper (or something close)How to Refinish Bathroom Countertops: a Step by Step Tutorial
  • Comet or some form strong cleaner
  • Abrasive scrubby pad
  • Lime Away
  • Mask if you don’t want to inhale yucky fumes

To start off, remove your faucet as well as drain so all surfaces are able to be refinished. (Now, I’m sure that if you reeeaally don’t want to remove your faucet, you could possibly work around it and just paint right up to the edge. I understand that plumbing is the absolute WORST. So, that is totally up to you)

Clean your entire countertop with comet. Rinse well and let dry. Scrub surface with an abrasive scrubber and lime away, just to make sure the surface is super clean and gunk free. Rinse and let dry completely.

Use the sandpaper and just scrub all over, by hand, until it feels a little rough all over. This is a high grit, so it will just open up the surface and allow it to grab onto the new product. That is an important step! Finally, remove all dust very well with your tack cloth. I love tack cloth! That stuff works! No dust is getting by that thing.

Follow instructions on the can for mixing parts A and B… Now, for the scary, I mean fun, part. Take your roller and apply your first coat. **** Use a VERY light amount of paint for all your coats.****If you don’t, it will bubble up and make drip marks and that is NOT good. So take your time and do it thin. It’s going to look like a streaky mess. Don’t pass out. It will be ok. If I had a pic I would show you how horrible mine looked at this point.  Leave about 1-2 hours of dry time with lots of ventilation before your next coat. I ended up doing 3 coats on my countertop.

I feel the roller is the best tool to use all over. It gives the smoothest look. I used the angled brush for hard to reach spots as well as edges. Let that baby dry for a few days at least before using your sinks again.

It will look awesome! Go for it! Don’t be scared…. =)

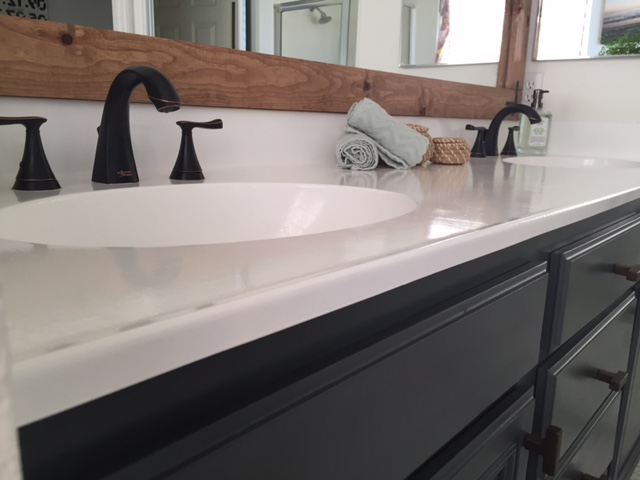
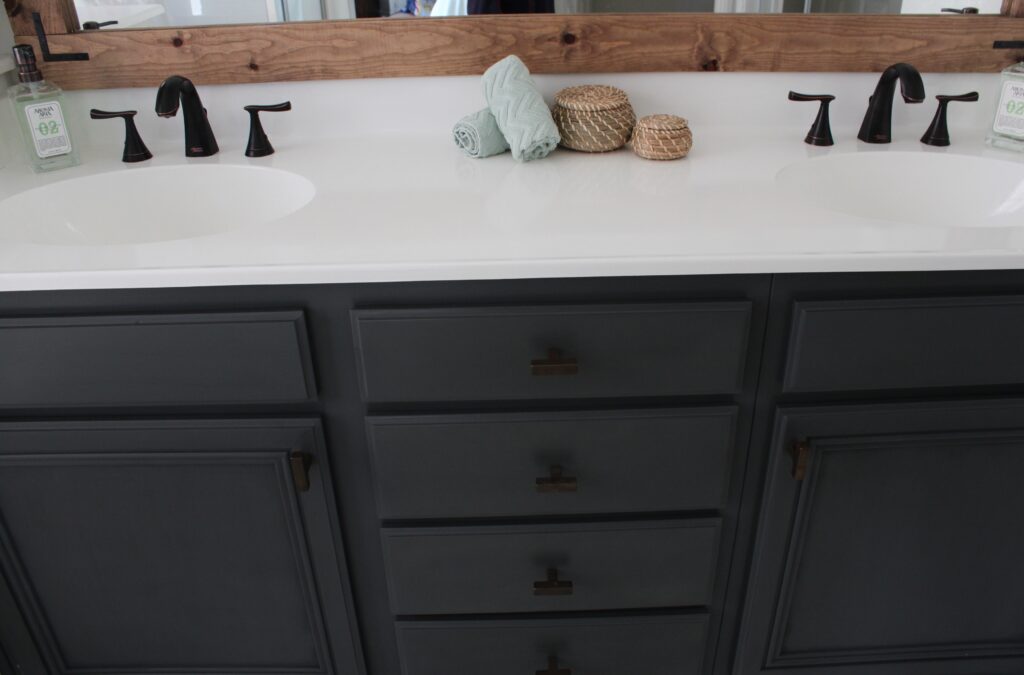
25 bucks and my bathroom went from boo-hoo, to hallelujah! And the new Dark bronze faucets I added were just soooo gorgeous on the fresh bright white top.

Sorry for the lack of visual step-by-step to refinish bathroom countertops, but please let me know if you have any questions! Happy Refinishing!

XOXO,

Kelly

How to Refinish Bathroom Countertops: a Step by Step Tutorial featured by top US DIY blog, Domestic Blonde

You may also like

Comments

  1. Jana

    December 21, 2016 at 3:28 pm

    So how long has this lasted for you? I’ve heard that it starts to peel around six months but I’m hoping that is wrong.

    Reply
    • Kelly

      December 26, 2016 at 5:06 am

      Hi Jana-
      I have only done this a few months or so ago. I am not sure about peeling. From what I can tell so far, that shouldn’t be an issue. I could see how not doing enough coats of the product with adequate coverage you could have some issues. If you decide to do this, make sure to do 3 good coats. Take your time to get good coverage. ????

      Reply
  2. Tenille

    November 3, 2017 at 1:52 pm

    Hi Kelly! Your bathroom looks amazing! May I ask what your countertop was made of before you painted? Also, how is it holding up now? Im looking for a quick fix until we remodel our bathroom (not for a few years or so). Did you seal the paint or was that included in the refinishing kit?

    Reply
    • Kelly

      November 3, 2017 at 3:49 pm

      Hi, thank you! The countertop was from the 90’s… I cannot remember what the material is called! You can see it in my before photo on the blog post. It’s holding up great! Just be sure to do multiple thin coats to get good coverage. Especially around the edges. There is no sealer needed for this project. The product fully hardens. I think this would be perfect for your situation ❤️

      Reply
      • Tenille

        November 4, 2017 at 9:53 pm

        I hope so… Im going to give it a try! Do your remember if it was Corian? Also, did you have to drill out new holes for your faucets?

        Reply
        • Kelly

          November 5, 2017 at 12:18 pm

          Yes! I believe they were Corian! I removed the old faucets, refinished the countertop, then put new faucets into the original holes. No new holes

          Reply
  3. Tiliea Shipp

    April 25, 2018 at 5:18 am

    Nevermind my comment on the cabinet post! Found found the answer here lol

    Reply
    • Kelly

      April 26, 2018 at 10:01 am

      Ok great! Have fun with your project!

      XO,

      Kelly

      Reply
  4. Hannah

    April 27, 2018 at 7:31 pm

    What was the product that you used? I need to refinish some HIDEOUS Corian and this post is giving me hope! Also, how long did you let it cure?

    Reply
    • Kelly

      April 27, 2018 at 8:40 pm

      Hi! I’m so sorry, I just noticed that my product list wasn’t showing up in my post. I fixed it!
      I used the Rust-Oleum Tub & Tile Kit. I believe I let it cure for 3 days before using it ????????

      Reply
  5. Katie

    October 5, 2018 at 6:29 am

    I have just builder grade countertops in my bathroom with drop in sinks. Do you think this will work for my counters?

    Reply
    • Kelly

      October 8, 2018 at 12:52 pm

      Hi! What is the material of your countertop?

      Reply
  6. Megan

    October 6, 2019 at 3:44 pm

    Hi!
    I have super dated granite countertops that aren’t my style at all. Do you this would work on them? How are they holding up now?

    Reply
    • Kelly

      October 14, 2019 at 11:55 am

      Yes it would work! I have a small amount of cracking in the edges now, since doing mine. For a temporary fix (a few years) this is a great solution!

      Reply
  7. Kimberley Barendregt

    January 13, 2020 at 6:56 am

    Hi i love how this turned out! Do you happen to have a tutorial for framing the mirror??

    Reply
    • Kelly

      January 18, 2020 at 4:06 pm

      Yes I do!
      https://domesticblonde.com/2017/01/06/put-a-frame-on-it/

      Have fun! XO

      Reply

Leave a Reply Cancel reply

Your email address will not be published. Required fields are marked *

Recipe Rating


Search The Blog

Hey, I’m Kelly!

Hey, I’m Kelly!

I love DIY Home Improvement, and I'm sharing all of my projects with you! Not only that, but my favorite products, family life, and more! xoxo

  • Email
  • Facebook
  • Instagram
  • Pinterest

Pinterest

Follow @domesticblonde

Maybe the update wasn’t necessary? You tell me. Maybe the update wasn’t necessary? You tell me. I do sort of miss the adorable little curtains that were above the mirror 😝
You can find these bathroom items in my LTK or Amazon store, linked in my bio ❤️

#interiordesign #inter #bathroomdesign #bathroomremodel #bathroomdecor #bathroomrenovation #wallpaper #bathroomwallpaper #homedecor #home #neutraldecor #homeinterior #founditonamazon #hometour #powderroom
I’ve gotten lots of questions about wallpaper an I’ve gotten lots of questions about wallpaper and what is safe while installing. I’d say all of these worries are myths, and just hang the wallpaper!
It’s going to turn out great 👏

#homedecor #wallpaperdesign #wallpaperinspo #wallpaper #moderntraditional #howwedwell #homedesign #homerenovation #bathroomdesign #bathroomdecor #interiordesign #decor #diyprojects
Life changer? Yup, I think so… the kids can inde Life changer? Yup, I think so… the kids can independently get things from kitchen without asking for help. 👏 Would this make your life easier too?

Find it linked in my LTK and Amazon Store.
https://liketk.it/41pKd

#interiordesign #interior #designinspo #designinspiration #organization #kitchendesign #kitchenorganization #homedecor #homedesign #kitchenremodel #kitchenrenovation #kitchen
Please tell me I’m not the only one who hates th Please tell me I’m not the only one who hates that glare from the glass on framed art? When it’s possible to use this hack, I do it. Maybe I’m OCD… but it makes me happy. 

#interior #home #interiordesign #diyhomedecor #homedecor #homedesign #walldecor #homeinspiration #kitchendecor #style #interiordecor #kitchen #wallart
When I see something that I want to change, I have When I see something that I want to change, I have to change it. Even if it’s something I haven’t tried before. Where there’s a will, there’s a way. And I always love a before and after 💫 

#homeimprovement #homedecor #homedesign #interior #demo #remodeling #remodel #kitchen #diyhomedecor #tools #diy #designinspiration #kitchendesign #interiordesign #homeupdates
This kitchen was one of the most challenging proje This kitchen was one of the most challenging projects I’ve taken on… it wore me down! Long days working on each of the different parts of it. From putting together all of the cabinets,
to designing and piecing together the island. Truly a labor of love (that I thought I may not survive for a while there) 😆 But worth it, now that my family can live here and enjoy it everyday. Will I ever build a million cabinets again, you ask? Not likely! 

https://liketk.it/3ZE9M

#design #kitchendesign #kitchenremodel #diykitchen #decor #kitchendecor #interior #interiordesign #homeprojects #apartmenttherapy #home #kitchenisland #kitchensofinstagram
Hanging photos the FAST way. I used to get frustra Hanging photos the FAST way. I used to get frustrated when there were multiple hooks behind my frame that I had to line up. This method makes it cake 👌🏼 

https://liketk.it/3ZAxH

#homehacks #homedecor #design #homerenovation #homestyling #apartmenttherapy #decor #decorcrushing #diyhomeprojects #diy #interiordecor #interiordesign #kitchenrenovation #walldecor #wallart #kitchendecor #homedesign #doityourself #home
Styling open shelves in the kitchen. I love open s Styling open shelves in the kitchen. I love open shelves ❤️ they add so much character and warmth in the room.
Find all of these items in my ltk, or comment and I can send you the links ❤️

https://ltk.app.link/Y4Ns7cssAwb

#decor #openshelving #openshelvingkitchen #interiordesign #kitchendecor #kitchendesign #homedecor #interior #homeinterior #design #home

Copyright © 2023 · Theme by Blog Pixie

We are using cookies to give you the best experience on our website.

You can find out more about which cookies we are using or switch them off in settings.

Domestic Blonde
Powered by  GDPR Cookie Compliance
Privacy Overview

This website uses cookies so that we can provide you with the best user experience possible. Cookie information is stored in your browser and performs functions such as recognising you when you return to our website and helping our team to understand which sections of the website you find most interesting and useful.

Strictly Necessary Cookies

Strictly Necessary Cookie should be enabled at all times so that we can save your preferences for cookie settings.

If you disable this cookie, we will not be able to save your preferences. This means that every time you visit this website you will need to enable or disable cookies again.