• Home
  • DIY Projects
    • Home Office
      • Home Office Desk for 2
    • bathroom projects
      • Kid’s Bathroom Makeover
      • Guest Bathroom Makeover
      • Update: How to Refinish Bathroom Vanity
      • Stencil Bathroom Floor
      • Refinish Bathroom Counterops
    • Living Spaces
      • Easy Window Trim
      • Board & Batten Wall Family Room
      • Board & Batten Wall Living Room
      • Sliding Barn Door
      • Hanging Succulent Wall Garden
      • Hairpin Tables
      • How to Shorten Bamboo Shades
    • Kid’s Bedrooms
      • Platform Twin Bed Frame
      • Kid’s Bed Headboard
    • playroom
      • Magnetic Chalkboard
      • Hanging Basket light With Macrame Cord
    • Kitchen Projects
      • Kitchen Island
      • Refinish Your Kitchen Cabinets
  • Home
    • Holiday Decor Centerpiece
    • Best Gray Paint Colors
    • Top 5 Stencils for your home
    • Playroom Makeover
    • 10 Neutral Floor Poufs
    • Family Room Decor
  • Contact Kelly

Domestic Blonde

DIY - LIFESTYLE - MOTHERHOOD

  • Home
  • DIY Projects
    • Home Office
      • Home Office Desk for 2
    • bathroom projects
      • Kid’s Bathroom Makeover
      • Guest Bathroom Makeover
      • Update: How to Refinish Bathroom Vanity
      • Stencil Bathroom Floor
      • Refinish Bathroom Counterops
    • Living Spaces
      • Easy Window Trim
      • Board & Batten Wall Family Room
      • Board & Batten Wall Living Room
      • Sliding Barn Door
      • Hanging Succulent Wall Garden
      • Hairpin Tables
      • How to Shorten Bamboo Shades
    • Kid’s Bedrooms
      • Platform Twin Bed Frame
      • Kid’s Bed Headboard
    • playroom
      • Magnetic Chalkboard
      • Hanging Basket light With Macrame Cord
    • Kitchen Projects
      • Kitchen Island
      • Refinish Your Kitchen Cabinets
  • Home
    • Holiday Decor Centerpiece
    • Best Gray Paint Colors
    • Top 5 Stencils for your home
    • Playroom Makeover
    • 10 Neutral Floor Poufs
    • Family Room Decor
  • Contact Kelly

DIY Kitchen Update: Cabinet Trim Tutorial

cabinets
This website may use affiliate links. When you purchase products from an affliliate link, I make a small commission.

It can be VERY expensive to remodel your kitchen. Not everyone has 25k to drop! Or maybe you know your home right now is only a 5-year home, not your forever home. So, you would like a nice update- without the big cost. There are ways to do this! This post is all about changing the dated, round cabinet trim – or for a more correct term, the toe-kick. I also have previous tutorials on affordable updates you can do yourself in your kitchen, such as refinishing your own cabinets and hardware,  as well as making your own island.

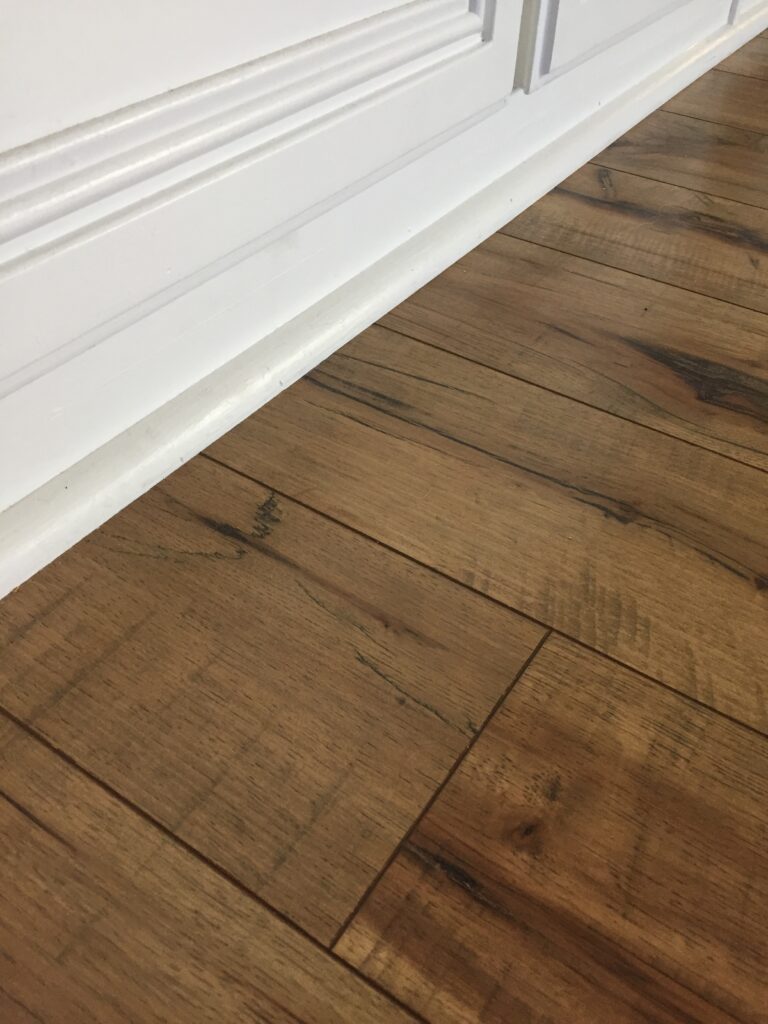
This is the round trim I am referring to below.

How to Update Cabinet Trim in your Kitchen Tutorial featured by top US DIY blog, Domestic Blonde

DIY Kitchen Update: Cabinet Trim Tutorial

In the photo above, you can see my son standing in front of the old cabinet trim. I can never find the photos I need to prove my point, when I need them! So this will have to do for now.

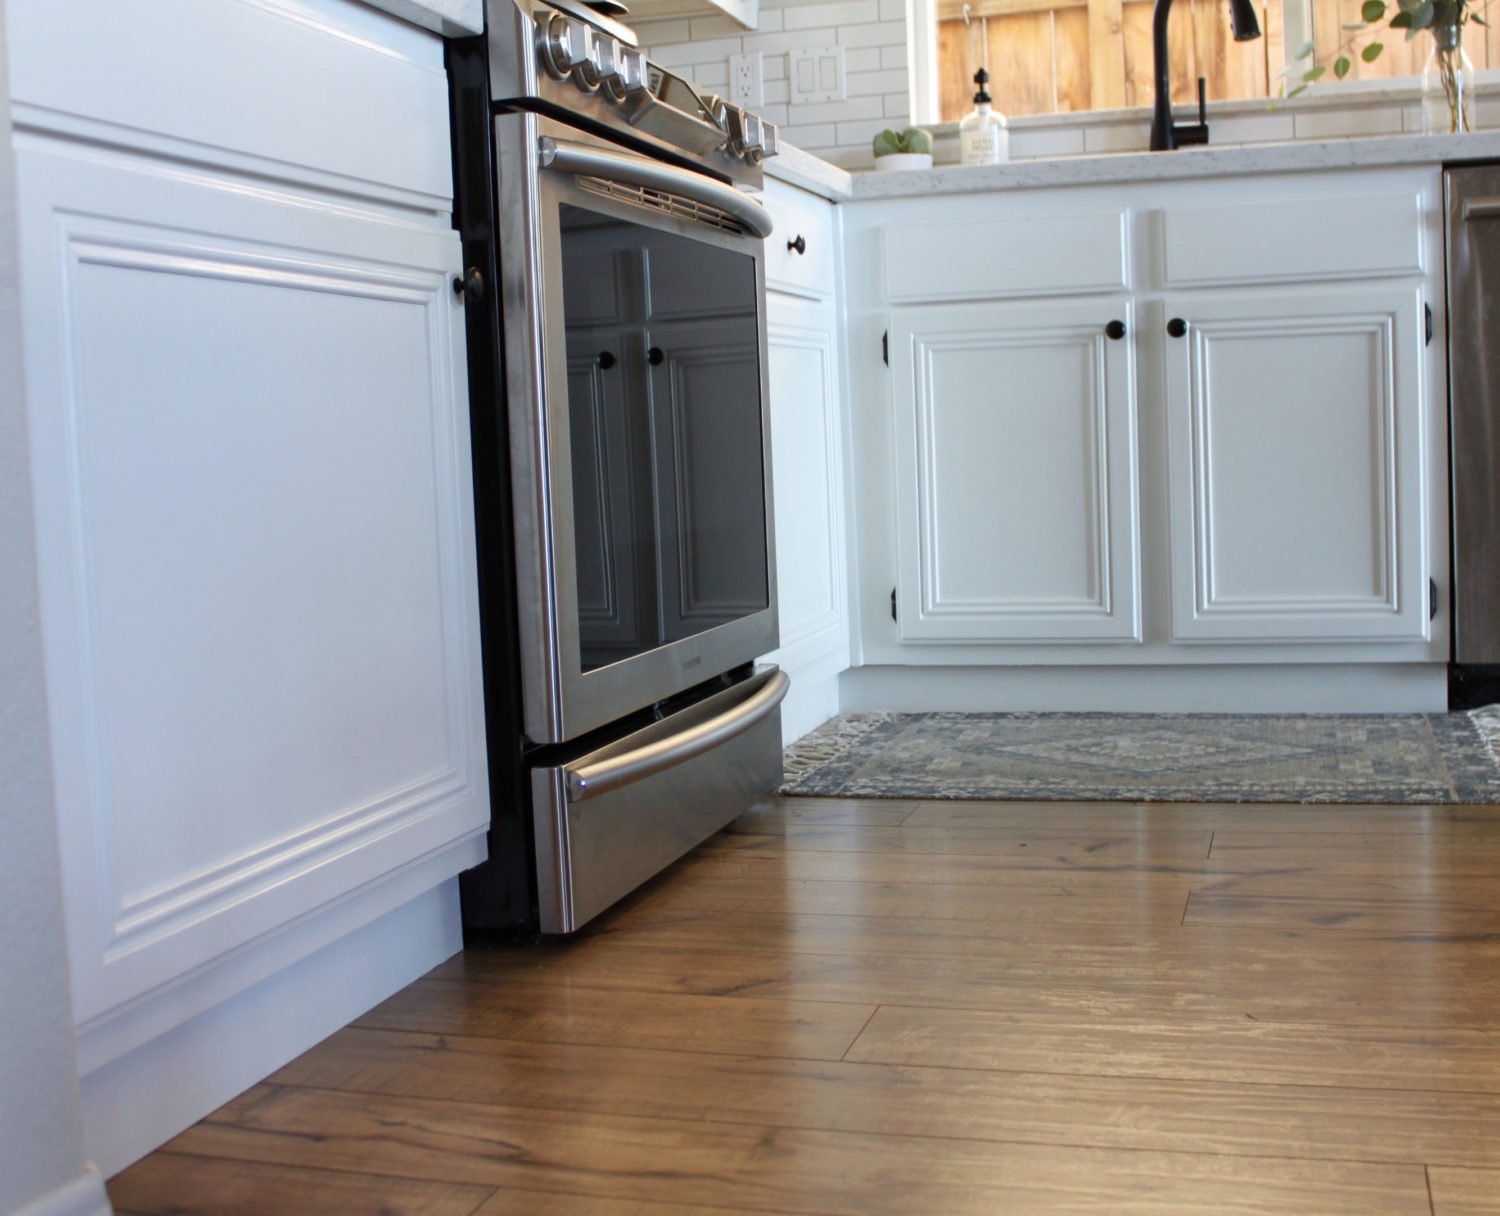
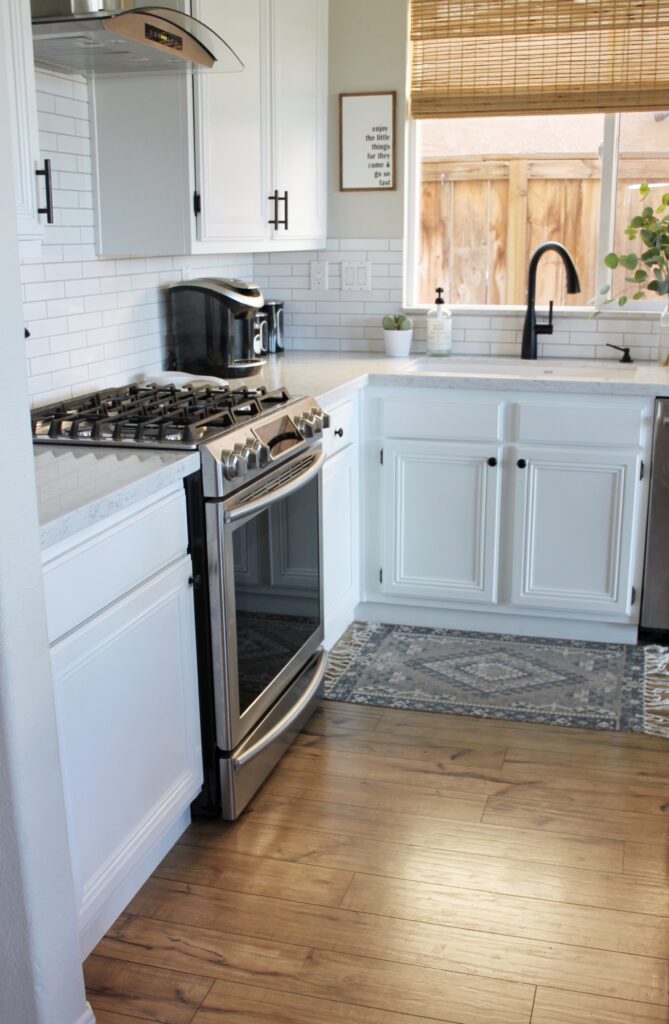
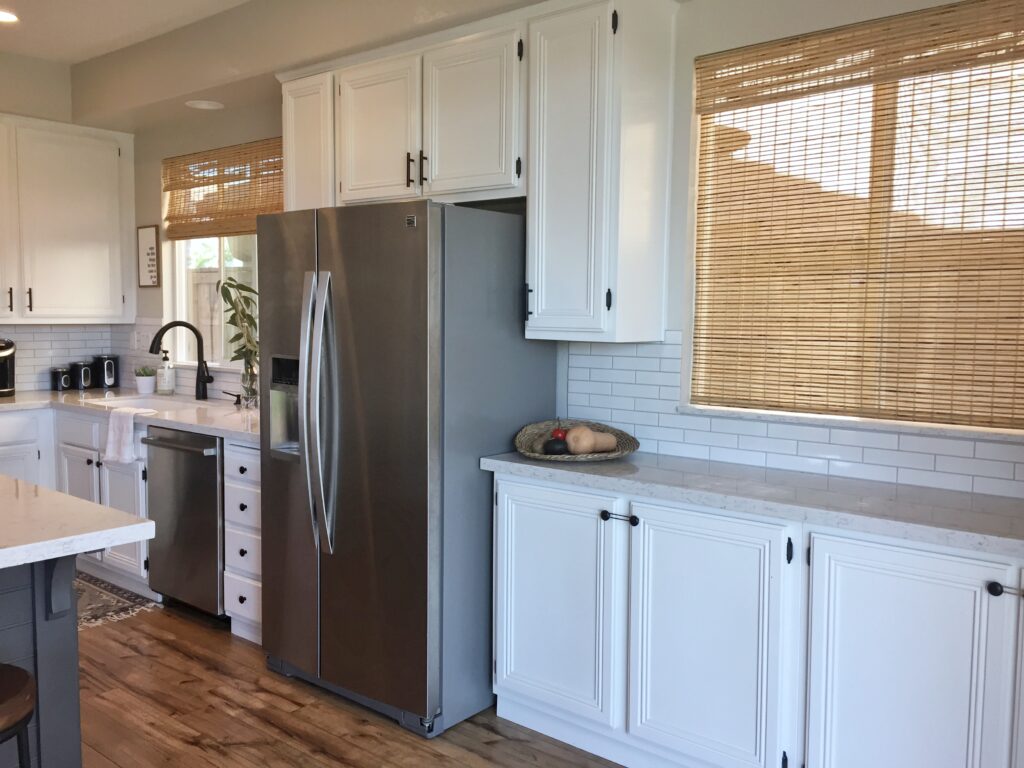
We didn’t want to spend thousands on brand new kitchen cabinets, so refinishing them was really my only option. Luckily for me, that worked out and we love the results. The older design style of the cabinets didn’t bother me at all. I found them to have a fun personality that some of the shaker style cabinets tend to lack. The one part of the existing cabinets that I really felt dated the space, was the quarter-round shaped trim all along the bottom. At least in our kitchen, it looked dated. I’m sure it can be done fabulously in a newer kitchen, but ours not so much.

Here is the surprisingly simple way to update your cabinet trim make a more modern change!

Items you will need to update your cabinet trim(affiliate links below):

      1. Chop SawDIY Kitchen Update: Cabinet Trim Tutorial– I have this saw!
      2. Nail GunDIY Kitchen Update: Cabinet Trim Tutorial– This is what I have and love it!
      3. Wood Glue
      4. Paint to match cabinets
      5. Caulking/spackle
      6. 1 x 3 wood boards

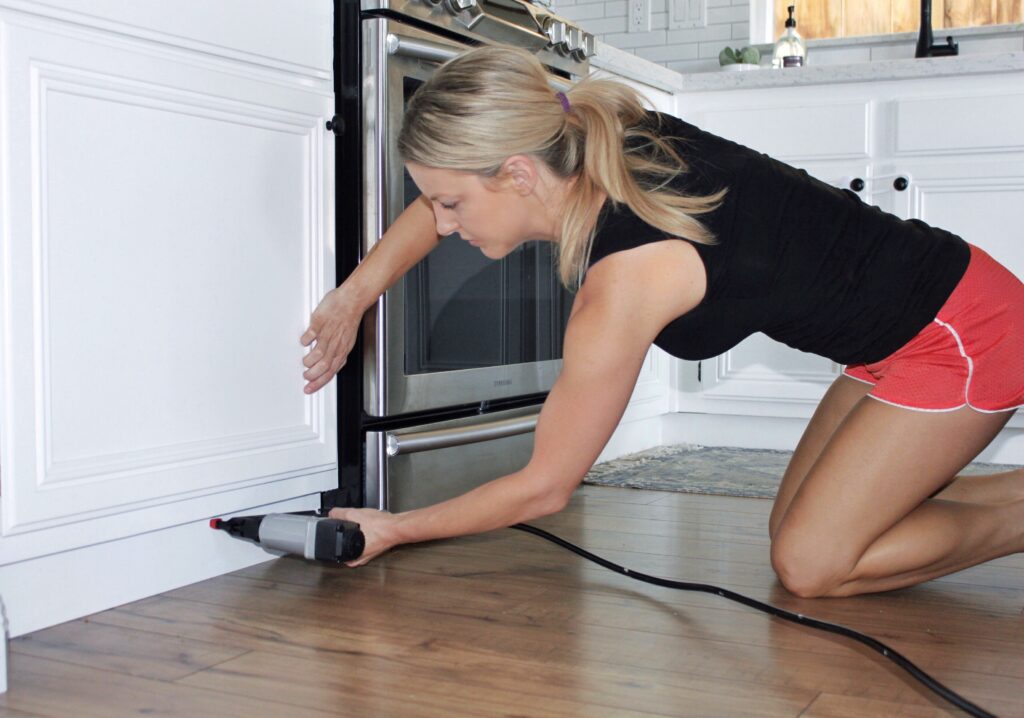
Let’s get to work! Take a chisel and pop off all of the round trim.  It should come off fairly easily. I also took off the piece of wood behind the trim as well. This part is fun. I like to take out my aggression whenever I get the chance to demo something. “I love Demo Day” like Chip Gaines always says. Ha. Man, I really wish I had cable again, so I could just watch some HGTV!

Measure each section that you will be covering with the 1”x 3” boards. For me, this was the perfect size to fit underneath my cabinets. So, you should be able to just cut to length and not worry about ripping any narrower…. BUT measure the space under there before you go and just take my word for it. Your kitchen may be different than mine. If, for some reason it’s too short for a 1×3, you can rip your boards with a table saw. If you need a taller board, try going up a size. These pre-cut boards are all available at Home Depot. Fingers crossed they will slide right under your cabinets like butta.

Ladies who are reading this. If you don’t have a little chop saw like thisDIY Kitchen Update: Cabinet Trim Tutorial, get one! There are so many things you can do even if this is your only tool.

How to Update Cabinet Trim in your Kitchen Tutorial featured by top US DIY blog, Domestic Blonde

DIY Kitchen Update: Cabinet Trim Tutorial

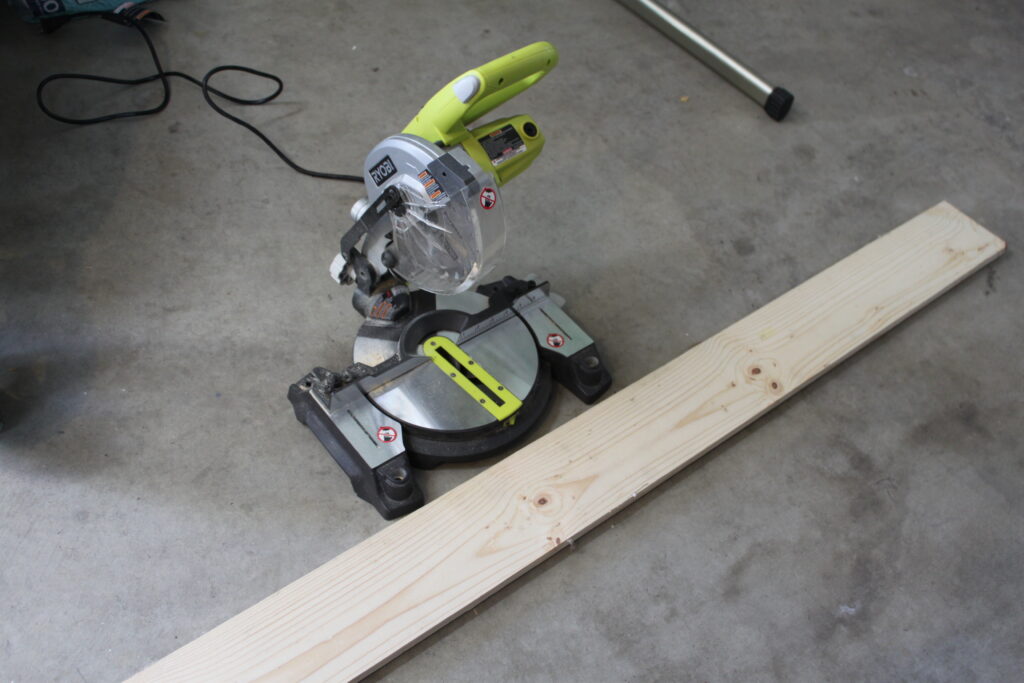
Cut each section to size, and double check to be sure they fit properly before painting. Save yourself some agony later- just double check. Then, prime and paint your boards with the same paint you used for your cabinets. Well, that’s obvious Kelly…Sheesh sometimes I just need to give ya’ll more credit! Lol.

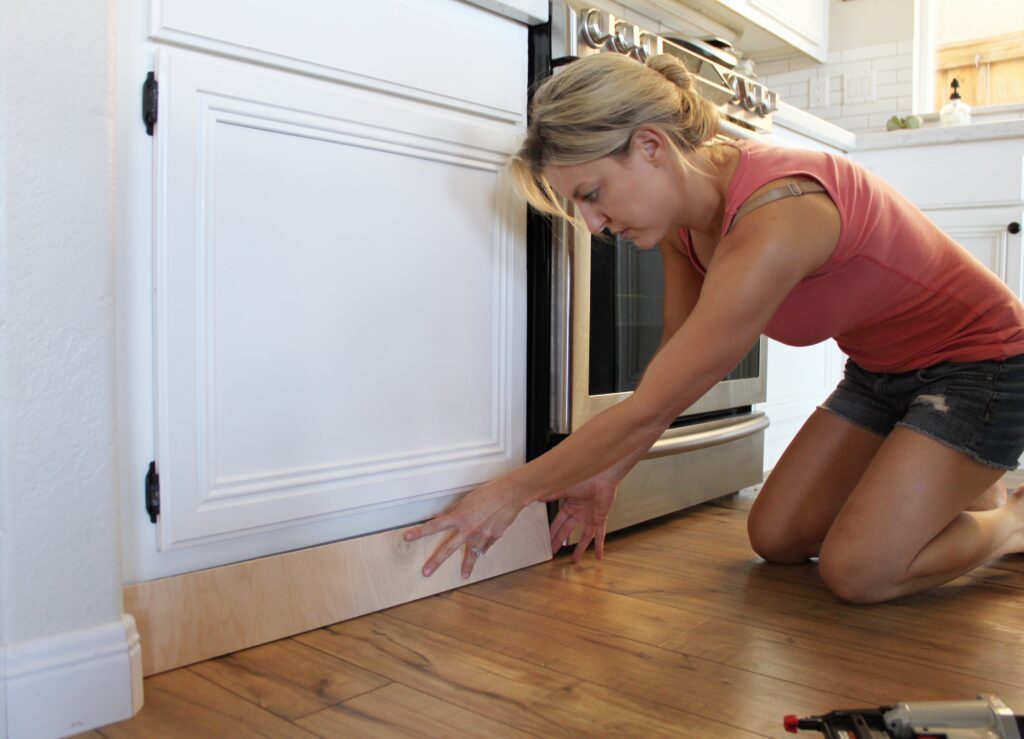
Once dry, apply some nail glue and use your brad nail gun to attach cabinet trim. Fill in cracks and cover nail heads with caulking or spackle and touch up your paint.

How to Update Cabinet Trim in your Kitchen Tutorial featured by top US DIY blog, Domestic Blonde

That’s it! That is the whole project to update your cabinet trim. Your kitchen looks updated and fresh and it was pretty simple, too!

Who needs to hire a professional, when YOU got this?

*I also did this on our island, and forgot to include the toe-kick instructions with that post. So, for those of you wondering how to finish that last step, this is it. Only on the island I used a 1″x 6″ board. Follow the same steps to create the toe-kick under your island.

DIY Kitchen Update: Cabinet Trim Tutorial

How to Update Cabinet Trim in your Kitchen Tutorial featured by top US DIY blog, Domestic Blonde

Happy Updating.

XOXO,

 DIY Kitchen Update: Cabinet Trim Tutorial

You may also like

Comments

  1. Danielle

    June 23, 2017 at 1:42 pm

    Wow, what a difference! My cabinets could definitely use this. We had new tile installed and the base of the cabinets were damaged.

    Reply
    • Kelly

      June 23, 2017 at 9:59 pm

      Absolutely! This would be perfect for you and it’s simple!

      Reply
  2. Virjinia Harp

    June 23, 2017 at 6:34 pm

    How neat! Our house is a bit older and it has the original cabinets so this would be a great update! Thanks for sharing

    Reply
    • Kelly

      June 23, 2017 at 10:00 pm

      That’s so great!

      Reply
  3. Natalie

    June 23, 2017 at 7:45 pm

    This is great ! Looks fantastic:) we are planning to buy our first home this March so I’ll have to remember this DIY!

    Reply
  4. Bridget

    June 24, 2017 at 7:14 am

    What a difference this makes! Thanks for sharing these tips! Your kitchen looks fab 🙂

    Reply
    • Kelly

      June 29, 2017 at 10:30 pm

      Thank you, that is so nice!

      Reply
  5. Kristen

    June 24, 2017 at 8:43 am

    Wow! What a difference! Our kitchen cabinets need some love and I’m gonna look at doing this ourselves!

    Reply
    • Kelly

      June 29, 2017 at 10:30 pm

      Thank you! It is a pretty simple project!

      Reply
  6. Cammeo

    June 24, 2017 at 4:33 pm

    We’re fixing up our home and I seriously love all of your DIYs!!

    Reply
    • Kelly

      June 29, 2017 at 10:29 pm

      Thank you! I really appreciate that and hope they are helpful for you at your house!

      Reply
  7. Livi

    June 25, 2017 at 10:17 am

    You’re so handy! It looks great!

    Reply
    • Kelly

      June 29, 2017 at 10:28 pm

      Thank you! When you want something done, you have to do it yourself 😉

      Reply
  8. Aseky Bonnaire

    June 25, 2017 at 10:39 am

    Looks so good! Your kitchen is gorgeous!

    Reply
    • Kelly

      June 29, 2017 at 10:28 pm

      Thank you so much!

      Reply
  9. Tamara Goyette

    June 25, 2017 at 9:44 pm

    Things like changing that can make such a big difference!

    Reply
  10. Jessica Madlo

    October 15, 2017 at 1:07 pm

    Love this update!!! I am wanting to do this is my house but one little problem is that we have a vent right under our sink. Any ideas to tackfully go around it?

    Reply
    • Kelly

      October 15, 2017 at 6:59 pm

      You should! I’m trying to imagine what you mean by a vent. But, if it’s what I am picturing you could cut the toe kick to frame flush around the vent. Is the vent really being used? If not, cover it up.

      Reply
  11. Maile Aquino

    July 20, 2018 at 12:00 am

    What size are your cabinets on the left hand side of your kitchen window? I love your whole layout. Can I possibly get some measurements? Did you do custom cabinets?

    Reply
  12. Kristi

    April 25, 2019 at 7:48 am

    Beautiful job with everything !! I couldn’t imagine not being able to watch HGTV ! Get yourself an Amazon Fire Stick (or a Roku) and simply add the HGTV app. You’ll be able to watch live, as well as a boat load of shows that are not aired. Or if you have a Smart tv, simple add the app onto it, it’s free to do. Don’t want you to go without any longer !! 🙂

    Reply
    • Kelly

      April 30, 2019 at 10:34 am

      ooooh that’s a great tip! Thank you!

      Reply

Leave a Reply Cancel reply

Your email address will not be published. Required fields are marked *

Recipe Rating


Search The Blog

Hey, I’m Kelly!

Hey, I’m Kelly!

I love DIY Home Improvement, and I'm sharing all of my projects with you! Not only that, but my favorite products, family life, and more! xoxo

  • Email
  • Facebook
  • Instagram
  • Pinterest

Pinterest

Follow @domesticblonde

Happy Easter! Today Kade asked if he could be bap Happy Easter! 
Today Kade asked if he could be baptized at church, and it was so special! Swipe to see the most awesome baptism ever 🙌🏻🥰😭What a stud!
Happy Birthday Tegan Grace 🥰 You bring all the Happy Birthday Tegan Grace 🥰
You bring all the spunk to this family. You are my very best little friend. Please STOP 🛑 growing up because I feel an ache inside my soul knowing you won’t be little for much longer.
This morning I watched video snippets of her at different points throughout her life and realized two things-
1. She’s been a total rockstar/diva since the beginning.
2. Time goes by SO DANG FAST. And that’s a hard one to swallow.

I love you more than anything 👯‍♀️❤️ Happy 6th!
Highlight Reel vs. Reality - @modmtnhaus is gettin Highlight Reel vs. Reality
-
@modmtnhaus is getting Christmas ready... can I just stay here all the time? 🎄
We are heading to Big Bear this weekend for a late We are heading to Big Bear this weekend for a late Thanksgiving and I can’t wait 🥰 @modmtnhaus is still available the week of Christmas! You can contact me for private bookings, or check the link in my bio. For Christmas week availability specifically, head to VRBO. 🌲 ⛄️
9•12•21 Happy 10 year wedding anniversary to m 9•12•21
Happy 10 year wedding anniversary to my selfie-buddy for life. 📷
We’ve been snapping selfies all over this world together for the last decade (plus 3 years of dating)... now we have 2 more little ones in the frame with us. Let’s take selfie’s together until we’re old and gray 👵🏻 👴 
I love you! #onedecadedown
This may be my favorite room at @modmtnhaus I’m This may be my favorite room at @modmtnhaus
I’m ready to go back 🌲
This corner fireplace just got the best upgrade wi This corner fireplace just got the best upgrade with a new mantle 🙌🏼 #ad It’s always so fun to see what a little wood and some #Minwax Wood Stain can create.I always use @minwaxusa when a project calls for stain. This time I used Minwax® Wood Finish Oil Based Penetrating Stain in the color Driftwood. This formula delivers premium oil-rich color in a single coat that dries in just two hours. Available in 36 colors! #FinishedwithMinwax #MinwaxPartner
FIRST DAY OF SCHOOL. Who’s more excited, me or t FIRST DAY OF SCHOOL.
Who’s more excited, me or the kids? 😆 Tegan is in Kindergarten and Kade is 3rd grade. My babies are getting so big! 😍

Copyright © 2022 · Theme by Blog Pixie

We are using cookies to give you the best experience on our website.

You can find out more about which cookies we are using or switch them off in settings.

Domestic Blonde
Powered by  GDPR Cookie Compliance
Privacy Overview

This website uses cookies so that we can provide you with the best user experience possible. Cookie information is stored in your browser and performs functions such as recognising you when you return to our website and helping our team to understand which sections of the website you find most interesting and useful.

Strictly Necessary Cookies

Strictly Necessary Cookie should be enabled at all times so that we can save your preferences for cookie settings.

If you disable this cookie, we will not be able to save your preferences. This means that every time you visit this website you will need to enable or disable cookies again.